If you’ve ever tried to preserve a flower, you know the heartbreak of watching a vibrant red rose turn a dull, brownish-purple, or seeing a delicate daisy lose its shape completely.
While air-drying and pressing have their charms, there is a method that feels like true magic: using silica gel. T
his incredible technique preserves not just the color but also the three-dimensional shape of your blooms, resulting in flowers that look breathtakingly lifelike.
This opens up a whole new realm of silica dried flower crafts, allowing you to create stunning, professional-looking pieces that simply aren’t possible with flat, pressed flowers.
Silica gel, a desiccant that looks like sand or salt, works by rapidly absorbing moisture from the petals, locking in their color and form before they have a chance to fade or wilt.
The results are so vibrant and realistic that your friends will have to touch them to believe they’re not fresh. This method is perfect for preserving flowers with complex shapes, like roses, dahlias, and zinnias.
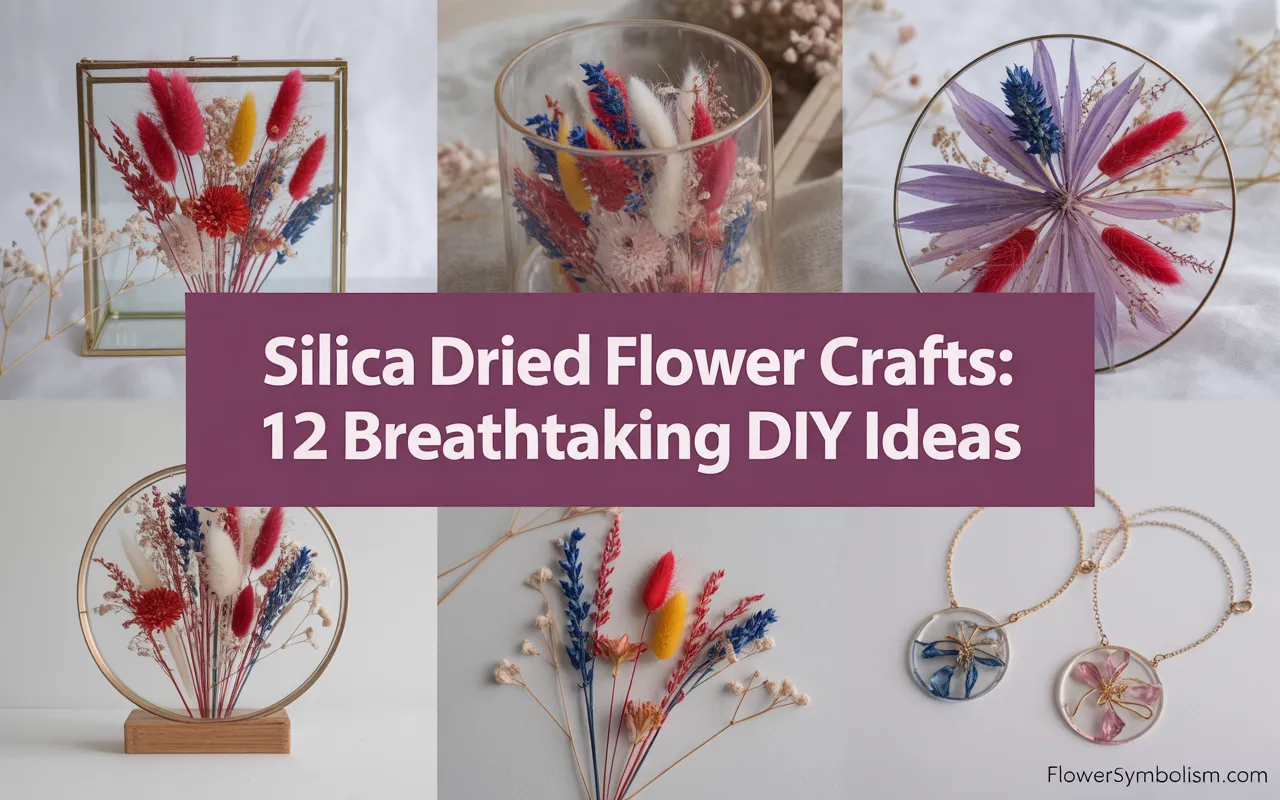
This guide is your complete introduction to the art of silica drying and crafting. We will walk you through 12 breathtaking DIY ideas that showcase the unique beauty of these perfectly preserved blooms.
From jaw-dropping resin art to everlasting bouquets, we’ll explore projects for every skill level.
We’ll also cover the essential tools and provide step-by-step instructions to help you master the process and start your journey into the world of silica dried flower crafts. Let’s dive in!
The Secret to Perfect Preservation: Using Silica Gel
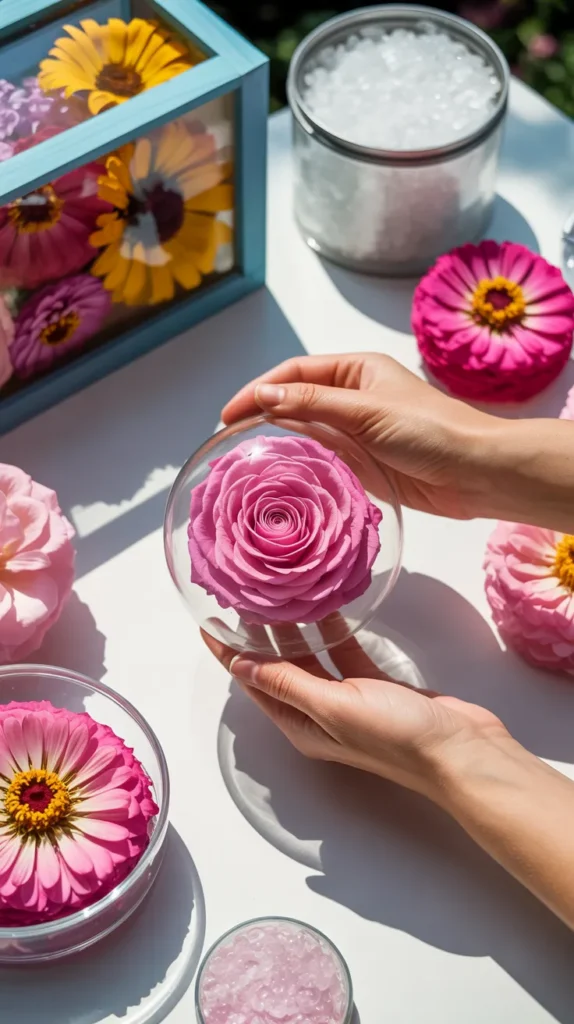
Before we jump into the crafts, let’s quickly cover the drying process. It’s the foundation for all silica dried flower crafts. You’ll need a large, airtight container and a box of flower drying silica gel.
- Pour a one-inch layer of silica gel into the bottom of your container.
- Snip your fresh flowers, leaving about an inch of stem. Place them face-up on the silica gel, ensuring they don’t touch.
- Gently pour more silica gel around and over the flowers, using a small spoon to make sure the crystals get between all the petals. Continue until the flowers are completely buried.
- Seal the container tightly and store it in a cool, dry place for 2-7 days, depending on the flower’s size and thickness.
- Once dry, gently pour out the silica gel and use a soft brush to remove any remaining crystals from the petals.
The key is to use a fine, dust-like silica gel, not the large crystals found in desiccant packets.
A product like {Activa Flower Drying Art Silica Gel} is perfect for this, as its fine consistency won’t damage delicate petals and its color-indicating crystals turn from blue to pink when saturated, letting you know when it’s time to “recharge” the gel by baking it in the oven.
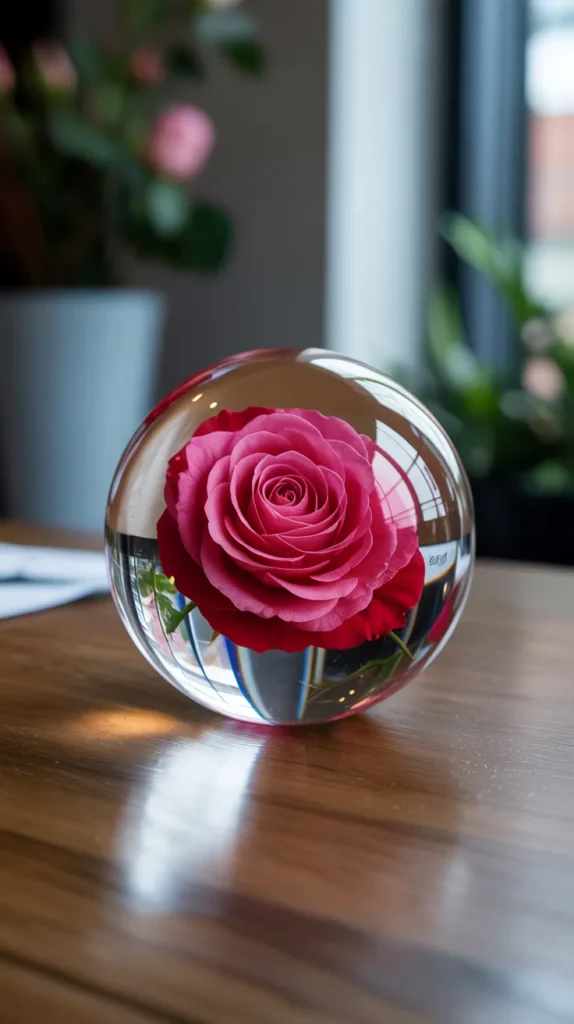
1. The “Frozen in Time” Resin Sphere or Cube
This is the ultimate showstopper project for silica dried flower crafts. By encasing a perfect, 3D silica-dried flower in a sphere or cube of crystal-clear resin, you create a mesmerizing paperweight or decorative object that looks like a flower frozen in time. It’s a truly magical piece that will have everyone asking how you made it.
Because silica gel preserves the flower’s shape perfectly, you can capture a rose or dahlia in its full, multi-petaled glory.
What you’ll need:
- A perfectly silica-dried flower (a rose, dahlia, or zinnia works well)
- A silicone sphere or cube mold
- High-quality epoxy resin
Step-by-step:
- Choose your best-dried flower. Make sure it’s completely free of silica dust.
- This project is best done in layers to prevent the flower from floating. Pour a small layer of mixed resin into the bottom of your mold and let it cure until it’s tacky (a few hours).
- Place your flower face-down onto the tacky layer.
- Slowly pour your mixed resin around and over the flower until the mold is full. Using a high-quality, non-yellowing resin is critical for this project. {ArtResin Epoxy Resin} is an excellent choice because it’s formulated to be crystal clear and has UV stabilizers to protect against yellowing, ensuring your piece remains beautiful for years.
- Let it cure for 24-72 hours before demolding your breathtaking masterpiece.
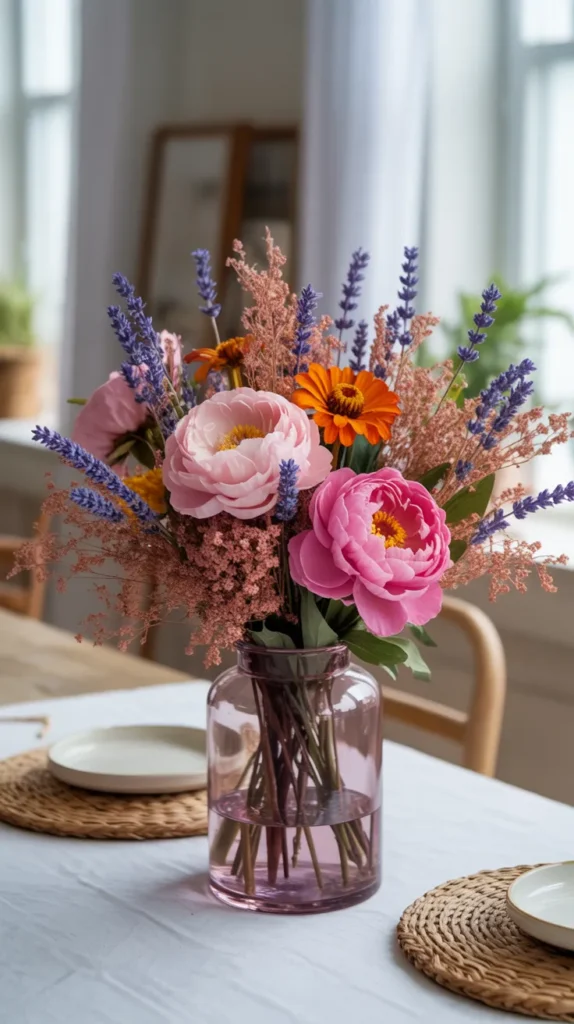
2. The Everlasting Bouquet
Why settle for a bouquet that wilts in a week? With silica-dried flowers, you can create a vibrant, lifelike bouquet that will look just as fresh a year from now. This is one of the most practical and beautiful silica dried flower crafts, perfect for home decor or as a sustainable wedding bouquet.
The key is to dry a wide variety of flowers and foliage to create texture and interest. Dry roses for focal points, zinnias for color, lavender for height, and even some leaves and ferns for greenery.
What you’ll need:
- A large assortment of silica-dried flowers with stems attached (or you can wire false stems)
- Floral wire and floral tape
- Ribbon
Step-by-step:
- If your flowers have short stems, you’ll need to wire them. Push a piece of sturdy floral wire through the base of the flower head and wrap it around the short stem.
- Cover the wire and stem with green floral tape, stretching the tape as you wrap to activate its stickiness.
- Start building your bouquet by gathering a few focal flowers.
- Add filler flowers and greenery around them, turning the bouquet in your hand as you go.
- Once you’re happy with the size and shape, secure all the stems together tightly with floral tape.
- Cover the floral tape with a beautiful silk or velvet ribbon for a polished finish.
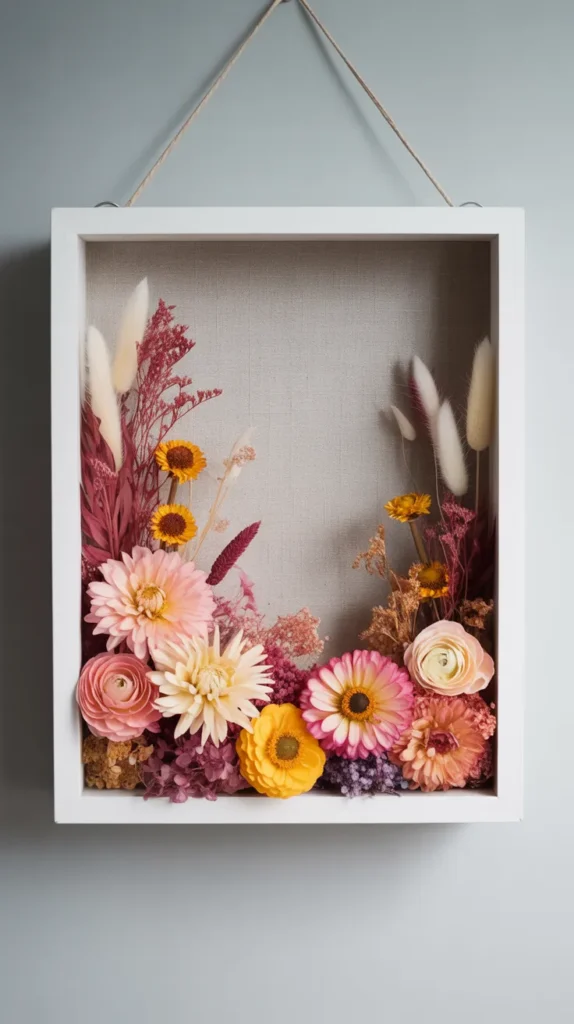
3. 3D Shadow Box Flower Garden
A shadow box gives you the perfect stage to display the three-dimensional beauty of your silica-dried blooms.
Unlike a flat frame, a shadow box allows you to create a layered, “flower garden” scene that is protected from dust and damage. This is a classic and elegant way to create art with silica dried flower crafts.
What you’ll need:
- A shadow box frame
- A piece of linen or textured paper for the background
- A variety of silica-dried flowers
- A hot glue gun
Step-by-step:
- Open your shadow box and affix your chosen background fabric or paper to the backing board.
- Plan your composition. You can create a dense, “meadow” look by packing the entire box, or a more minimalist design with just a few perfect blooms.
- Trim the stems of your flowers so they will fit within the depth of the shadow box.
- Using a hot glue gun, carefully apply a dab of glue to the back of each flower head or stem and press it onto the background. A high-quality glue gun like the {Gorilla Dual Temp Mini Hot Glue Gun Kit} is essential here, as its precision tip and strong bond are perfect for securing your precious flowers exactly where you want them.
- Start with your largest flowers first, then fill in the gaps with smaller blooms and leaves.
- Once you’re finished, reassemble the shadow box and admire your miniature garden.
4. Enchanting Floral Light Cloche
A glass cloche, or bell jar, instantly adds a sense of wonder and importance to whatever it contains. By creating a scene with silica-dried flowers and adding a string of fairy lights, you can craft a truly enchanting piece of decor that looks like it came from a fairytale.
What you’ll need:
- A glass cloche with a wooden base
- A few perfect silica-dried flowers
- Preserved moss
- A strand of battery-operated fairy lights with a small battery pack
- A hot glue gun
Step-by-step:
- Start by gluing a layer of preserved moss onto the wooden base to create a natural ground cover.
- Drill a small hole in the base to thread the fairy lights through, or simply hide the battery pack under the moss at the back.
- Arrange and glue your silica-dried flowers into the moss. Create a small, magical scene.
- Weave the fairy lights in and around the flowers.
- Place the glass cloche over the top. The resulting piece is a breathtaking, self-contained world that glows from within.

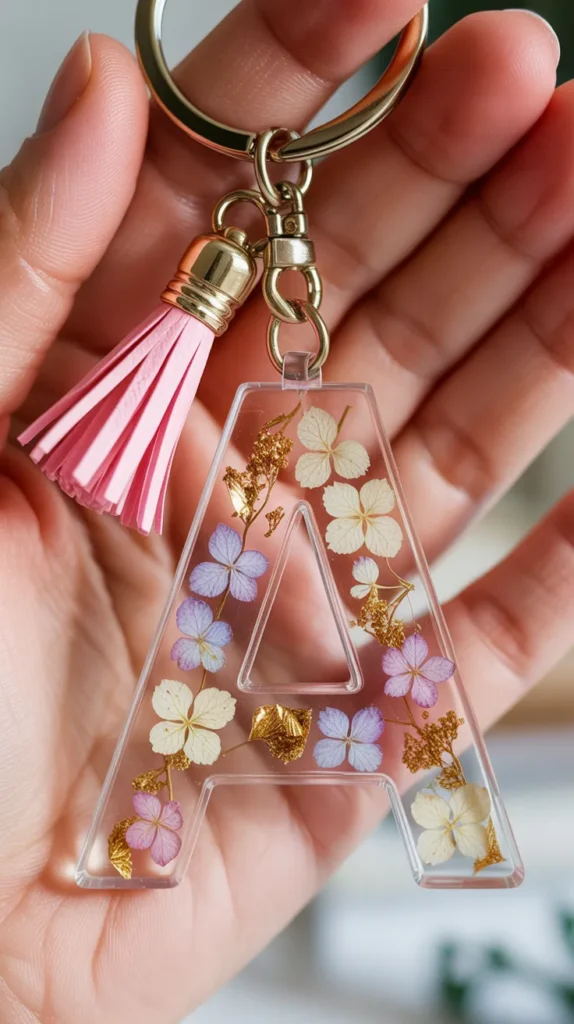
5. Custom Resin Initial Keychains
This is a fantastic and profitable idea for silica dried flower crafts that is perfect for selling online or at markets.
By filling alphabet-shaped resin molds with small, silica-dried flower heads and petals, you can create personalized, high-quality keychains that make for perfect gifts.
The key is to use small but beautifully shaped flowers that will fit inside the mold, like hydrangea florets, verbena, or tiny rosebuds.
What you’ll need:
- An alphabet silicone mold
- Epoxy resin
- Small silica-dried flowers
- Keychain hardware
Step-by-step:
- Place your small dried flowers into the letter mold. Remember the mold is upside down, so place them face-down.
- Mix your resin and pour it into the mold, making sure to cover the flowers completely.
- Let it cure until it’s tacky, then you can embed the eye-screw for the keychain hardware directly into the resin.
- Let it cure fully, then demold the letter. Attach the chain and keyring to the eye-screw.
- You can add a matching tassel for an extra professional touch. A {PandaHall Tassel Making Kit} is great for creating your own custom tassels in any color to match your flowers.
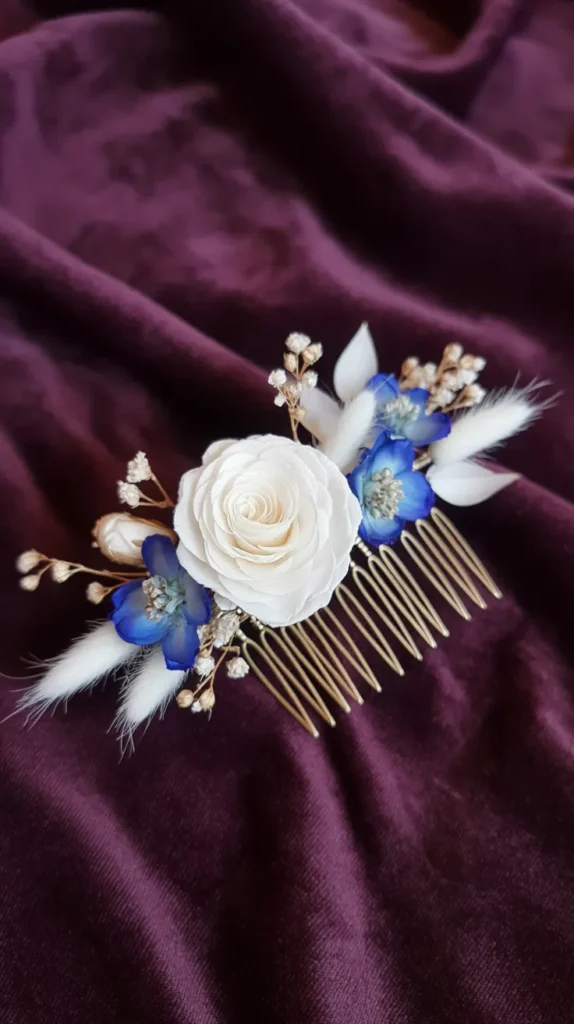
6. Lifelike Floral Hair Accessories
The wedding and special occasion market is huge for silica dried flower crafts. Because silica-dried flowers look so fresh and realistic but are also durable, they are perfect for creating hair combs, pins, and crowns that can be cherished as keepsakes long after the event.
What you’ll need:
- A variety of small-to-medium silica-dried flowers
- Blank metal hair combs or pins
- Floral wire and floral tape
- A hot glue gun
Step-by-step:
- Wire any flowers that need extra support by pushing a thin wire through the base and twisting it down.
- Create a small, balanced composition with your chosen flowers.
- Use floral wire to bind the stems together into your desired shape.
- Secure the entire arrangement to the metal hair comb using more floral wire.
- Use a hot glue gun to reinforce the connection points and cover any sharp wire ends with a small piece of felt for comfort.
7. Unique “Flower Bomb” Bath Bombs
Elevate the humble bath bomb into a luxury spa product. By embedding a whole, small, silica-dried flower in the center of a bath bomb, you create a beautiful surprise for the user. When the bath bomb fizzes away, it releases a perfect, beautiful flower into the water.
What you’ll need:
- Your favorite bath bomb recipe (baking soda, citric acid, Epsom salts, etc.)
- A small, sturdy silica-dried flower for each bath bomb (like a marigold or small zinnia)
- Bath bomb molds
Step-by-step:
- Mix your dry bath bomb ingredients.
- Mix your wet ingredients separately.
- Slowly combine the wet and dry ingredients until the mixture has the consistency of damp sand.
- Pack one half of your mold with the mixture, press your dried flower into the center, and then overfill the other half of the mold.
- Press the two halves together firmly.
- Let the bath bombs dry for at least 24 hours before packaging them. To ensure they stay fresh and the scent is preserved, shrink-wrapping them is a great idea. A {National Shrinkwrap System} provides a professional, tight seal that also protects the delicate flower inside.

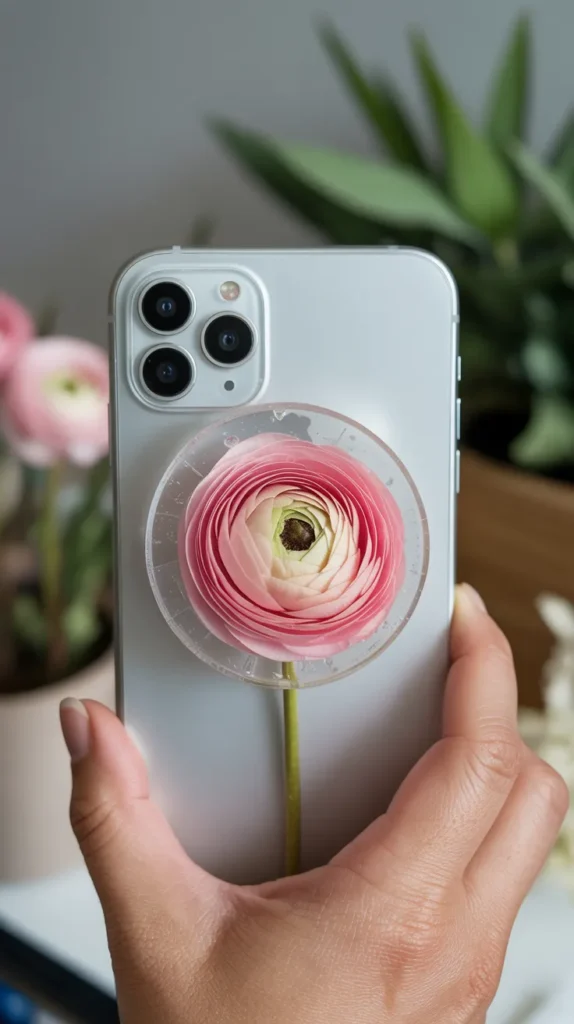
8. 3D Botanical Cell Phone Grips
This is a modern, trendy, and very sellable take on silica dried flower crafts. By creating a custom resin top for a blank phone grip, you can offer a unique and functional accessory that appeals to a wide audience.
What you’ll need:
- A small, shallow circular silicone mold
- A small, perfectly silica-dried flower (a ranunculus or cosmos works well)
- Epoxy resin
- A blank, pop-up style phone grip
- Strong adhesive
Step-by-step:
- Place your flower face-down in the silicone mold.
- Mix and pour your resin, filling the mold.
- Let it cure completely.
- Demold your resin disc.
- Use a strong, permanent adhesive like {E6000 Craft Adhesive} to glue the resin disc securely to the top of the blank phone grip. This industrial-strength glue creates a permanent, waterproof bond that can withstand daily use.
- Let the glue cure fully before use.
9. Realistic Floral Magnets
Create tiny pieces of art for the fridge or office whiteboard. This is a simple and fun project that is great for using up your smaller dried blooms. They sell well in sets and are a great, affordable entry-level product.
What you’ll need:
- Small, silica-dried flowers
- Small, shallow resin molds or bottle caps
- Resin
- Small, strong magnets
Step-by-step:
- Place your small flowers in your chosen molds.
- Fill the molds with resin and let them cure.
- Once cured, demold your floral resin cabochons.
- Use a strong adhesive to glue a magnet to the back of each one.
- Package them in sets of three or five on a branded piece of cardstock for a professional look.
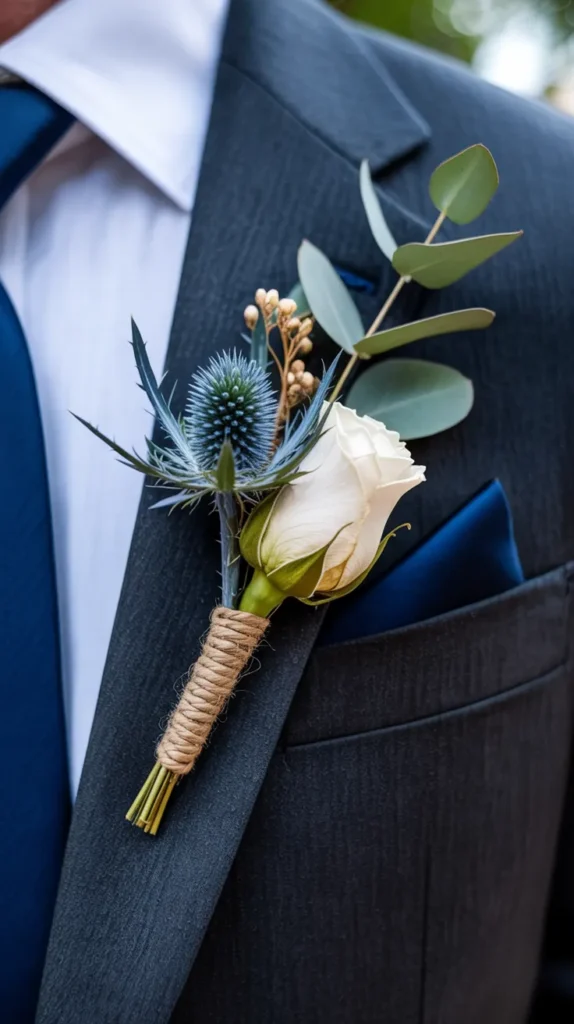
10. Everlasting Boutonnieres
Just like the hair combs, boutonnieres for weddings and proms are a fantastic market for silica dried flower crafts. They offer a realistic look that’s far superior to traditional silk flowers but with the durability that fresh flowers lack.
What you’ll need:
- A few small, complementary silica-dried flowers and leaves
- Floral wire and tape
- Ribbon or twine
- A boutonniere pin
Step-by-step:
- Choose a focal flower, like a small rosebud, and add a few accent elements, like a sprig of lavender or a small leaf.
- Wire the stems together tightly.
- Wrap the entire stem bundle neatly with floral tape, then cover the tape with a decorative ribbon or rustic twine.
- Tuck a pin in the back for easy attachment.
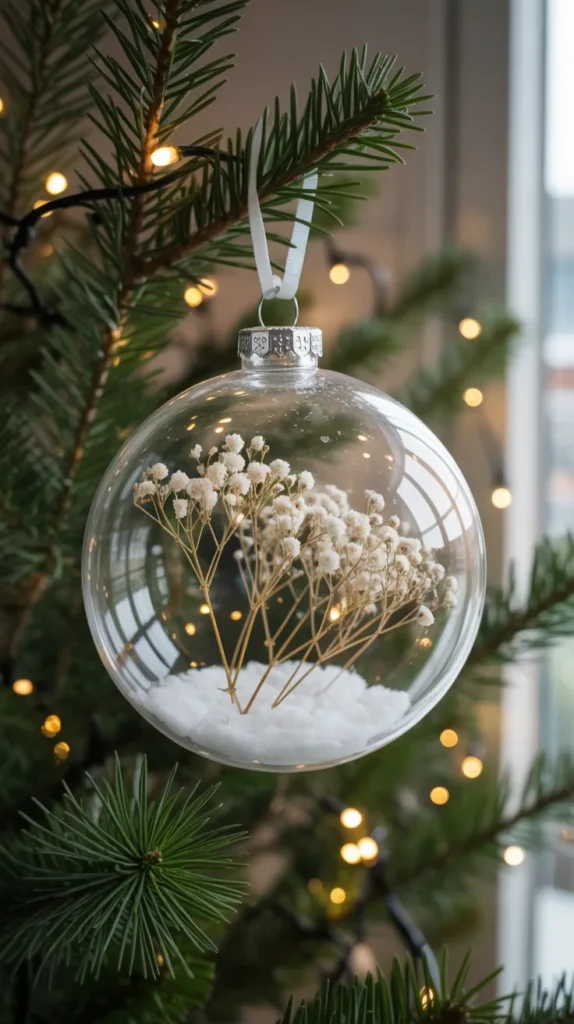
11. Custom Christmas Ornaments
Create magical Christmas ornaments by filling clear, fillable baubles with tiny, silica-dried flowers. These are beautiful, lightweight, and make for cherished holiday heirlooms. They are a fantastic seasonal item to add to your craft business.
What you’ll need:
- Clear, fillable glass or plastic ornaments
- Tiny silica-dried flowers (like baby’s breath, hydrangea florets, or rosebuds)
- Tweezers
- A decorative ribbon for the top
Step-by-step:
- Carefully remove the top of the ornament.
- Using tweezers, gently place your tiny dried flowers inside the ornament.
- Fill it as much or as little as you like. A single, perfect rosebud can be just as stunning as a bauble full of baby’s breath.
- Replace the top of the ornament and tie a beautiful ribbon for hanging.
12. “Flowerfetti” Push-Pop Confetti
Give the eco-friendly confetti trend a 3D twist. Instead of flat, pressed petals, fill confetti poppers with tiny, whole, silica-dried flower heads like verbena, mimosa, or lavender buds. When popped, they create a beautiful, fragrant, and textural shower.
What you’ll need:
- Clear, food-safe push-pop containers
- A large quantity of small, lightweight, silica-dried flower heads and petals
Step-by-step:
- Gather your “flowerfetti.” A mix of colors and shapes looks best.
- Simply fill the push-pop containers with your floral mix.
- Create a custom sticker for the outside to brand your product or customize it for an event.
- These are perfect for weddings, baby showers, and birthday parties.

Your Silica Crafting Business Toolkit
Investing in the right tools will elevate the quality of your products from hobbyist to professional. Here are some of the essential supplies mentioned in this guide.
| Product Name | Brand | Use |
|---|---|---|
| Flower Drying Art Silica Gel | Activa | A fine-consistency gel perfect for preserving the 3D shape and color of delicate flowers. |
| Epoxy Resin | ArtResin | For creating professional, crystal-clear, non-yellowing resin crafts like spheres and keychains. |
| Dual Temp Mini Hot Glue Gun Kit | Gorilla | Provides a strong, reliable bond for sturdy shadow boxes and hair accessories. |
| Tassel Making Kit | PandaHall | Allows you to create custom, professional-looking tassels to add value to keychains. |
| Shrinkwrap System | National | Provides a professional, tamper-proof seal for bath bombs, preserving freshness and scent. |
| E6000 Craft Adhesive | E6000 | An industrial-strength glue perfect for permanently bonding resin pieces to phone grips. |
Conclusion: Cultivating Your Craft into a Business
The art of silica dried flower crafts offers a unique opportunity to create truly breathtaking products that stand out in a crowded marketplace.
The realism and vibrant color you can achieve with this method lend a high-end, professional quality to your work that customers will notice and appreciate.
Start by mastering the silica drying process itself, then choose one or two projects from this list that you are most excited about.
Perfect your technique, develop a signature style, and invest in beautiful photography. With passion, patience, and a little business savvy, you can transform your love for these everlasting blooms into a rewarding and profitable venture.
So, go ahead and start preserving. Your future customers are waiting for the unique, handmade beauty that only you can create. Which of these breathtaking ideas will you build your business on?