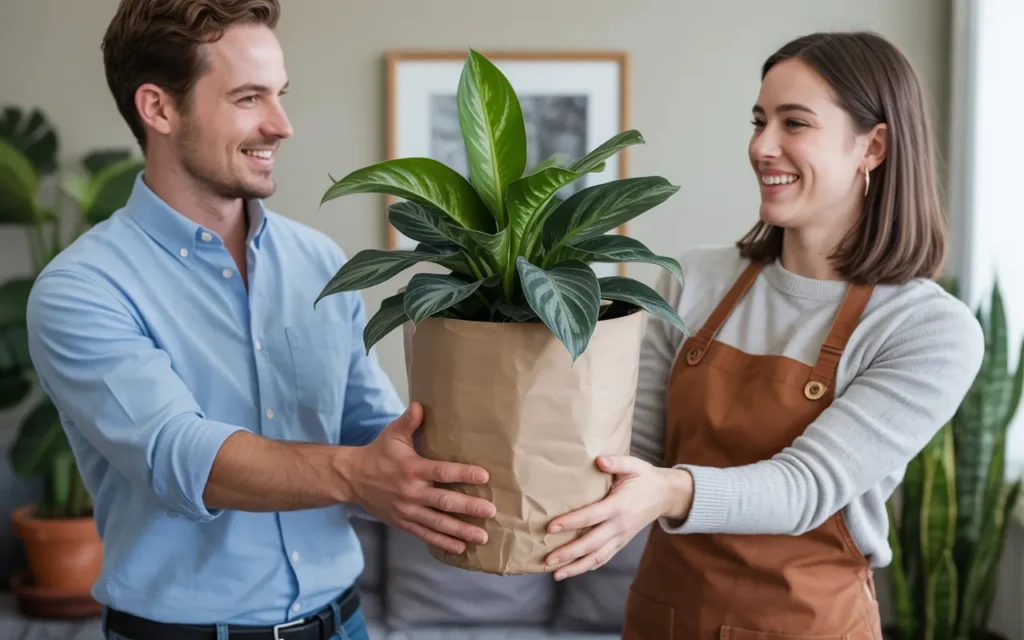
A living plant is a wonderful gift. It’s a symbol of growth, care, and life that can bring joy for years to come. But just handing someone a plain plastic or terracotta pot can feel a little unfinished. Learning how to wrap a potted plant as a gift elevates your thoughtful present from simple to stunning, making the moment of giving truly special.
Don’t worry, you don’t need to be a professional gift wrapper. With a few simple materials and creative ideas, you can transform any potted plant into a beautifully presented gift.
This guide will show you 10 easy and elegant ways to wrap your plant, perfect for any occasion. Let’s get ready to wrap!
Why Bother Wrapping a Plant?
Taking a few extra minutes to wrap your plant gift makes a huge difference.
- It Shows Extra Thought and Care: A thoughtful presentation shows you went the extra mile. It says, “I didn’t just grab this; I prepared it especially for you.”
- It Looks Finished and Polished: Wrapping hides the plain nursery pot and creates a cohesive, beautiful gift that looks like it came from a high-end boutique.
- It Adds a Personal Touch: You can customize the wrapping to match the occasion, the recipient’s personality, or the style of the plant itself.
- It Makes It Easier to Transport: A good wrap can help contain any loose soil and make the plant easier to carry without getting your hands dirty.
- The “Wow” Factor: A beautifully wrapped plant is simply more exciting to receive. It enhances the entire gift-giving experience.
If you enjoyed wrapping potted plants, you’ll also love these tips:
- For preparing the plant before wrapping, see how to pot a plant properly.
- After gift-wrapping, you may help recipients with plant care: how to take care of a monstera plant.
- If the pot is too tight, here’s how to repot a monstera plant.
- Want to include a little green gift too? Consider propagate snake plant in water as a side present.
- And for edible gifts, try how to plant tomatoes from seeds as a cheerful addition.
The Essentials: Pre-Wrapping Checklist
Before you start folding and tying, a little preparation will ensure your gift looks great and the plant stays healthy.
- Choose a Healthy Plant: Make sure the plant you’ve chosen is healthy, vibrant, and free of pests or yellowing leaves.
- Ensure the Pot is Clean: Wipe down the outside of the pot to remove any dirt, dust, or water spots.
- Check the Soil Moisture: You want the soil to be slightly damp, not soaking wet. Water the plant a day or two before you plan to gift it. This prevents it from being too heavy and dripping water on the wrapping paper or the recipient.
- Cover the Drainage Hole (Temporarily): If you’re worried about leakage, you can temporarily place a small piece of tape over the pot’s drainage hole. Just be sure to tell the recipient to remove it! A better option is to place the nursery pot inside a decorative waterproof foil or a plastic pot saucer.
- Groom the Plant: Snip off any dead or yellowed leaves to make sure the plant looks its absolute best.
How to Wrap a Potted Plant as a Gift: 10 Stylish Methods
Here are ten fantastic ideas, ranging from quick and simple to elegantly detailed.
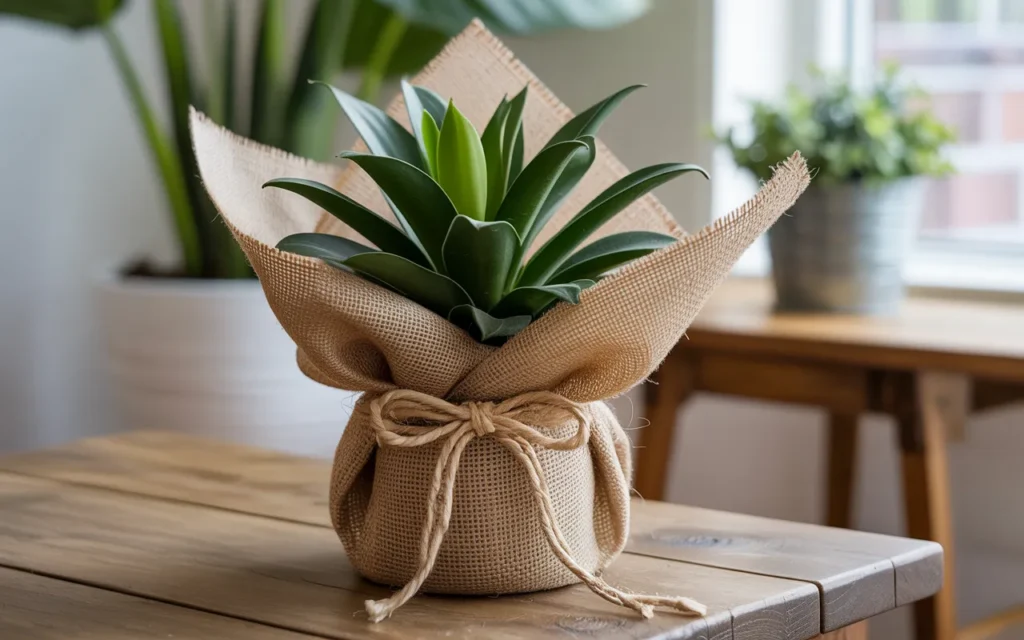
1. The Classic Burlap Wrap (Rustic Charm)
This method is incredibly easy, budget-friendly, and gives a wonderful rustic, farmhouse feel.
Materials:
- A square piece of burlap fabric
- Twine or a beautiful ribbon
- Scissors
Instructions:
- Cut Your Burlap: Lay your burlap flat and place the pot in the center. The burlap should be large enough to pull up and cover the sides of the pot completely, with a little extra.
- Gather the Fabric: Bring all four corners of the burlap up and around the pot.
- Cinch and Tie: Cinch the fabric snugly around the base of the plant’s stems. Use a piece of jute twine or a pretty ribbon to tie it securely in place with a bow.
- Fluff and Finish: Fluff out the burlap at the top for a soft, ruffled look. It’s simple, elegant, and takes less than two minutes.
Elevate your gifting game with plants that pair well or add charm:
• Use attractive containers — learn how to decorate plant pots for presentation appeal.
• For greenery inside, see grow monstera plant tips.
• Include savory herbs by linking to how to plant herbs in pots.
• Brighten your gift garden with how to plant flower seeds.
• For scent, consider how to use lavender plant as a fragrant gift pairing.
2. The Pleated Paper Method (Elegant and Polished)
This technique uses wrapping paper to create a clean, pleated look that looks incredibly professional.
Materials:
- A rectangular piece of sturdy wrapping paper or craft paper [Amazon Product: Heavy-Duty Kraft Wrapping Paper Roll]
- Double-sided tape
- Ribbon
Instructions:
- Measure and Cut: The height of your paper should be about 1.5 times the height of the pot. The length should be long enough to wrap around the pot with a small overlap.
- Wrap the Pot: Secure one end of the paper to the pot with double-sided tape. Wrap the paper around the pot, securing the other end with more tape. You now have a paper cylinder around your pot.
- Create the Pleats: Starting at the bottom, fold the excess paper underneath the pot in neat, overlapping pleats, working your way around in a circle. It’s just like wrapping the end of a can-shaped gift. Secure the final pleat with tape.
- Finish with a Ribbon: Tie a beautiful ribbon around the center of the pot to complete the elegant look.
3. The Simple Fabric “Furoshiki” Wrap (Eco-Friendly and Reusable)
Furoshiki is the Japanese art of wrapping with fabric. It’s beautiful, sustainable, and the fabric wrap itself is a bonus gift.
Materials:
- A square piece of fabric (a pretty tea towel, a silk scarf, or a Furoshiki cloth)
- No tape or ribbon needed!
Instructions:
- Position the Pot: Lay your fabric square flat in a diamond shape, with one corner pointing towards you. Place the pot in the center.
- First Knot: Take the corner closest to you and the corner farthest from you and bring them up over the top of the plant. Tie them together in a simple, single knot.
- Second Knot: Now take the remaining two side corners. Bring them up and around the first knot, and tie them into a secure double knot.
- Arrange the “Ears”: Adjust the fabric “ears” created by the knots to look like a beautiful bow. The result is a secure handle for carrying and a stunning presentation.
4. The Two-Toned Tissue Paper Wrap (Soft and Colorful)
This is a quick and colorful method, perfect for adding a soft touch to a birthday or “get well soon” gift.
Materials:
- Two different colors of tissue paper
- Ribbon or twine
Instructions:
- Layer the Tissue: Lay two large sheets of tissue paper on top of each other, staggering them so the corners of the bottom sheet are visible.
- Place and Gather: Place your pot in the center. Just like the burlap method, bring all the tissue paper up and around the sides of the pot.
- Cinch and Tie: Gently cinch the tissue paper around the base of the plant and tie it with a ribbon. Be careful not to tear the delicate paper. The two colors will create a beautiful, layered ruffle at the top.
Transition from gift wrapping to broader gardening inspiration:
- Start with how to decorate plant pots — make your wrapped plant stand out.
- Next, learn how to pot a plant so future gifts are well prepared.
- Check how to grow monstera plant tips for stylish leafy additions.
- Give a living gift idea — read how to replant aloe vera plant.
- Include edible flair with how to plant herbs in pots as a bonus for the recipient.
5. The Decorative Gift Bag Method (Quickest and Easiest)
In a real hurry? This is the go-to method for a beautiful presentation in seconds.
Materials:
- A gift bag that is the right size and shape for your plant
- Tissue paper
Instructions:
- Create a Base: Place a sturdy piece of cardboard in the bottom of the gift bag to give it a stable base and protect it from moisture.
- Add Cushioning: Crumple up a few sheets of tissue paper and place them in the bottom of the bag.
- Nestle the Plant: Carefully place your potted plant inside the bag on top of the crumpled tissue.
- Fluff and Fill: Arrange more sheets of tissue paper around the plant, tucking them in to hide the pot and fill the bag. Let some of the tissue fluff out of the top for a festive look.
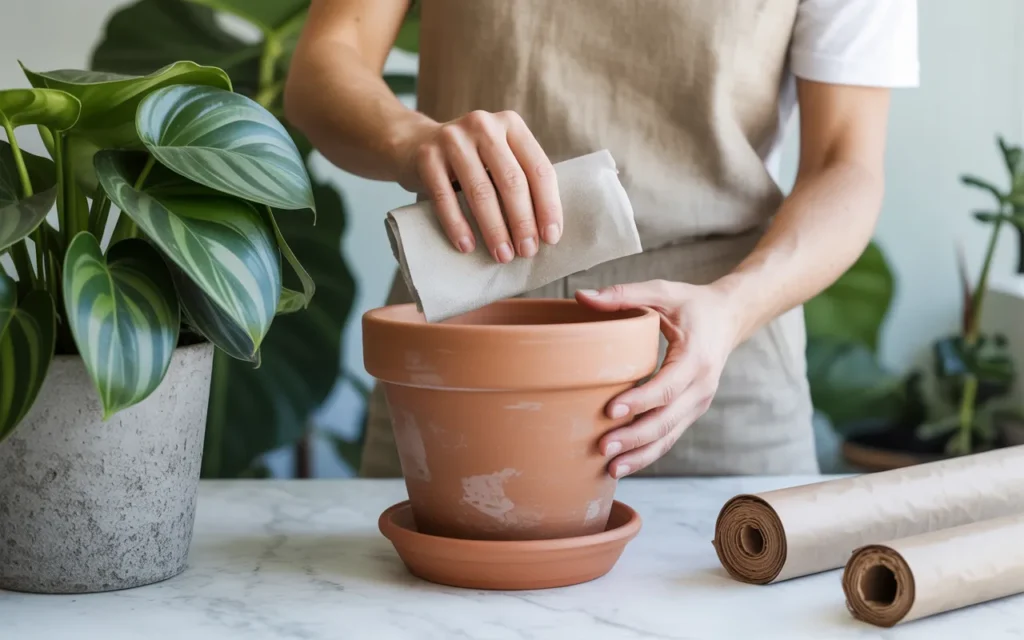
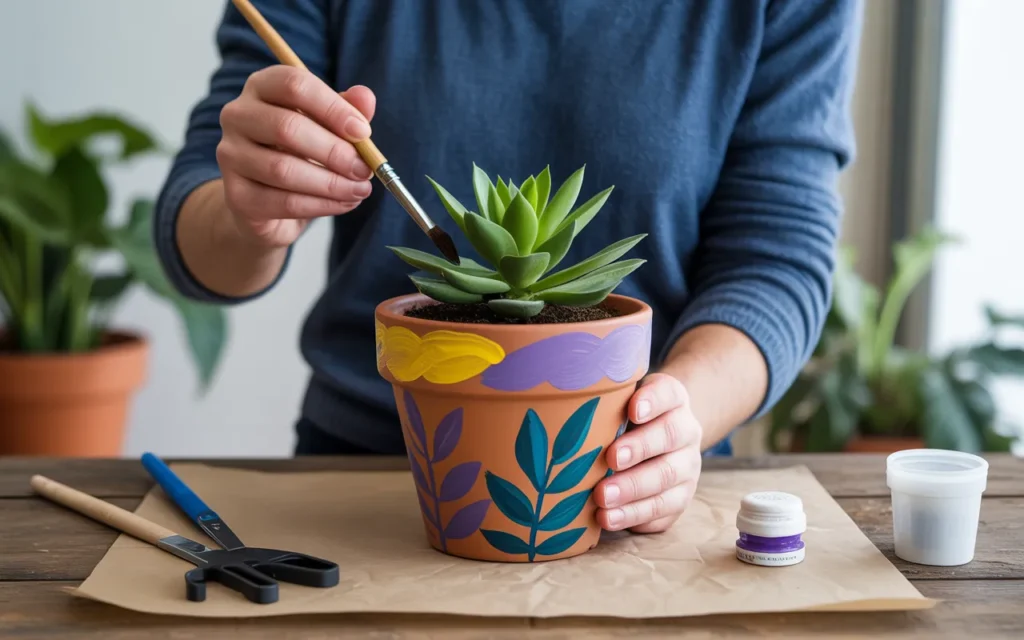
6. The Painted Pot Gift (A Personal, Lasting Gift)
For this method, the wrapping is the gift. Decorating the pot itself is a wonderfully personal touch.
Materials:
- A plain terracotta pot
- Acrylic craft paints and brushes [Amazon Product: Acrylic Paint Set with Brushes]
- Clear waterproof sealant
Instructions:
- Seal the Inside: To prevent water from ruining your paint job, paint the entire inside of the terracotta pot with a clear waterproof sealant. Let it dry completely.
- Paint Your Design: Get creative! Paint a pattern, a picture, a name, or a special message on the outside of the pot.
- Seal the Outside: Once your masterpiece is dry, seal the entire outside with the clear sealant. This protects your art and makes it last.
- Pot the Plant: Pot your chosen plant directly into its new, custom-decorated home. Add a simple gift tag and you’re done!
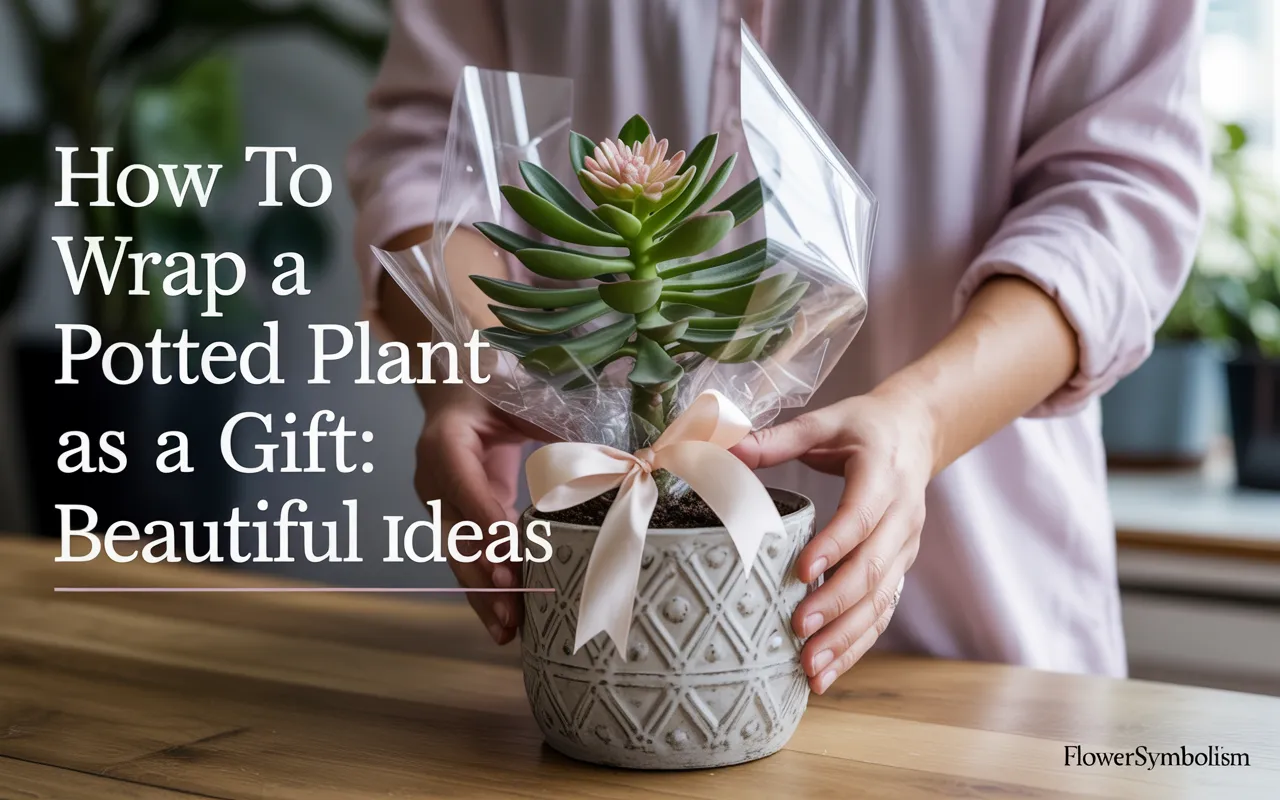
7. The Cellophane and Ribbon Wrap (Classic Florist Style)
This clear wrap lets the beauty of the plant shine through while still looking like a fancy gift from a professional florist.
Materials:
- A roll of clear or patterned cellophane
- A curling ribbon or a large pull bow [Amazon Product: Big Satin Pull Bows for Gifts]
Instructions:
- Cut a Large Square: Place your pot in the center of your cellophane sheet to make sure it’s large enough to come up and over the top of the plant.
- Gather Upwards: Bring the cellophane up around the plant, creating a tent-like shape over the top.
- Tie it Off: Cinch the cellophane together high above the plant’s leaves and tie it off with your ribbon. If using a pull bow, this is where you’ll attach it. It’s a classic for a reason!
8. The Tea Towel Wrap (A Gift Within a Gift)
Similar to the Furoshiki method, this uses a beautiful, functional tea towel as the wrapping. It’s perfect for a housewarming gift.
Materials:
- A pretty, high-quality tea towel
- Safety pins or ribbon
Instructions:
- Center the Pot: Lay the tea towel flat and place the pot in the center.
- Fold and Secure: Fold the tea towel up and around the pot, creating neat folds as you go. You can secure the fabric in place with a few well-hidden safety pins, or simply tie it all together with a beautiful coordinating ribbon.
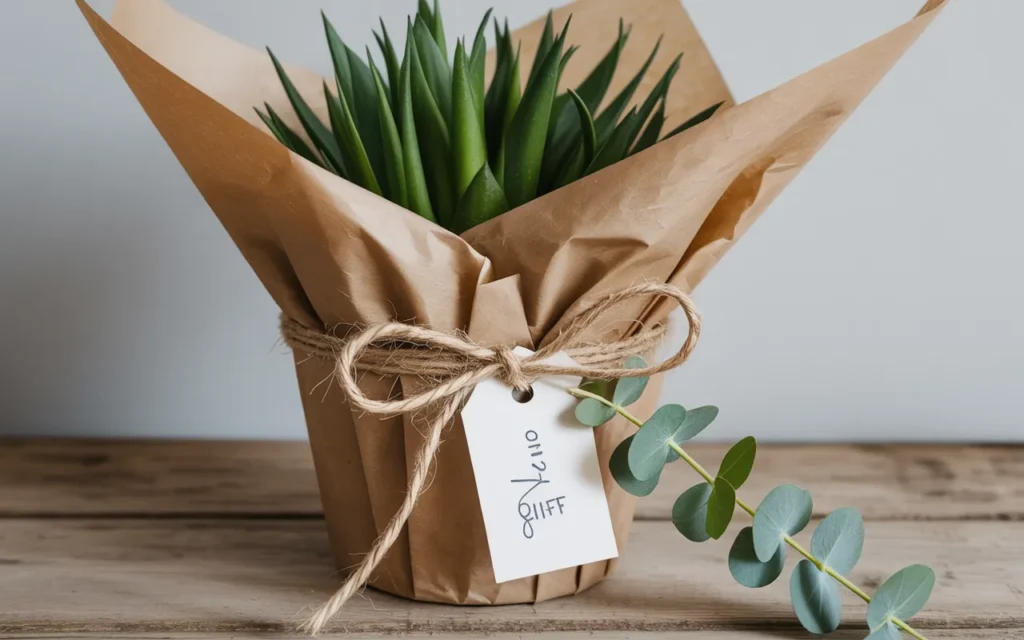
9. The Natural Kraft Paper and Greenery Look (Modern and Minimalist)
This look is understated, modern, and very chic. It focuses on natural textures.
Materials:
- Brown or black kraft paper
- Jute twine
- A sprig of fresh greenery (like eucalyptus or rosemary)
- A gift tag [Amazon Product: Brown Kraft Paper Gift Tags with Twine]
Instructions:
- Wrap the Pot: Use the pleated paper method (Idea #2) to neatly wrap the pot in the kraft paper.
- Tie with Twine: Wrap the jute twine around the pot several times and tie a simple knot or small bow.
- Add the Finishing Touches: Tuck the sprig of greenery under the twine and attach your gift tag. The simplicity is what makes it so beautiful.
10. The Basket Treatment (A Cozy, Reusable Container)
Placing the plant in a beautiful basket is perhaps the most elegant and practical wrapping solution of all.
Materials:
- A basket that is slightly larger than your plant pot
- A plastic saucer to fit inside the basket
- Filler material like moss, shredded paper, or fabric
Instructions:
- Protect the Basket: Place the plastic saucer in the bottom of the basket. This will catch any water drips and protect the basket material.
- Place the Plant: Set your potted plant inside the basket on top of the saucer.
- Fill the Gaps: Use your filler material (Spanish moss is a beautiful choice) to fill in the gaps between the pot and the sides of the basket. This hides the plastic pot and gives it a professional, finished look. Tie a ribbon around the handle for a final touch.
Conclusion
A plant is a gift that continues to grow, and how you present it should be just as special. With these ten creative ideas, you now know how to wrap a potted plant as a gift for any person and any occasion. You can turn a simple houseplant into a memorable, personal, and stunning present that is sure to make someone’s day. The extra effort is always worth it.
Frequently Asked Questions (FAQs)
1. How do you gift wrap a potted plant without it leaking?
Water the plant a day or two in advance so the soil is damp but not wet. For extra security, place the nursery pot on a plastic saucer or inside a waterproof florist’s foil before wrapping it in paper or fabric.
2. What is the easiest way to wrap a plant pot?
The easiest methods are the burlap wrap (Idea #1) or the gift bag method (Idea #5). Both require minimal folding or taping and can be done in just a couple of minutes while still looking beautiful.
3. Can you wrap a plant in wrapping paper?
Yes, absolutely! The pleated paper method (Idea #2) is a great way to use wrapping paper. Just be sure to use a thicker, sturdier paper that won’t tear easily. Brown kraft paper is an excellent, durable option.
4. How do you make a plant look like a gift?
The key is to hide the plain nursery pot and add a finishing touch. Wrapping the pot in fabric, paper, or burlap and tying it with a beautiful ribbon or twine instantly transforms it into a proper gift. Adding a personalized gift tag is the final perfect touch.
5. What is Furoshiki gift wrapping?
Furoshiki is the traditional Japanese art of using a single piece of fabric to wrap gifts. It’s an eco-friendly, reusable, and beautiful way to wrap items of all shapes and sizes, and it works perfectly for potted plants (see Idea #3).
6. How do you prepare a plant for gifting?
Make sure the plant is healthy and clean. Wipe down the pot and the leaves, trim any dead or yellowing foliage, and ensure the soil is lightly moist but not waterlogged.
7. What can I use instead of wrapping paper for a plant?
There are many creative alternatives! Try using burlap, a pretty tea towel, a silk scarf, cellophane, or even newspaper for a unique look. Placing the plant in a beautiful basket is also a great option where the “wrapping” is a reusable gift itself.