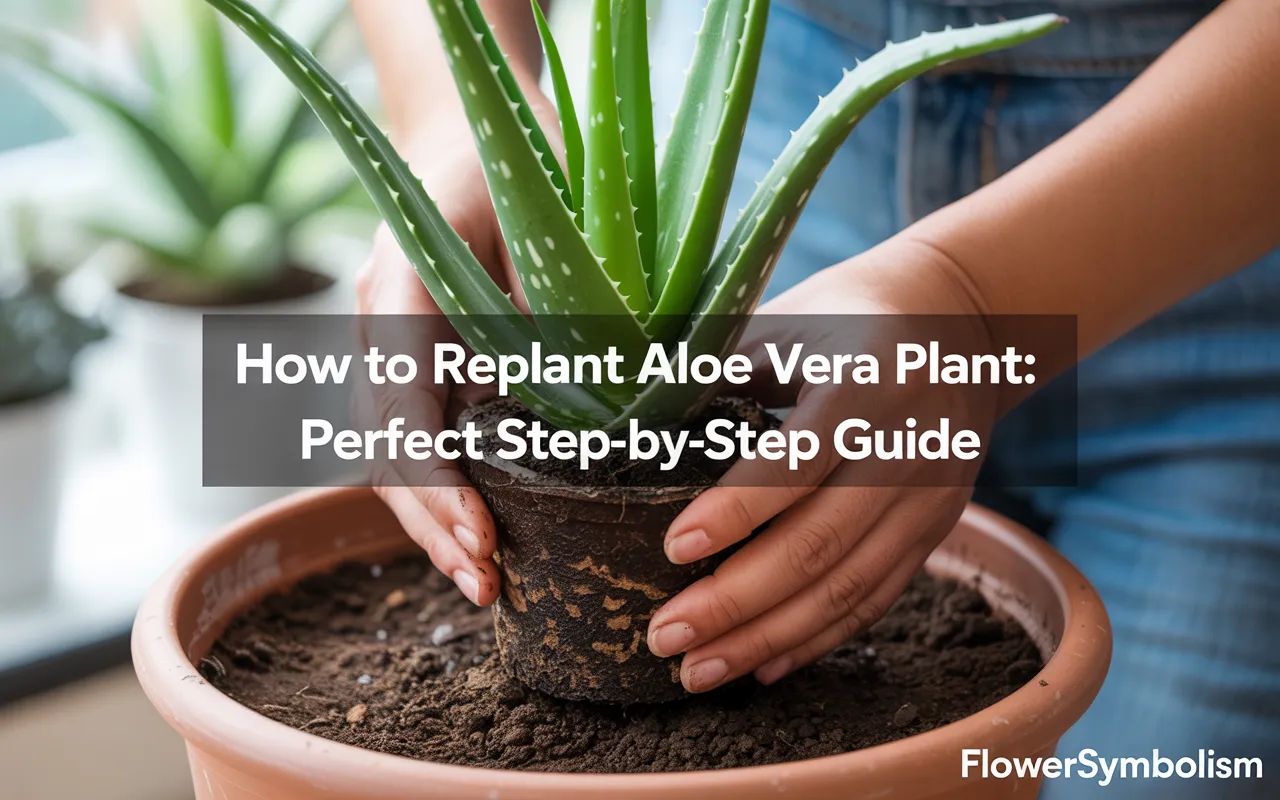
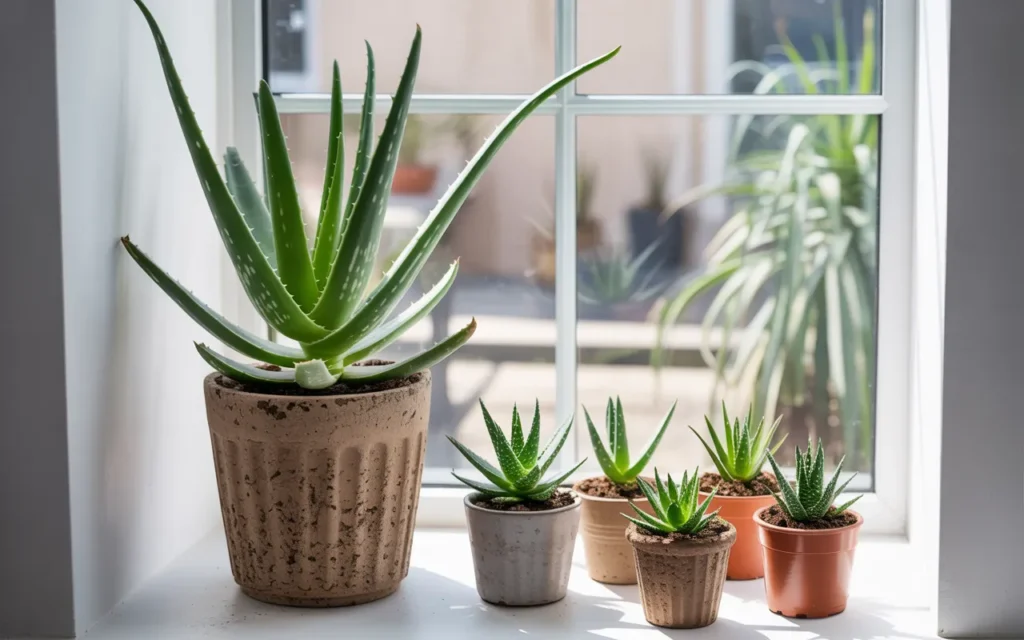
Aloe vera is the superstar of houseplants. It’s beautiful, famously low-maintenance, and its gel-filled leaves are a soothing remedy for sunburns. But eventually, every happy aloe plant will outgrow its pot or produce a family of baby “pups.” This is when you’ll need to know how to replant aloe vera plant to keep it healthy and thriving.
Don’t be nervous! Repotting succulents can seem daunting, but aloe is incredibly tough and forgiving. This guide will walk you through every simple step, from knowing when it’s time to repot to separating the babies and giving your plant the perfect new home. Let’s get our hands dirty and give your aloe the fresh start it deserves.
Why Replanting Aloe Vera is So Important
Repotting isn’t just about moving your plant to a prettier container; it’s a vital part of its long-term health care. Over time, several things happen in your aloe’s pot that make a fresh start necessary.
- It Becomes Root-Bound: A healthy aloe vera plant will eventually fill its entire pot with roots. When the roots have nowhere left to go, they form a dense, tangled mass. This restricts the plant’s ability to absorb water and nutrients, stunting its growth.
- The Soil Gets Depleted: Potting soil doesn’t last forever. Over time, your plant uses up all the available nutrients. The soil also compacts, reducing aeration and drainage, which is very dangerous for a succulent.
- It Gets Top-Heavy and Unstable: As your aloe grows taller and heavier, a small pot can no longer support its weight. The plant can easily tip over, potentially causing damage to its beautiful, fleshy leaves.
- It Produces Babies (Pups!): A happy aloe will produce small offset plants, called “pups,” around its base. These pups compete with the mother plant for water, nutrients, and space. Separating them gives everyone room to grow and gives you more aloe plants to keep or share!
- It’s a Health Check-Up: Repotting is the perfect opportunity to inspect the plant’s roots. You can check for signs of root rot or pests that you wouldn’t normally see, allowing you to catch problems early.
Want to explore more easy plant projects while working with Aloe Vera? Try these:
- Learn how to pot a plant the right way for healthy roots.
- Give your garden a stylish touch — see how to decorate plant pots.
- Add more greens indoors by growing a monstera plant.
- Love flowers? Try this beginner-friendly guide on how to plant flower seeds.
- Bring fragrance and flavor to your windowsill with how to plant herbs in pots
The Telltale Signs: When to Replant Your Aloe
Your aloe plant will give you clear signals when it’s ready for a new home. Keep an eye out for these signs.
- Roots Growing Out of the Drainage Hole: This is the most obvious sign. If you see roots peeking out of the bottom of the pot, your plant is definitely looking for more space.
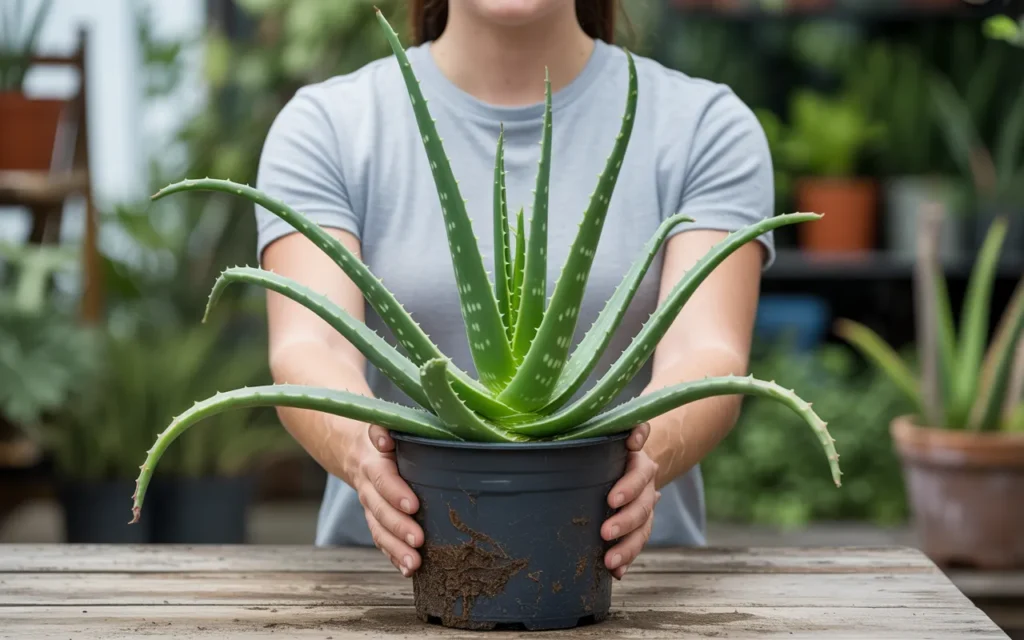
- The Plant Looks Too Big for its Pot: If the aloe plant is more than twice as tall as its pot or seems to be spilling out over the sides, it’s likely top-heavy and needs a more stable base.
- Pups are Crowding the Pot: If the base of your mother plant is surrounded by lots of baby aloe pups, it’s time to separate the family. This is the most common reason people need to replant aloe vera.
- Water Runs Straight Through: When you water the plant, does the water immediately run out the bottom without seeming to soak in? This can mean the pot is so full of roots that there’s very little soil left to hold moisture.
- It’s Been a Long Time: As a general rule, it’s a good idea to repot your aloe vera every 2 to 3 years, even if it doesn’t show obvious signs of stress. This gives it a fresh batch of nutrient-rich soil.
The best time of year to repot your aloe is in the spring or early summer. This is the beginning of its active growing season, which means the plant will be strong and ready to recover quickly from the stress of being moved.
The Perfect New Home: Choosing the Right Pot and Soil
Setting your aloe up for success starts with its new pot and soil. These are the two most critical decisions you will make.
1. The Right Pot
Aloe vera is a succulent, and its biggest enemy is too much water. The pot you choose plays a huge role in moisture control.
- Drainage is a MUST: This is the most important rule. The pot must have a drainage hole. If you have a decorative pot with no hole, use it as a cachepot (a decorative outer pot) and keep your aloe in a plastic pot with drainage inside it.
- Material Matters: Terracotta (unglazed clay) is the absolute best choice for aloe vera. The clay is porous, which means it breathes. This allows excess moisture to evaporate through the walls of the pot, helping the soil to dry out faster and preventing deadly root rot. Glazed ceramic or plastic pots will work, but you must be much more careful not to overwater.
- Size it Up (The Right Way): This is a common mistake! Do not put your aloe in a giant pot. Choose a new pot that is only 1 to 2 inches larger in diameter than the old one. A pot that is too large will hold too much soil, which stays wet for too long and can easily cause root rot.
[Amazon Product: Set of 3 Terracotta Pots with Saucers in Various Sizes]
2. The Right Soil
Never use garden soil for a potted aloe plant. It is too dense, holds too much water, and can contain pests. You need a special potting mix designed for succulents.
- Buy a Specialized Mix: The easiest and best option is to buy a commercial Cactus and Succulent Potting Mix. This mix is specially formulated with ingredients like sand and perlite to be very gritty and fast-draining, which is exactly what aloe needs.
- DIY Succulent Mix: If you’re feeling adventurous, you can make your own mix. A great recipe is:
- 2 parts standard all-purpose potting soil
- 1 part perlite (the little white rocks that look like styrofoam)
- 1 part coarse sand or small gravel
This combination ensures that water drains quickly and the roots get the aeration they need.
[Amazon Product: Premium Fast-Draining Succulent & Cactus Soil Mix]
Once your Aloe Vera settles, you might want to explore similar gardening care topics:
• How to take care of a monstera plant for strong, glossy leaves.
• When your plants outgrow their containers, here’s how to repot a monstera plant.
• Want to expand your plant collection? Try propagating a snake plant in water.
• Interested in growing edibles too? See how to plant tomatoes from seeds.
• Add aroma to your indoor garden with how to take care of a rosemary plant
How to Replant an Aloe Vera Plant: The Main Event
You have your pot and soil ready. Now it’s time to perform the transplant. It’s best to do this outside or on a surface covered with newspaper for easy cleanup.
Your Replanting Toolkit:
- Your new pot
- Your succulent/cactus soil mix
- The aloe plant to be repotted
- Gardening gloves (aloe leaves have small serrated edges)
- A butter knife or small trowel
- A sharp, clean knife or pruning shears (for separating pups)
Step-by-Step Guide to Repotting
Step 1: Remove the Aloe from its Old Pot
- Aloe plants can be a bit stuck in their pots. Don’t just pull it by its leaves.
- Turn the pot on its side and run a butter knife around the inside edge to loosen the soil.
- Gently squeeze the sides of the pot if it’s plastic. Then, with one hand supporting the base of the plant, carefully tip the pot and wiggle the plant free.
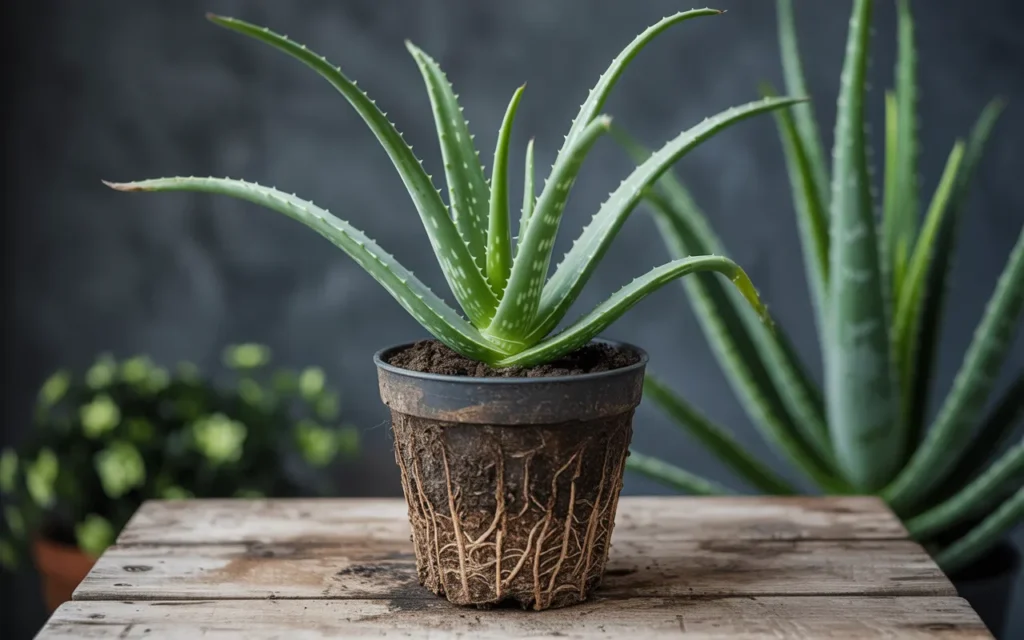
Step 2: Clean and Inspect the Roots
- Gently brush away as much of the old, depleted soil from the root ball as you can. This is your chance to play plant detective.
- Healthy roots should be firm and white or pale tan.
- Unhealthy roots (a sign of root rot) will be black, brown, soft, and mushy. If you find any mushy roots, you must trim them off with your clean knife or shears. Be ruthless! You need to remove all the rot to save the plant.
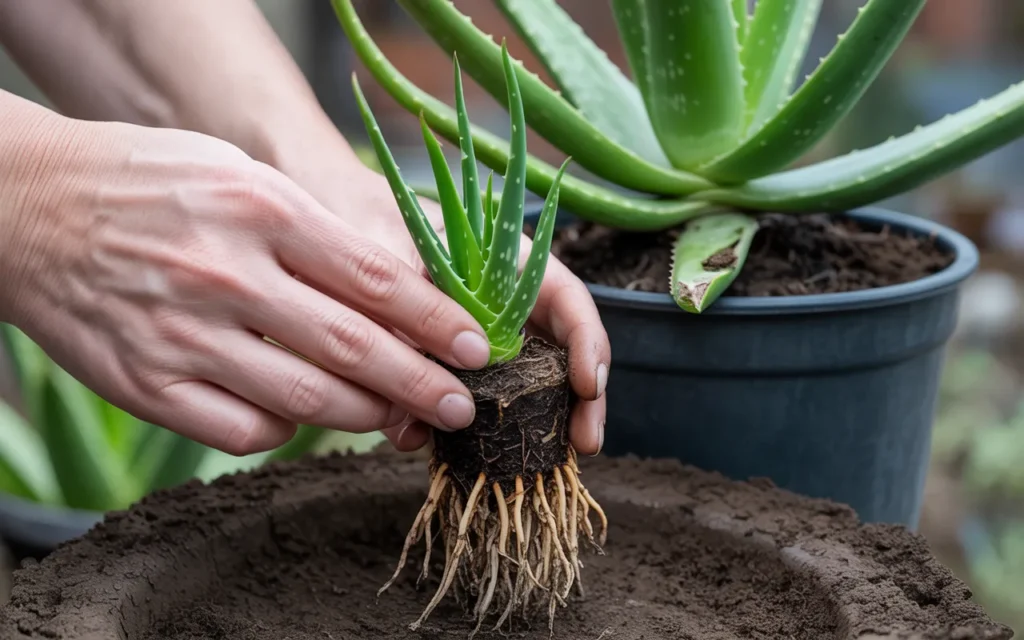
Step 3: Separate the Pups (If Any)
- If your plant has babies, now is the time to separate them.
- Gently pull the pups away from the mother plant. They should have their own small root system already attached.
- If a pup is connected by a thick root (an umbilical cord, of sorts), use your clean, sharp knife to make a clean cut, leaving as many roots on the pup as possible.
Aloe Vera pairs beautifully with other low-maintenance or decorative plants. Try adding:
- Mint in pots – great for fresh fragrance.
- Curry leaf plants – simple and aromatic.
- Marigold seeds – for bright, pest-resistant blooms.
- Cucumbers in pots – easy homegrown veggies.
- Sunflowers – for a vibrant outdoor touch
Step 4: Let Them Callus (A Crucial Waiting Period)
- This is a key step for succulents. Any place where you cut roots or separated a pup is an open wound. If you plant these wounds in moist soil right away, they can easily rot.
- Set the mother plant and all the pups in a dry, shady spot for 1 to 3 days. This allows the wounds to dry and form a “callus,” which protects them from infection.
Step 5: Prepare the New Pot
- Cover the drainage hole with a small piece of screen mesh or a coffee filter to prevent soil from falling out.
- Do not add a layer of rocks to the bottom of the pot. This is an old myth that actually makes drainage worse.
- Fill the new pot about one-third of the way with your fresh cactus/succulent soil mix.
Step 6: Pot the Plant
- Take your callused mother plant and place it in the center of the new pot.
- The goal is to have the base of the plant (where the leaves begin) sit about an inch below the rim of the pot. Add or remove soil from the bottom to get the height just right.
- Begin filling in around the plant with your soil mix until the pot is full. Gently pat the soil down, but don’t compact it.

Step 7: Potting the Pups
- You can plant each pup in its own small pot. Choose a pot that is just slightly larger than the pup’s root system (a 2-4 inch pot is usually perfect).
- Follow the same potting procedure as you did for the mother plant. Now you have a whole new family of aloe plants!
The Most Important Aftercare Step: DO NOT WATER!
This feels wrong, but it is the most critical part of successful aloe repotting.
- Wait at least one full week after repotting before you give the plant its first watering.
- Why? The roots have been damaged during the repotting process. Watering immediately can shock the sensitive roots and introduce rot.
- Waiting a week gives the roots time to heal and settle into their new, dry home.

Ongoing Care for Your Happy Aloe
- Sunlight: Aloe loves bright, indirect sunlight. A spot near a south-facing window is ideal, but be careful not to let it get scorched by intense, direct afternoon sun, which can turn the leaves yellow or brown.
- Watering: This is where most people go wrong. Aloe vera is a desert plant and is extremely drought-tolerant. Always let the soil dry out completely between waterings.
- A good test is to stick your finger 2 inches into the soil. If it’s dry, it’s time to water. If you feel any moisture, wait longer.
- When you do water, water deeply until it runs out the drainage hole. Then, let it dry out completely again. It’s always better to under-water an aloe than to over-water it.
- Fertilizing: Aloe doesn’t need much fertilizer. You can feed it with a balanced, liquid houseplant fertilizer diluted to half-strength just once or twice during the spring/summer growing season. Do not fertilize in the fall or winter.
Conclusion
You are now a certified aloe vera surgeon! Knowing how to replant an aloe vera plant is a simple skill that will empower you to keep your plants healthy for decades and to multiply your collection for free.
By providing the right pot, the right soil, and giving the roots time to heal before watering, you are ensuring your plant will recover quickly and thrive in its new home. Enjoy your happy, healthy, and ever-growing aloe family!
Frequently Asked Questions (FAQs)
1. What kind of soil is best for replanting aloe vera?
The best soil is a fast-draining mix specifically designed for cacti and succulents. You can buy a pre-made bag or mix your own using potting soil, perlite, and coarse sand. This prevents water from sitting around the roots.
2. How do you separate aloe vera pups for replanting?
Gently remove the mother plant from its pot and brush off the soil. Pull the pups away from the main root ball. If they are attached by a thick root, use a clean, sharp knife to cut them free, making sure each pup has some of its own roots.
3. How big should the pot be when repotting aloe?
Choose a pot that is only 1-2 inches wider in diameter than the previous pot. A pot that is too large holds too much moisture and is the number one cause of root rot in aloe plants.
4. Should I water aloe vera after repotting?
No! This is very important. You should wait at least one full week after repotting before you water your aloe. This allows any damaged roots to heal and prevents them from rotting in the moist soil.
5. How do I know when my aloe plant needs to be repotted?
Look for signs like roots growing out the drainage hole, the pot being crowded with baby “pups,” the plant looking too top-heavy for its container, or if it has been 2-3 years since it was last repotted.
6. What type of pot is best for an aloe vera plant?
A terracotta (unglazed clay) pot with a drainage hole is the ideal choice. The porous clay allows the soil to dry out more quickly, which is perfect for a drought-loving succulent like aloe.
7. Can you cut a piece of aloe and replant it?
Yes, but it’s easier to replant the “pups” that grow from the base. If you do take a leaf cutting, you must let the cut end dry and callus over for several days to a week before placing it in soil, or it will rot. Growing from pups is a much more reliable method.