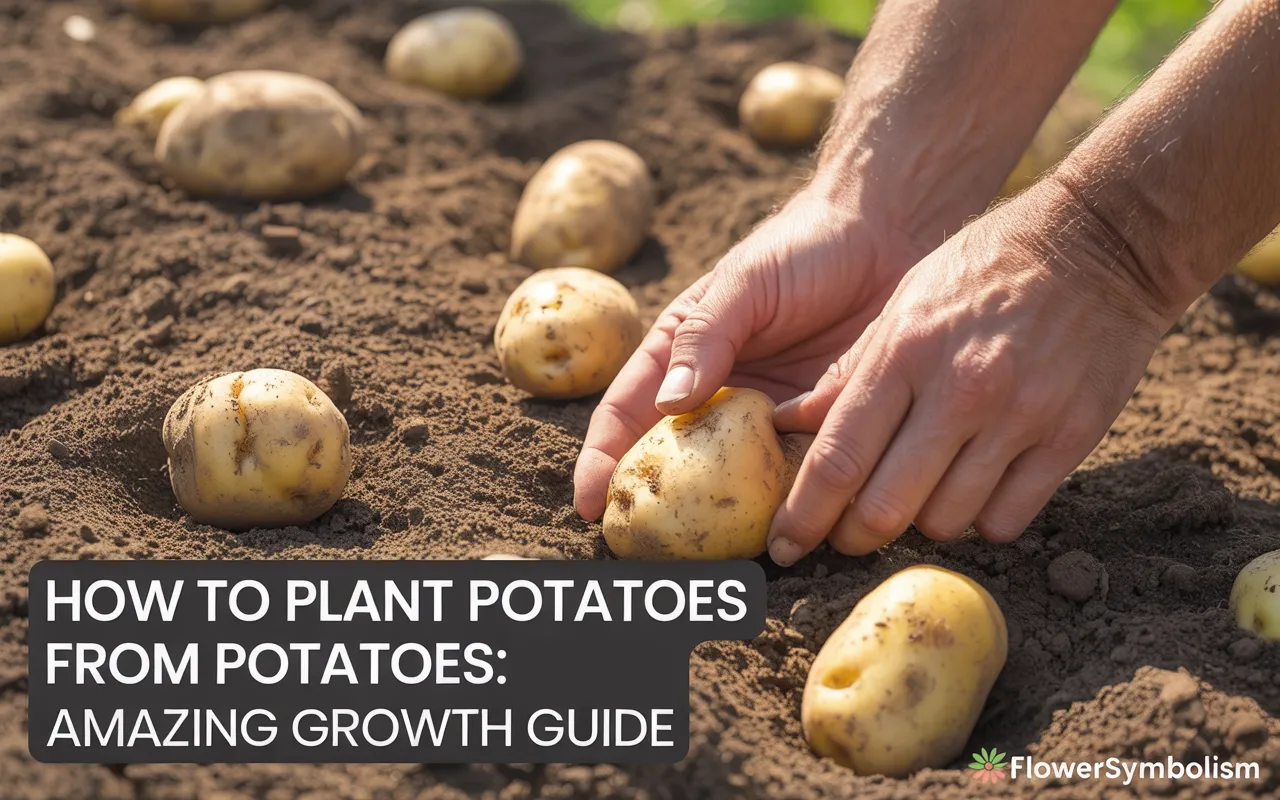
Did you know that one of the easiest ways to grow a whole new batch of delicious potatoes is by using a potato you already have? It’s true! This guide will show you everything you need to know about how to plant potatoes from potatoes, a fun and incredibly rewarding process that turns a simple kitchen staple into a bountiful harvest.
Growing your own food is a special kind of magic. You get to watch a small potato piece transform into a thriving plant that produces pounds of fresh, tasty spuds.
We’ll cover every simple step, from waking up your potatoes to pulling them out of the ground. Get ready to be amazed by the power of a single potato!
Can You Really Plant a Potato from the Grocery Store?
This is the first question everyone asks, and the answer is: yes, you can, but it’s not the best idea. Here’s why:
- Sprout Inhibitors: Most potatoes you buy at the supermarket have been sprayed with a chemical to stop them from sprouting in the store and in your pantry. This can make them very slow, or even unable, to grow.
- Disease Risk: Grocery store potatoes are not certified to be disease-free. They could carry potato diseases like blight or scab, which could infect your garden soil for years to come.
The Best Choice: Certified Seed Potatoes
The absolute best way to start is by using certified seed potatoes. These aren’t seeds like a tomato seed; they are just potatoes that were grown specifically to be planted.
- They are guaranteed to be disease-free.
- They have not been treated with sprout inhibitors.
- They are ready to grow and will give you a much healthier, more reliable harvest.
You can find seed potatoes at garden centers, farm supply stores, or online in the early spring.
[Amazon Product : Certified Organic Russet Seed Potatoes]
Understanding Potato Types
Before you buy your potatoes, it helps to know that there are two main types, which grow in different ways.
- Determinate Potatoes: Think of these as “bush” potatoes. They produce all their tubers in one single layer just above where you planted the potato piece. They mature faster (70-90 days) and don’t need a lot of “hilling up” (we’ll explain this later!). Examples: Yukon Gold, Red Pontiac, Norland.
- Indeterminate Potatoes: These are “vining” potatoes. They will keep setting new potatoes all the way up the main stem as it grows. This means the more you bury the stem with soil, the more potatoes you can get! They take longer to mature (110-135 days). Examples: Russet Burbank, Nicola, King Harry.
For your first time, a determinate variety like Yukon Gold is a great choice because it’s quicker and requires less work.
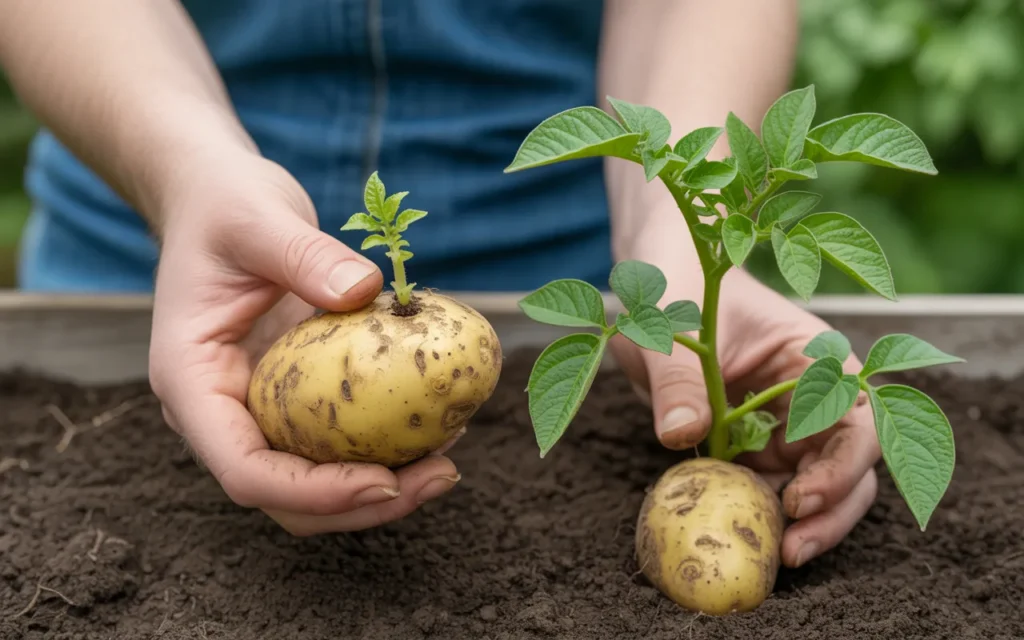
“Chitting”: The Secret to a Great Head Start
About 2 to 4 weeks before you plan to plant, it’s a great idea to “chit” your potatoes. Chitting is just a fun word for encouraging your seed potatoes to sprout before you plant them. This gives them a huge head start on the growing season.
How to Chit Your Potatoes:
- Step 1: Place your seed potatoes in a single layer. An empty egg carton or a shallow cardboard box works perfectly.
- Step 2: Position them so the end with the most “eyes” (little dimples or buds) is facing up.
- Step 3: Put the container in a cool, bright place that is out of direct sunlight. A cool windowsill, a garage near a window, or a three-season porch are all great spots.
- Step 4: Be patient! Over the next few weeks, you will see thick, sturdy, green or purple sprouts begin to grow from the eyes. This is a sign they are awake and ready to grow!
Tip: If your sprouts are long, white, and skinny, it means your chitting location was too dark. You want short, sturdy sprouts.

Should You Cut Your Potatoes?
If your seed potatoes are large (bigger than a chicken egg), you can cut them into smaller pieces to get more plants.
- Use a clean knife to cut the potato into pieces that are about 2 ounces each.
- Crucially, make sure every single piece has at least two or three eyes on it. The sprouts grow from the eyes.
- After cutting, let the pieces sit out on a counter for 1 to 3 days. This allows the cut surface to dry out and form a protective “skin” or callus, which helps prevent it from rotting in the soil.
Preparing the Perfect Potato Patch
Potatoes are not too picky, but they do have a few preferences for their home.
Sunlight is Key
Potatoes need at least 6-8 hours of direct sunlight per day to produce a good crop. The leaves use sunlight to create the energy that they store in the underground potatoes (tubers).
Rich, Loose Soil
Potatoes need to be able to expand easily underground. This means they love soil that is:
- Loose and not compacted: Hard, heavy clay soil will result in small, misshapen potatoes.
- Well-draining: Potatoes will rot if they sit in soggy soil.
- Slightly acidic: They prefer a soil pH between 5.8 and 6.5.
How to Prepare Your Garden Bed
The secret to great soil is adding lots of organic matter.
- Choose your sunny spot.
- Spread a generous 3-4 inch layer of compost over the entire area. [Amazon Product: Premium Organic Compost for Vegetable Gardens]
- Use a shovel or a garden fork to mix this compost into the top 8-10 inches of your existing soil. This will make the soil rich, improve its texture, and help it hold water.
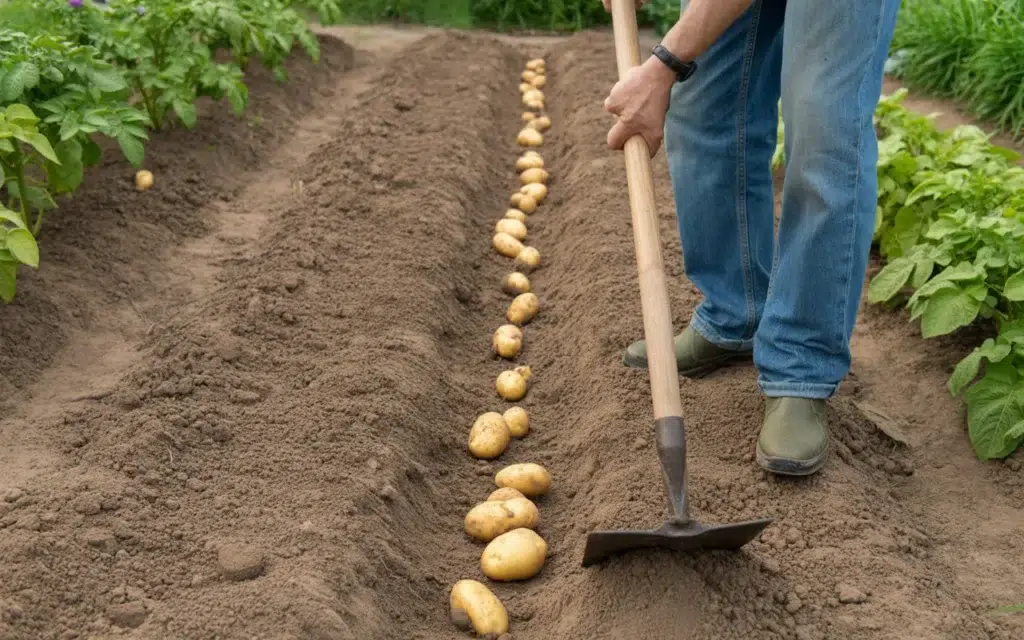
How to Plant Potatoes from Potatoes: The Trench Method
This is the classic, time-tested way to plant potatoes in a traditional garden bed.
Step 1: Dig Your Trenches
- Using a hoe or a shovel, dig shallow trenches that are about 6 to 8 inches deep.
- If you are planting multiple rows, space your trenches about 2 to 3 feet apart. This gives the plants plenty of room to grow and gives you space to walk between them.
Step 2: Add Fertilizer (Optional but Recommended)
- Potatoes are heavy feeders. It’s a great idea to add a balanced, slow-release granular vegetable fertilizer to the bottom of the trench.
- Sprinkle the fertilizer according to the package directions. A good fertilizer will provide the nutrients your plants need throughout the season. [Amazon Product: Organic All-Purpose Vegetable Fertilizer]
Step 3: Place Your Potatoes
- Place your chitted seed potatoes (or your cut pieces) in the bottom of the trench.
- Space them about 12 inches apart.
- Make sure the sprouts are pointing up towards the sky!
Step 4: Cover Them Up
- Use a rake or hoe to gently pull the soil from the sides of the trench back over the potatoes.
- Cover them with about 3 to 4 inches of soil. They should be completely buried.
Step 5: Water Well
- Give the planted area a good, gentle soaking with a hose or watering can. This helps the soil settle around the potatoes and gives them the moisture they need to start growing.
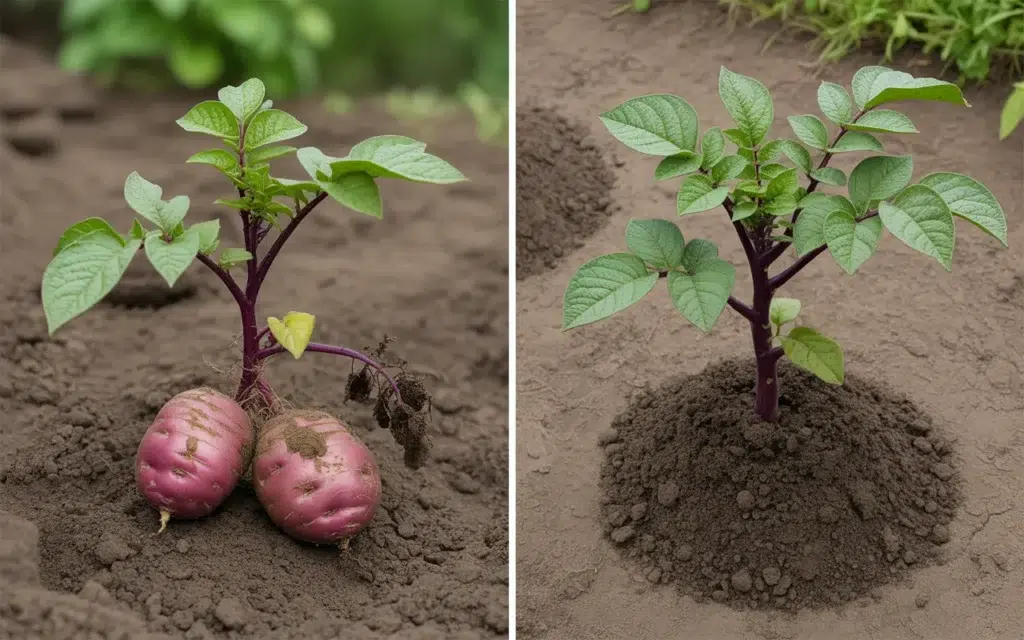
The “Hilling” Method: Your Key to a Bigger Harvest
As your potato plants grow, you’ll need to “hill” them. This is the single most important task for getting a great crop.
Why do we hill potatoes? New potatoes form on side shoots that grow off the main stem. If these shoots are exposed to sunlight, they will turn green and produce a toxic compound called solanine. Hilling means covering the growing stem with soil. This keeps the developing potatoes in the dark, protects them from the sun, and gives the plant more space to produce even more potatoes!
How to Hill Your Potatoes:
- First Hilling: When your potato plants have grown to be about 6-8 inches tall, it’s time for the first hilling. Use a hoe or your hands to gently pull loose soil from between the rows up and around the base of the plants. Cover the stems with about 3-4 inches of soil, leaving the top set of leaves exposed.
- Subsequent Hillings: Repeat this process every 2 to 3 weeks. Each time the plant grows another 6-8 inches, pull more soil up around the stems.
- You will eventually create a wide, mounded “hill” of soil along your row.
Caring for Your Growing Potatoes
Watering
- Potatoes need consistent water to form well-shaped tubers, about 1 to 2 inches of water per week.
- Water deeply when you do water. This encourages the roots to grow deep into the soil.
- Try to water the base of the plant and avoid getting the leaves wet, especially in the evening. This can help prevent fungal diseases like blight. A soaker hose is a great tool for this. [Amazon Product : Garden Soeaker Hose Kit]
Common Pests
- Colorado Potato Beetle: This is the most notorious potato pest. The adult is a yellow-and-black striped beetle. The larvae are soft, red grubs that will eat the leaves voraciously. The best control is to inspect your plants every few days and hand-pick any beetles or larvae you find into a bucket of soapy water.
- Flea Beetles: These tiny black bugs chew lots of little “shotgun” holes in the leaves. They rarely kill the plant but can weaken it. Floating row covers can protect young plants.
Common Diseases
- Early & Late Blight: These are fungal diseases that cause dark spots on leaves and can ruin a crop. To prevent them, ensure good air circulation between plants, water the soil instead of the leaves, and rotate your potato crop to a new spot in the garden each year.
- Potato Scab: This causes rough, scabby patches on the skin of the potatoes. It’s often caused by soil pH being too high. Keeping your soil slightly acidic helps prevent it.
Harvest Time: Unearthing Your Treasure!
This is the moment you’ve been waiting for! The timing of your harvest depends on what kind of potato you want to eat.
When to Harvest
- “New Potatoes”: About 2-3 weeks after the plants have finished flowering, you can harvest small, delicious “new potatoes.” Their skins will be very thin and tender. You can carefully dig around the base of a plant with your hands and “rob” a few tubers without pulling up the whole plant.
- Full-Sized “Storage” Potatoes: For the main harvest of large potatoes that will last for months, you must wait until the leafy tops of the plants have turned yellow and died back completely. This is a critical signal that the plant is done growing. When this happens, stop watering the plants for a week or two. This helps the potato skins to thicken, which is essential for long-term storage.
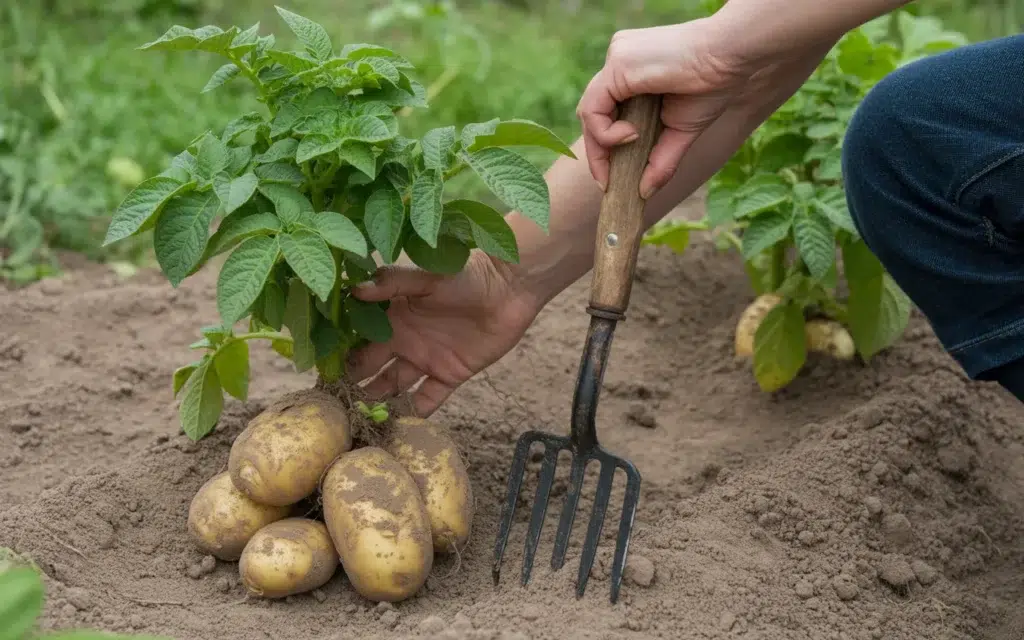
How to Harvest
- Choose a dry day.
- Use a garden fork or a sturdy shovel. Start digging about a foot away from the center of the plant to avoid spearing the potatoes.
- Gently lift the soil and the entire plant.
- Use your hands to rummage through the loose soil and gather your potatoes. It feels like a true treasure hunt!
Storing Your Harvest for Winter
- Cure Them First: After harvesting, gently brush the dirt off the potatoes (do not wash them!). Lay them out in a single layer in a dark, well-ventilated, and humid place for about 1 to 2 weeks. A garage or covered porch works well. This “curing” process allows their skins to harden and any small cuts to heal.
- Find a Cool, Dark Place: The ideal storage spot is cool (45-50°F), dark, and has some humidity. A basement or root cellar is perfect.
- Store them in a breathable container like a cardboard box, a wicker basket, or a paper bag. Do not store them in plastic bags.
- Check them periodically and remove any that are starting to spoil.
Conclusion
You are now fully equipped with the knowledge of how to plant potatoes from potatoes. From the simple joy of watching them sprout on your windowsill to the excitement of unearthing your own food from the soil, growing potatoes is a fundamental gardening experience that connects you directly to the earth.
The taste of a potato you grew yourself is richer and more satisfying than any you can buy at the store. So grab a few seed potatoes and get ready to enjoy the process and the delicious rewards!

Frequently Asked Questions (FAQs)
1. How many potatoes do you get from one potato plant?
This can vary greatly depending on the variety and growing conditions, but a single healthy potato plant will typically produce between 5 and 10 potatoes.
2. Can I just plant a potato that has sprouted in my pantry?
You can, and it will likely grow! However, it’s riskier than using certified seed potatoes because it might carry plant diseases and it may have been treated with a sprout inhibitor that makes it less vigorous.
3. What happens if you don’t hill potatoes?
If you don’t hill your potatoes, the developing tubers near the surface will be exposed to sunlight. This will cause them to turn green and produce solanine, a bitter compound that is toxic if eaten in large quantities. Hilling also encourages more potatoes to form on indeterminate varieties.
4. How do you know when your potatoes are ready to be dug up?
For small “new potatoes,” you can harvest them 2-3 weeks after the plant flowers. For a full crop of storage potatoes, you must wait until the green foliage has completely yellowed and died back.
5. What is the best month to plant potatoes?
This depends on your climate. In most regions, the best time to plant potatoes is in the early spring, about 2 to 4 weeks before your average last frost date.
6. Do potatoes need a lot of water?
Potatoes need consistent water, especially when the plants are flowering and the tubers are forming. They require about 1-2 inches of water per week from rain or irrigation. Inconsistent watering can lead to hollow or misshapen potatoes.
7. Can I grow potatoes in a pot or grow bag?
Yes! Growing potatoes in large containers or grow bags is an excellent method, especially for beginners or those with limited space. It offers great drainage and makes harvesting incredibly easy—you just tip the bag over