
Hydrangeas are the undisputed queens of the late summer garden. Their big, beautiful, cloud-like blooms in shades of blue, pink, white, and green are simply breathtaking.
It’s no wonder that we want to hold onto that beauty long after the season has passed.
The great news is that hydrangeas are one of the best flowers for drying, retaining their shape and color with spectacular results.
Learning how to dry hydrangea flowers is a simple and rewarding process that allows you to enjoy their charm all year long.
Drying hydrangeas isn’t just a way to preserve a garden memory; it opens up a world of creative decorating possibilities.
Dried hydrangea heads can be used in wreaths, centerpieces, bouquets, and countless other craft projects.
They bring a touch of rustic, vintage elegance to any space, and best of all, they require zero maintenance once they are dried.
This guide will be your go-to resource, walking you through 10 stunning methods for preserving these gorgeous blooms.
We’ll cover everything from the famously easy water-drying technique to faster methods using desiccants and modern tools.
We’ll share our best tips, step-by-step instructions, and everything you need to know about how to dry hydrangea flowers successfully. Get ready to fill your home with the timeless beauty of these magnificent blooms.
The Golden Rule: When to Harvest Hydrangeas for Drying
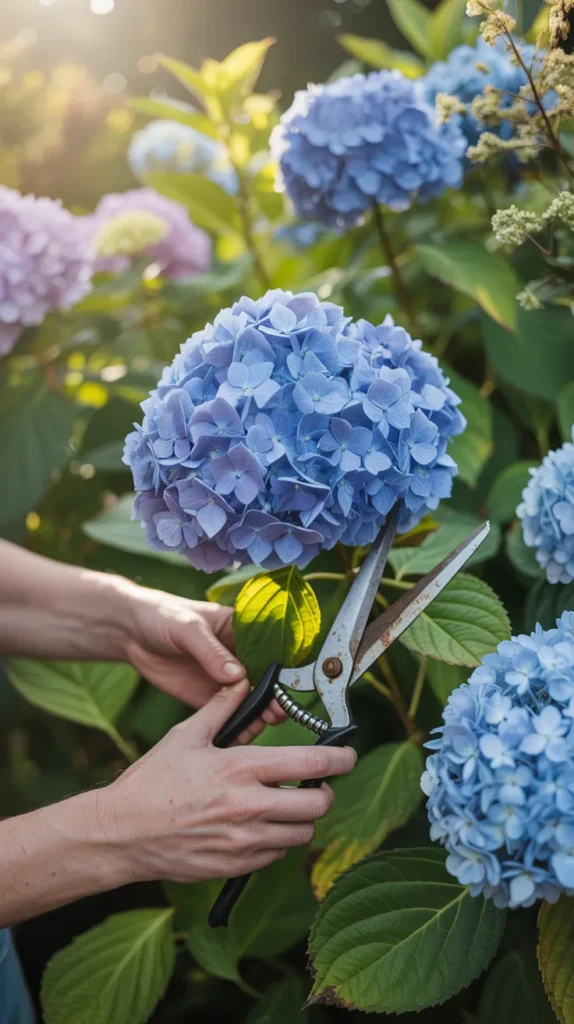
Before we dive into the methods, the most important step in learning how to dry hydrangea flowers is knowing when to cut them. The timing of your harvest is the single biggest factor in your success.
- Wait for Maturity: Do not try to dry fresh, soft, brightly colored blooms that have just opened. These young flowers have too much moisture and will simply wilt and shrivel.
- The Perfect Time: The ideal time to harvest hydrangeas for drying is at the very end of their blooming season, typically in late summer or early fall (August to October).
- Look for these signs: The large petals (which are actually sepals) should start to feel slightly papery or leathery to the touch. The colors will have begun to fade from their vibrant summer peak into more muted, antique shades. You might see hints of dusty rose, mauve, soft green, or burgundy. The small, true flowers in the center of the big petals will have opened.
- The “Shake” Test: Gently shake the stem. If the flower head feels firm and doesn’t droop, it’s likely ready.
Harvesting at this mature stage means the flower has already begun its natural drying process on the plant, giving you a huge head start.
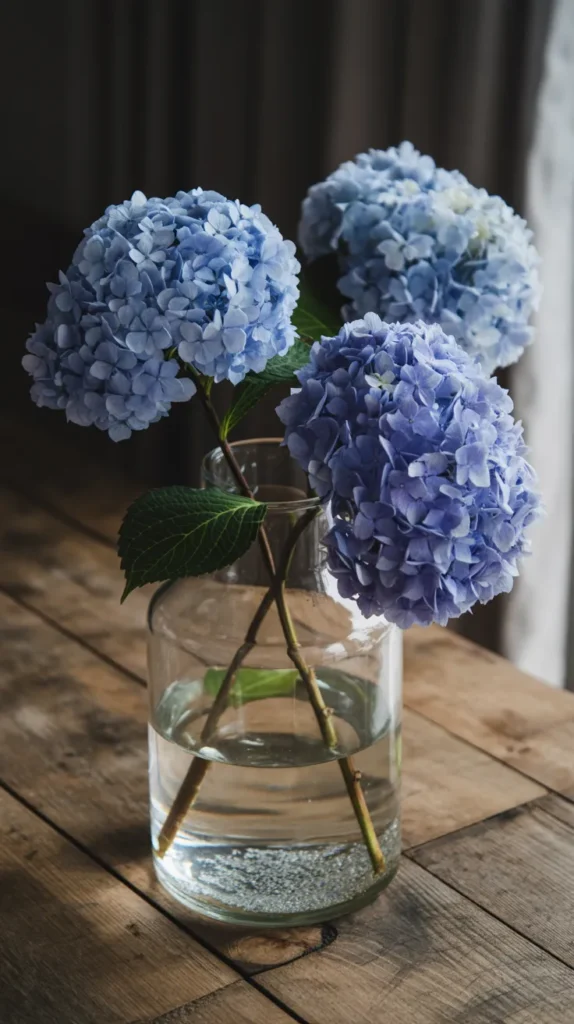
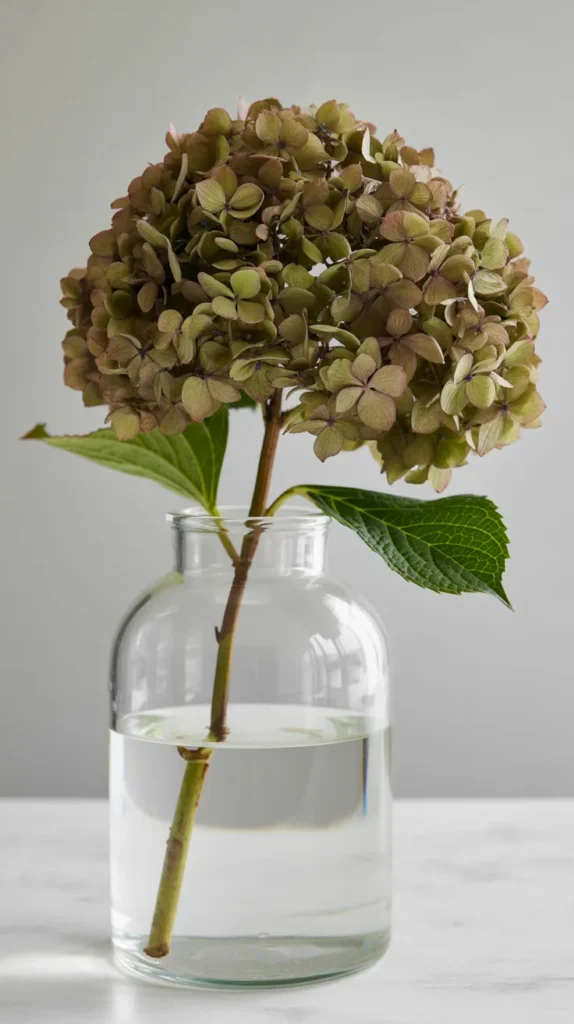
1. The Classic Water-Drying Method
This is the most popular, reliable, and almost foolproof technique for anyone learning how to dry hydrangea flowers.
It sounds counterintuitive—using water to dry something—but this slow and gentle process allows the blooms to dry gradually and gracefully, helping them maintain their shape and beautiful, muted colors.
Pros:
- Incredibly easy and requires minimal effort.
- Excellent preservation of the flower’s shape and volume.
- Results in beautiful, antique-toned blooms perfect for arrangements.
Cons:
- Takes several weeks to complete.
Step-by-Step Instructions:
- Prepare Your Stems: Once you’ve harvested your mature hydrangeas, strip all the leaves from the stems. The leaves hold a lot of moisture and will only rot in the water, so removing them is a crucial step.
- Arrange in a Vase: Find a sturdy vase and place your hydrangea stems inside.
- Add a Little Water: Fill the vase with just one to two inches of fresh water. You only want enough water to cover the very bottom of the stems.
- Find the Right Spot: Place the vase in a location that is out of direct sunlight and away from drafts or high humidity. A corner of your dining room, a bookshelf, or a side table is perfect.
- Forget About Them: This is the best part. Do not refill the water. Simply leave the hydrangeas alone. The flowers will slowly drink the initial water, and as it evaporates, they will begin their transition from fresh to dry.
- Check for Dryness: After 2 to 4 weeks, the petals should feel completely dry and papery to the touch. The stems will be stiff, and the vase will be empty. Your hydrangeas are now perfectly preserved.
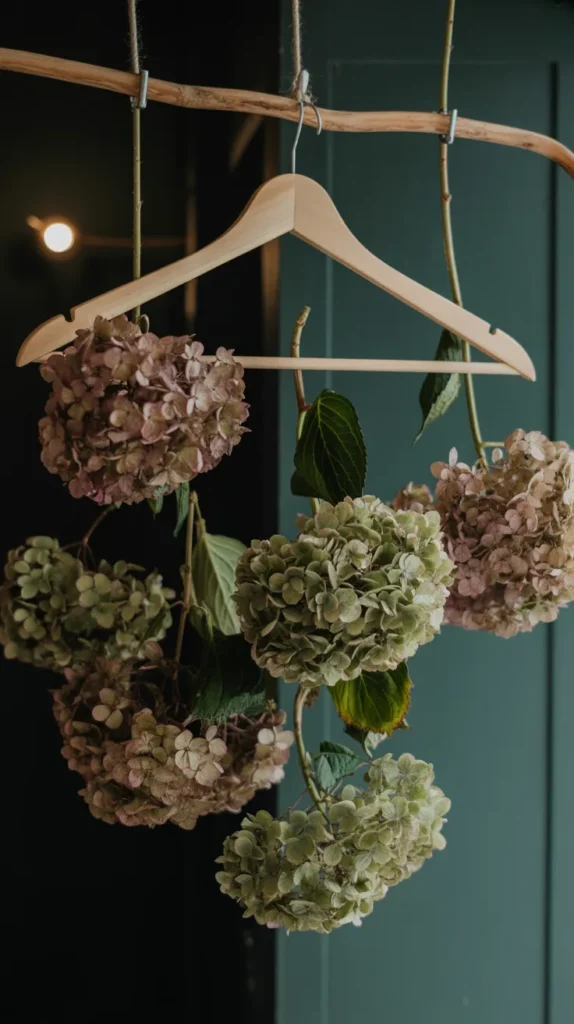
2. The Simple Air-Drying Method
This is the classic technique used for drying many types of flowers, and it works well for hydrangeas too, especially if you have many blooms to preserve. It involves hanging the flowers upside down in a dark, dry space.
Pros:
- Completely free and easy to do.
- Great for drying a large number of stems at once.
- Ensures the stems dry perfectly straight.
Cons:
- Requires a dedicated dark, dry space.
- The flower heads can sometimes flatten or shrink more than with the water-drying method.
Step-by-Step Instructions:
- Prep the Stems: Just as with the water method, strip all the leaves from your hydrangea stems.
- Hang Individually: Unlike smaller flowers, it’s best to hang hydrangeas individually rather than in large bundles. Their dense heads need maximum air circulation to prevent mold from forming in the center.
- Secure and Hang: Use a clothespin or tie a piece of twine around the end of each stem. Hang them upside down from a clothes hanger, a drying rack, or a rod.
- Find a Dark, Dry Spot: The location is key. A dark closet, a dry basement, an attic, or a pantry will work well. Darkness helps the blooms retain more of their beautiful, muted color.
- Wait Patiently: Leave the hydrangeas to hang for 2 to 3 weeks. They are ready when the petals are crisp and the stems are rigid.
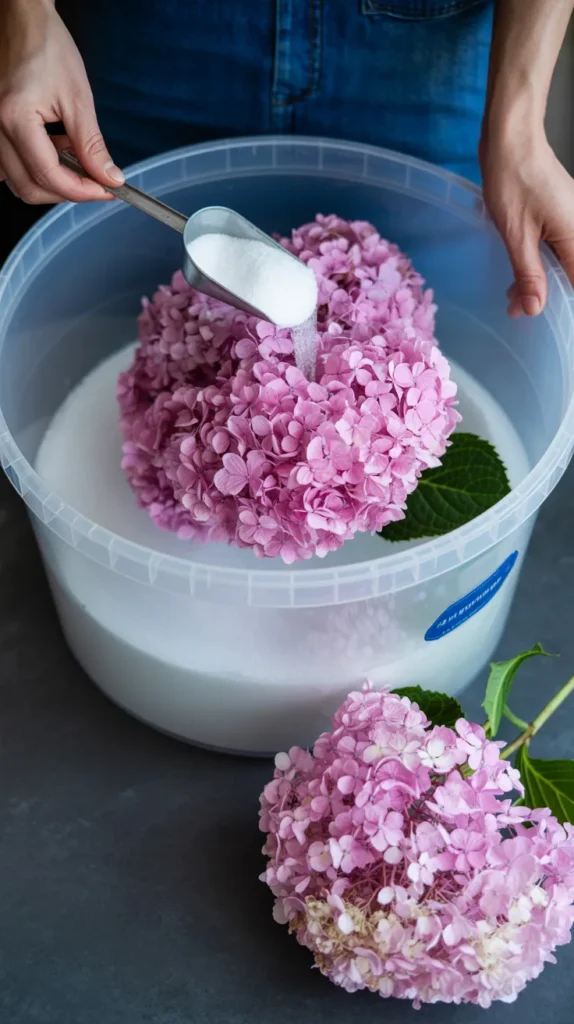
3. The Superior Silica Gel Method
If your goal is to preserve the hydrangea’s color with as much vibrancy as possible and maintain its full, rounded shape, silica gel is the ultimate tool.
This method uses a desiccant (a drying agent) to rapidly pull moisture from the petals, locking in their form and color with stunningly realistic results.
Pros:
- The best method for preserving color.
- Maintains the flower’s 3D shape almost perfectly.
- Relatively fast, taking days instead of weeks.
Cons:
- Requires purchasing silica gel, which can be an investment.
- The process is more hands-on and can be messy.
- Only practical for drying the flower heads, not long stems.
Step-by-Step Instructions:
- Gather Supplies: You’ll need a large, airtight container and a generous amount of flower-drying silica gel. For flowers as large and delicate as hydrangeas, a fine-grained product is essential. {Activa Flower Drying Art Silica Gel} is a fantastic choice because its fine texture won’t damage the delicate petals, and it has color-indicating crystals that turn from blue to pink when the gel is saturated and needs to be “recharged” in the oven.
- Prepare the Container: Pour a 2-inch layer of silica gel into the bottom of your container.
- Place the Flower: Cut the hydrangea head from the stem, leaving just an inch or two attached. Place the flower head face-up on the bed of silica gel.
- Gently Bury the Flower: This is the most critical step. Using a small cup or spoon, carefully pour more silica gel around and over the hydrangea. Make sure to get the crystals in between all the tiny florets and petals. Continue until the entire flower head is completely submerged.
- Seal and Wait: Seal the container tightly and place it in a cool, dark place. A large hydrangea head can take 4 to 7 days to dry completely.
- The Reveal: Gently pour out the silica gel to reveal your beautifully preserved bloom. Use a very soft, fine-bristled brush, like a makeup brush or a delicate {AIT Art Select Paintbrush}, to carefully dust away any remaining crystals from the petals.
4. Glycerin Preservation for Supple Blooms
This unique method doesn’t “dry” the hydrangeas in the traditional sense. Instead, it preserves them by having the stems draw up a glycerin solution, which replaces the water in the plant’s cells. This results in soft, supple, and pliable petals that won’t become brittle.
Pros:
- Keeps petals and stems soft and flexible indefinitely.
- Creates very long-lasting, durable results.
- The blooms will not crumble or shatter.
Cons:
- Significantly changes the color of the blooms, often turning them a deep, rich bronze, burgundy, or golden-brown.
- The process can be slow and sometimes unpredictable.
Step-by-Step Instructions:
- Prepare the Stems: Use fresh, mature hydrangeas for this method. Re-cut the stems at an angle and gently smash the bottom inch with a hammer. This helps the stems absorb the solution more effectively.
- Create the Solution: In a sturdy jar or vase, mix one part vegetable glycerin with two parts very hot water. Stir until the glycerin is fully dissolved. A pure, high-quality product like {NOW Solutions Vegetable Glycerine} is readily available and works perfectly for this preservation process.
- Place and Wait: Place your prepared hydrangea stems in the warm solution, ensuring the bottom 2-3 inches of the stems are submerged.
- Observe the Transformation: Let the stems sit in a cool, dark place for 2 to 4 weeks. You may need to top up the solution. You’ll know the process is complete when the petals feel soft and slightly oily to the touch and have taken on a new, deep, burnished color.
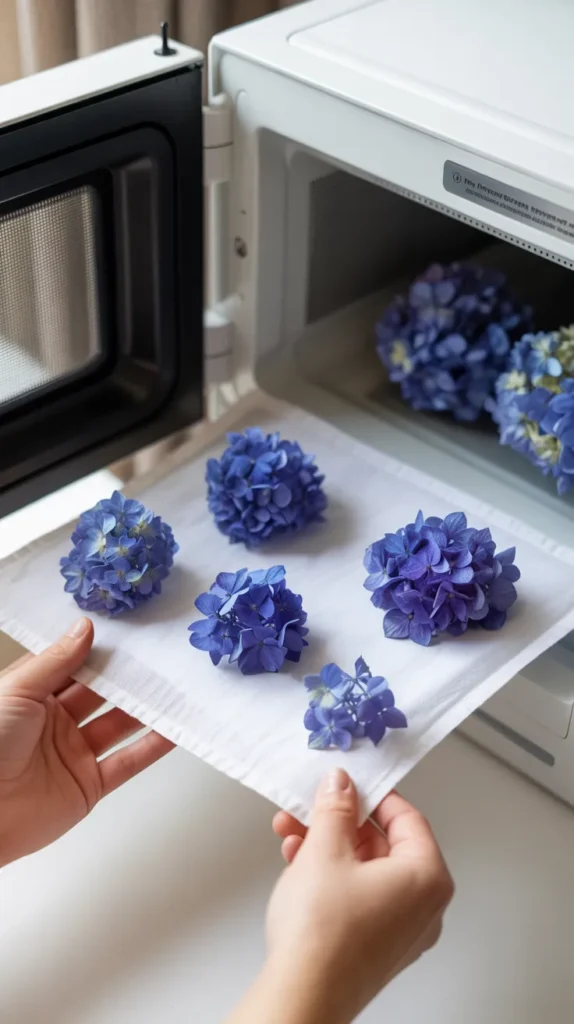
5. The Quick Microwave-Pressing Method
While you can’t dry a whole hydrangea head in a microwave, you can use it to perfectly press individual florets or petals.
This is a fantastic technique if you want to use the delicate petals for crafts like card-making, scrapbooking, or resin art.
Pros:
- Incredibly fast—you get results in minutes, not weeks.
- Excellent color retention, often superior to traditional pressing.
Cons:
- Only works for pressing individual, flat petals, not the whole flower head.
- Requires a special microwave flower press.
Step-by-Step Instructions:
- Get a Microwave Press: A dedicated press is essential for good results. The {Microfleur Max Microwave Flower Press} is a popular choice, designed with vented plates that allow moisture to escape, which is key to preserving color.
- Arrange the Petals: Carefully pluck individual florets from the hydrangea head. Arrange them in a single layer on the cotton liner of the press, making sure they don’t overlap.
- Microwave in Short Bursts: Place the press in your microwave. Heat on a medium-low setting for 20-30 seconds. After the first burst, open the press to vent the steam and let it cool for a minute.
- Repeat and Check: Repeat the process of short heating bursts followed by venting until the petals feel completely dry and papery.
6. The Food Dehydrator Method
A food dehydrator offers a controlled environment with low heat and constant airflow, making it a good option for drying hydrangea heads more quickly than air-drying.
Pros:
- Much faster than air-drying (hours instead of weeks).
- The controlled temperature prevents “cooking” the flowers.
Cons:
- Requires owning a food dehydrator.
- Can cause some flattening of the flower heads compared to the water-drying method.
Step-by-Step Instructions:
- Prepare the Flowers: Cut the hydrangea heads from their stems.
- Arrange on Trays: Place the flower heads face-up on the dehydrator trays. Leave as much space as possible between them for air to circulate freely. You may need to run the dehydrator with only a few trays to accommodate the large heads.
- Set the Temperature: Set your dehydrator to its lowest possible temperature, usually around 95-115°F (35-46°C). High heat will ruin the color.
- Dry and Check: Let the flowers dry for several hours (this could take anywhere from 6 to 18 hours, depending on the size and density of the bloom). Check on them periodically until the petals feel crisp and completely dry to the touch.

7. Letting Them Dry on the Bush
This is the ultimate hands-off technique for anyone wanting to learn how to dry hydrangea flowers. Nature does all the work for you! In the right climate, you can simply leave the blooms on the plant and let them dry naturally through the fall.
Pros:
- Requires absolutely zero effort.
- Results in beautifully muted, antique colors.
Cons:
- Only works in climates with dry, sunny autumns. Rain and frost will ruin the blooms.
- The colors will be more faded and browned than with other methods.
Step-by-Step Instructions:
- Do Nothing: As autumn approaches, simply leave the mature hydrangea heads on the bush.
- Let Nature Take Over: The combination of shorter days, cooler nights, and dry weather will naturally dry the flowers.
- Harvest When Ready: In late fall, before the first heavy frost or rainy season begins, check the blooms. If the petals feel papery and dry, you can cut the stems and bring them inside. They are already perfectly preserved and ready for display.

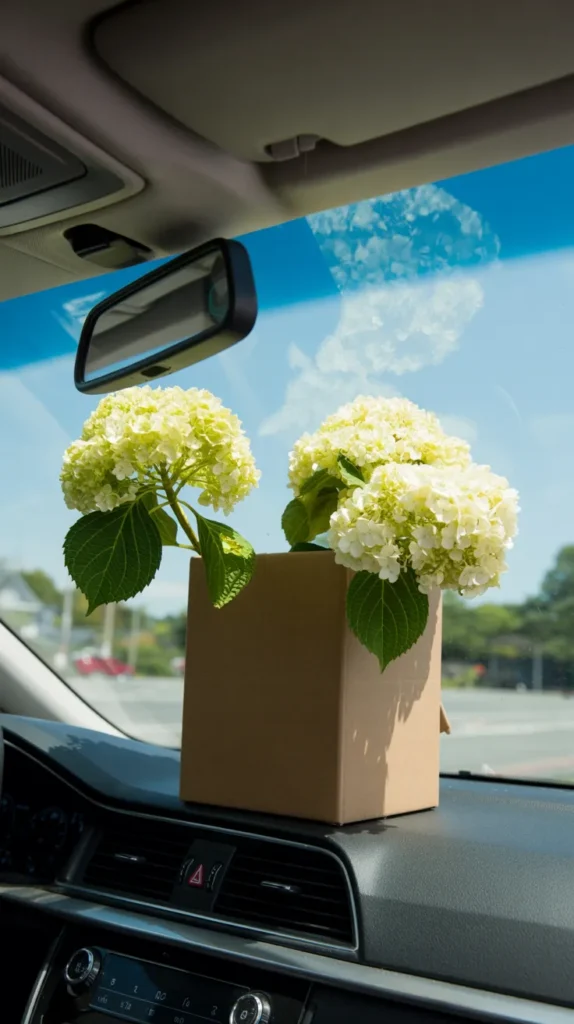
8. The “Car Dehydrator” Method
If you live in a hot, sunny climate, you can use your car as a passive solar dehydrator to speed up the drying process. The intense, trapped heat creates an ideal environment for drying flowers.
Pros:
- Uses free solar energy and is faster than air-drying.
- Can result in good color retention.
Cons:
- Only works in specific climates and on hot, sunny days.
- You can only dry a few heads at a time, depending on your car’s space.
Step-by-Step Instructions:
- Prepare Your Blooms: Lay your freshly cut, mature hydrangea heads on a baking sheet or in a shallow cardboard box.
- Park in the Sun: Park your car in direct, intense sunlight. Place the box on the dashboard, a seat, or in the back window area.
- Trap the Heat: Roll up the windows to trap the heat inside. The interior temperature can get very high, which is perfect for drying.
- Wait and Check: Leave the hydrangeas in the hot car for one to two full days. They should be crisp and dry when you take them out.
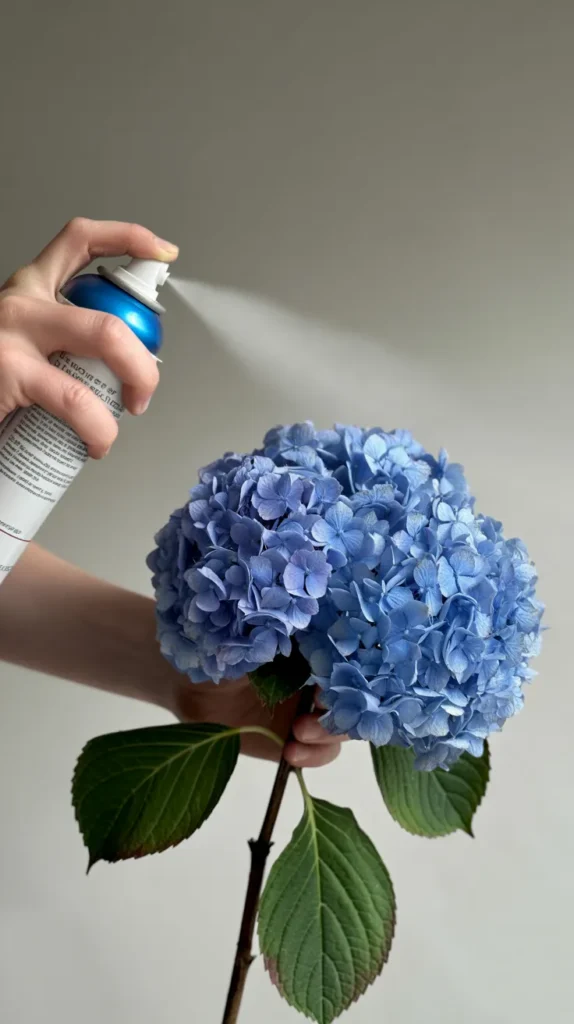
9. Creating a Protective Hairspray Seal
This isn’t a drying method itself, but a crucial final step for many of these techniques. Once your hydrangeas are dry, their petals can be delicate and prone to shattering. A light sealant helps to protect them and make them more durable.
Step-by-Step Instructions:
- Ensure They Are Dry: This step should only be done once the hydrangeas are completely and totally dry.
- Choose Your Sealant: A simple, inexpensive, extra-strong-hold aerosol hairspray works well. For a more professional, non-sticky finish, an artist’s fixative or a craft sealer like {Aleene’s Spray Acrylic Sealer} in a matte finish is an excellent choice.
- Spray Lightly: Hold the can about 12 inches away from the dried flower head.
- Apply a Fine Mist: Give the bloom a light, even coating. Don’t oversaturate it. It’s better to apply two very light coats than one heavy one. Let the first coat dry completely before applying a second. This will add a layer of protection, making the blooms less fragile and easier to work with in arrangements.
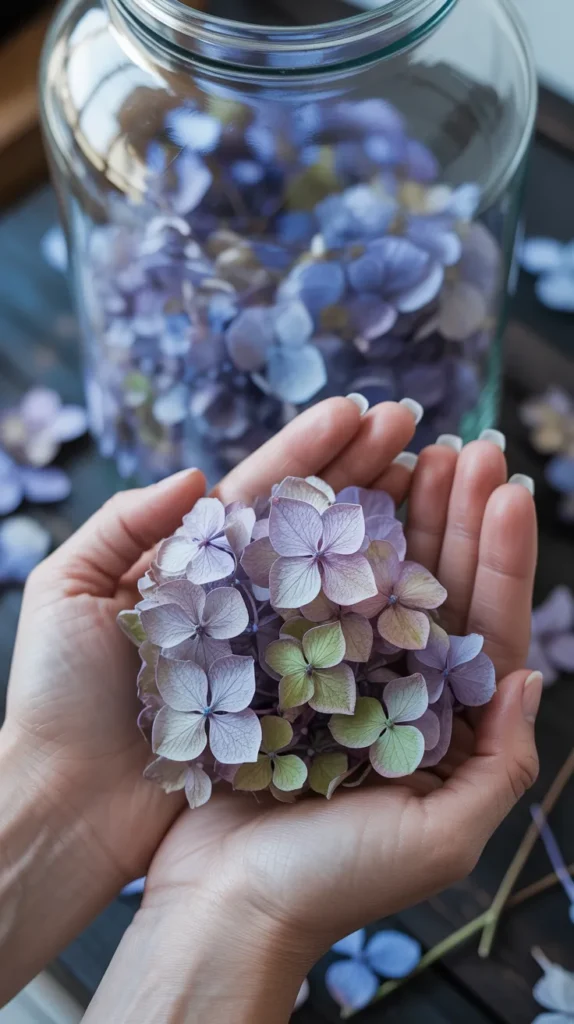
10. Using Leftover Petals for Confetti
As you handle your dried hydrangea heads, some of the individual florets will inevitably fall off. Don’t throw them away! These tiny, papery petals make the most beautiful, natural confetti.
How to Use Them:
- Wedding Toss: Provide cones of the petals for guests to toss as a bride and groom exit. It’s beautiful and biodegradable.
- Table Scatter: Sprinkle them down the center of a dining table for a romantic, decorative touch.
- Packaging Filler: Use them as a beautiful, fragrant filler when packaging a gift.
Storage Tip:
Keep your collected petals in a beautiful container. A clear glass jar with a lid not only keeps them safe but also doubles as decor.
A set of elegant {Bormioli Rocco Fido Square Jars with Clamp Lids} is perfect for storing and displaying your homemade confetti.
Your Hydrangea Drying Toolkit
To achieve the best and most beautiful results, having a few key supplies on hand can make all the difference. Here is a summary of the helpful products mentioned in this guide.
| Product Name | Brand | Best Use |
|---|---|---|
| Flower Drying Art Silica Gel | Activa | The gold standard for preserving the 3D shape and vibrant color of hydrangea blooms. |
| Select Paintbrush Set | AIT Art | The soft, fine bristles are perfect for gently cleaning silica gel crystals off delicate petals. |
| Vegetable Glycerine | NOW Solutions | Essential for the glycerin preservation method, which keeps petals soft and supple. |
| Max Microwave Flower Press | Microfleur | The best tool for quickly pressing individual hydrangea florets for craft projects. |
| Spray Acrylic Sealer | Aleene’s | Provides a professional, non-sticky seal to protect dried blooms from shattering. |
| Fido Square Jars with Clamp Lids | Bormioli Rocco | An elegant and airtight way to store and display your homemade hydrangea petal confetti. |
Conclusion: Fill Your Home with Everlasting Blooms
Learning how to dry hydrangea flowers is a simple joy that allows you to extend the life of your favorite garden beauties. Whether you choose the slow, meditative water-drying method or the fast, vibrant results of silica gel, you are creating a piece of sustainable, natural art for your home.
Don’t be afraid to experiment. Try drying blooms at slightly different stages of maturity to see the range of beautiful, antique colors you can achieve. The process is forgiving, and the results are always stunning.
So, next time you admire your hydrangea bush in the late summer sun, you’ll know exactly how to capture that moment forever. Which of these stunning methods will you try first? Happy drying