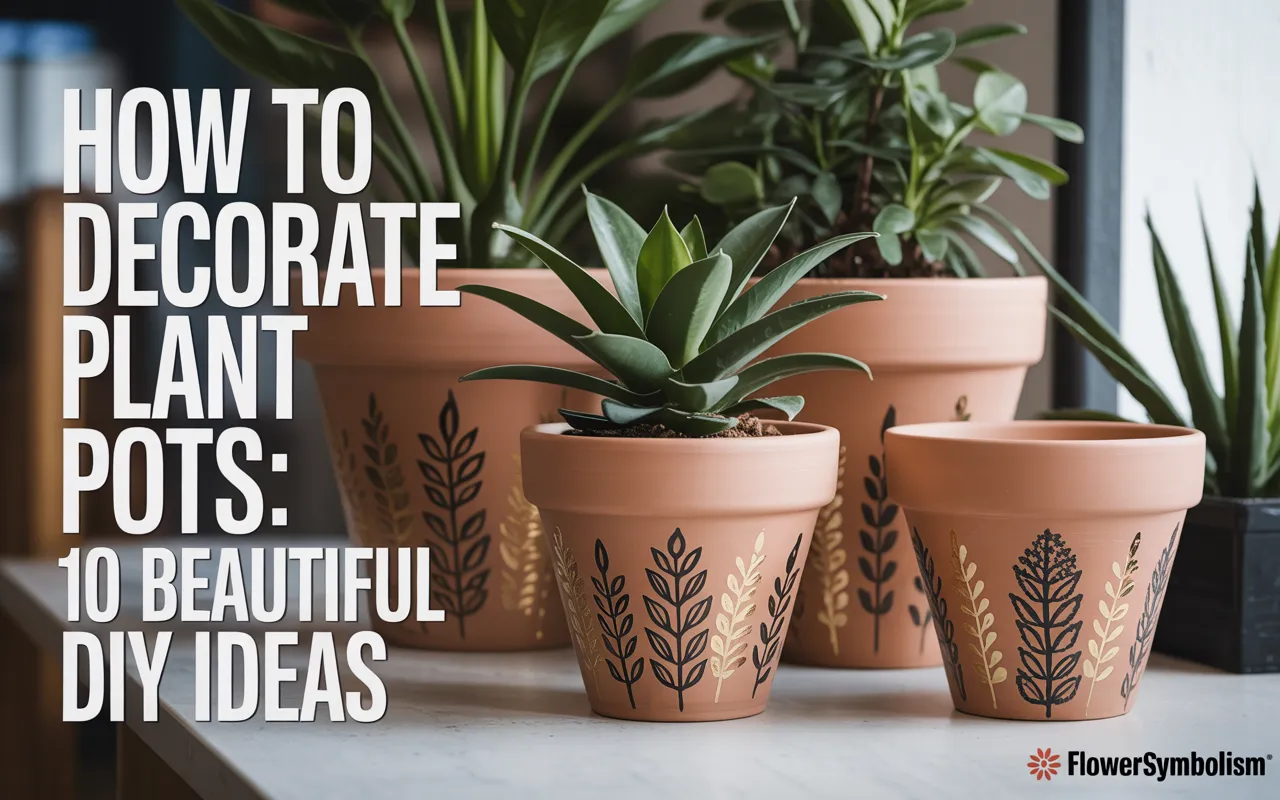
Your houseplants are like living works of art, so why not give them a frame that’s just as beautiful? While a plain pot does the job, a decorated one adds a pop of personality to your home. This guide is all about how to decorate plant pots, with 10 fun and easy DIY ideas that will transform your boring containers into stunning statement pieces.
You don’t need to be a professional artist or have a giant budget to give your plant pots a makeover. Many of these projects use simple craft supplies and can be completed in an afternoon. Let’s get creative and give your green friends the stylish homes they deserve!
Why Decorate Your Own Plant Pots?
Taking the time to decorate a plant pot is about more than just making something pretty. It’s a rewarding process with lots of benefits.
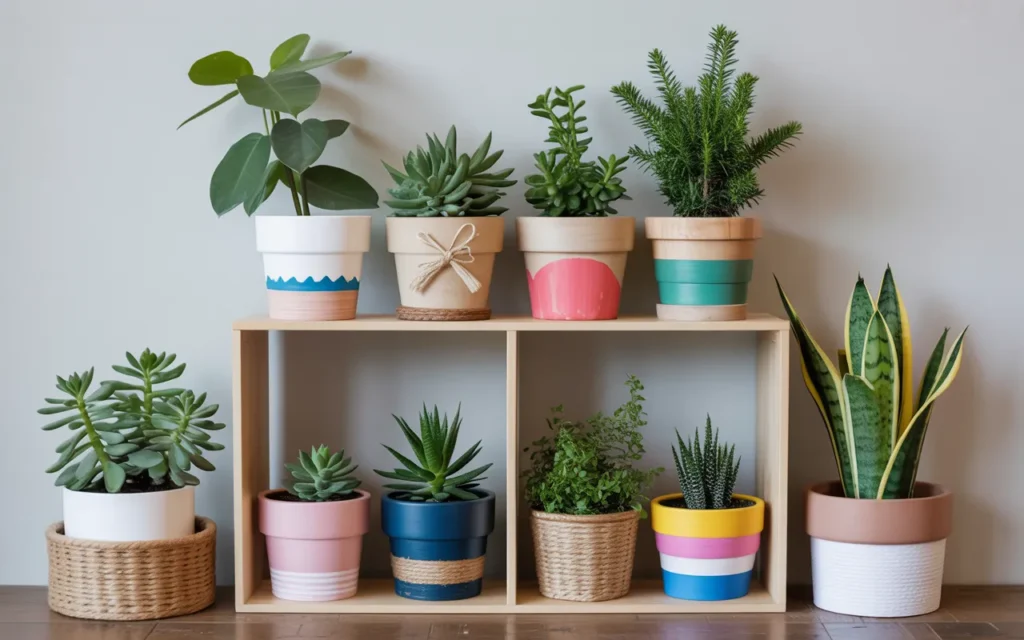
- Express Your Unique Style: You can create a pot that perfectly matches your home’s color scheme and decor, from minimalist and modern to bohemian and colorful.
- Save Money: Designer pots can be very expensive. With a little paint and creativity, you can make a cheap terracotta or plastic pot look like a high-end boutique item for a fraction of the cost.
- A Relaxing, Creative Outlet: Working with your hands and focusing on a creative project is a wonderful way to de-stress and unwind.
- Perfect for Gifting: A beautifully decorated pot with a plant inside makes a thoughtful and personal handmade gift for any occasion.
- Upcycle and Refresh: You can give old, faded, or ugly pots a brand-new life instead of throwing them away.
You’ve jazzed up your pots — now make your garden even more amazing:
- Check how to pot a plant the right way so your decoration lasts. How to pot a plant
- After decors, you may want to grow monstera plant for bold foliage. How to grow monstera plant tips
- Once the pot is perfect, you might learn replant aloe vera plant when it outgrows its space. How to replant aloe vera plant
- To add color, here’s how to plant flower seeds in your softened pots. How to plant flower seeds
- Want to mix utility with beauty? Try plant herbs in pots with decorative containers. How to plant herbs in pots
The Golden Rules Before You Start
Before you jump into a project, there are two very important things to keep in mind for the health of your plant.
- Drainage is Non-Negotiable: Make sure any pot you decorate has a drainage hole at the bottom. If it doesn’t, drill one. Plants need drainage to prevent root rot.
- Seal Your Work: For most projects, especially those involving paint on porous terracotta, sealing your pot inside and out is crucial. This protects your beautiful design from water damage and bubbling.
How to Decorate Plant Pots: 10 Fun and Easy Ideas
Here are ten creative projects for every skill level. We’ll break down the materials you’ll need and the simple steps to get it done.
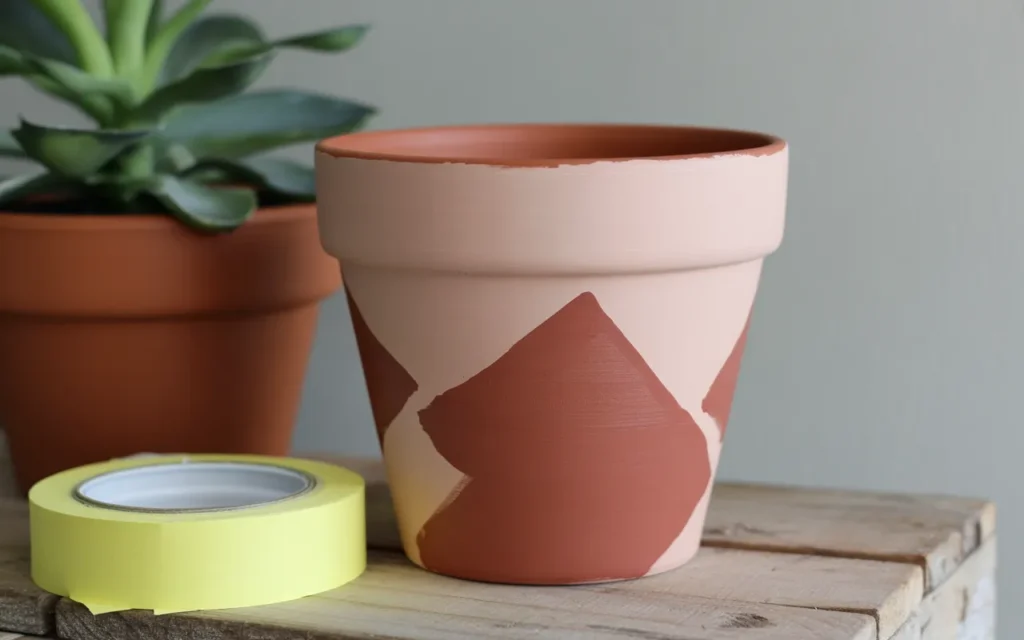
Idea 1: Classic Painted Terracotta
This is the most popular and versatile method. A little paint can completely transform a basic terracotta pot.
Materials:
- Terracotta pots
- Acrylic craft paint
- Paintbrushes (various sizes)
- Painter’s tape for clean lines
- Clear waterproof sealant (spray or brush-on)
Instructions:
- Clean and Prep: Make sure your pot is clean and dry.
- Seal the Inside (CRUCIAL): Terracotta is very porous. To prevent water from seeping through and ruining your paint job, apply two coats of a waterproof sealant to the entire inside of the pot. Let it dry completely.
- Paint Your Design: Now for the fun part! Use painter’s tape to create crisp geometric patterns, or paint freehand. You can do stripes, polka dots, abstract shapes, or even cute faces. You may need 2-3 coats of paint for opaque coverage.
- Seal the Outside: Once your design is totally dry, apply two coats of clear sealant over the entire outside of the pot. This will protect your art from water, dirt, and chipping.
Idea 2: The Gold-Dipped Look
This is a super simple way to make any pot look instantly chic and expensive.
Materials:
- A ceramic or plastic pot (any color)
- Gold spray paint (or any metallic color you like)
- Painter’s tape
- Clear sealant spray
Instructions:
- Tape It Off: Decide how high you want the “dipped” section to be. Carefully apply a straight line of painter’s tape around the pot. Press the edges down firmly to prevent paint from bleeding underneath.
- Cover the Top: Use newspaper or plastic bags to completely cover the part of the pot you don’t want to be painted.
- Spray Paint: In a well-ventilated area, apply 2-3 light, even coats of gold spray paint to the exposed bottom section of the pot. Let it dry between coats.
- The Reveal: Once the paint is completely dry, carefully peel off the painter’s tape to reveal your crisp, clean line.
- Seal: Apply a coat of clear sealant to protect the metallic finish.
Let your decorative pots become homes for living things — here are some ideas:
• Take care of monstera plant in your decorative pots for a lush indoor vibe. How to take care of a monstera plant
• If your decor hides the rim, know how to repot a monstera plant properly. How to repot a monstera plant
• Want propagation action? Learn propagate snake plant in water as an alternative plant. How to propagate snake plant in water
• Use decorative pots for edibles too — like plant tomatoes from seeds even in small planters. How to plant tomatoes from seeds
• For fragrance and herbs near your decorated pots, see take care of rosemary plant. How to take care of rosemary plant
Idea 3: Rustic Rope-Wrapped Pot
Add a touch of bohemian or coastal charm with this incredibly easy, textured look. This is perfect for covering up a less-than-beautiful plastic pot.
Materials:
- A pot to cover (plastic, old ceramic, etc.)
- Thick rope (jute, sisal, or cotton rope)
- A hot glue gun and plenty of glue sticks [Amazon Product: High-Temp Hot Glue Gun with Glue Sticks]
- Scissors
Instructions:
- Start at the Bottom: Apply a line of hot glue to the bottom edge of the pot. Press the end of your rope firmly into the glue.
- Wrap It Up: Work in small sections. Apply a line of glue, then immediately press the rope into it, keeping the coils tight against each other with no gaps.
- Continue to the Top: Keep going in a spiral until you reach the top rim of the pot.
- Secure the End: Cut the rope and apply a final dab of hot glue to secure the end neatly. This project is so fast and satisfying!
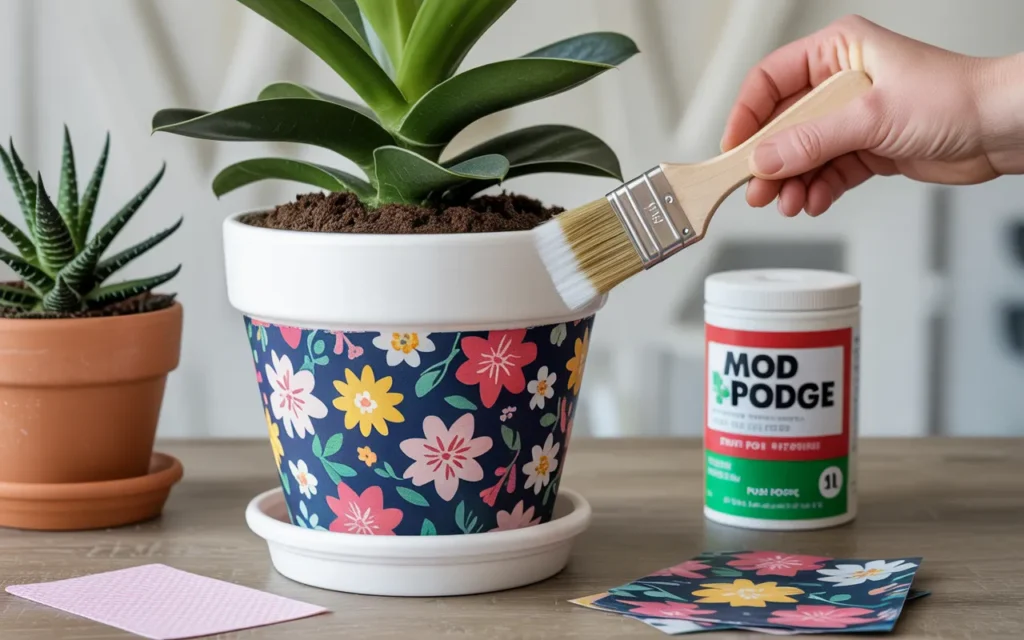
Idea 4: Fun Fabric Decoupage
Use beautiful fabric scraps to give a pot a vibrant, patterned look. Decoupage is easier than it sounds!
Materials:
- A pot (terracotta or plastic works well)
- Fabric scraps with a pattern you love
- Mod Podge (a special glue, sealer, and finish) [Amazon Product: Mod Podge Waterbase Sealer, Glue and Finish]
- A foam brush or paintbrush
- Scissors
Instructions:
- Prep the Pot: Paint your pot a solid color that coordinates with your fabric. This is important in case any tiny gaps show through. Let it dry.
- Cut Your Fabric: Cut your fabric into strips or patches that are easy to work with.
- Apply Mod Podge: Use your foam brush to apply a medium layer of Mod Podge to a section of the pot.
- Apply the Fabric: Press a piece of fabric onto the glued area, smoothing it out with your fingers to remove any wrinkles or air bubbles.
- Repeat: Continue this process, slightly overlapping the fabric pieces, until the entire pot is covered.
- Seal It: Once the pot is covered, apply two more coats of Mod Podge over the entire outside of the fabric-covered pot, letting it dry between coats. This seals and protects the fabric, making it water-resistant.
Idea 5: Elegant Gold Leaf Accents
Gold leaf adds a touch of true luxury and glamour. It looks difficult, but it’s a surprisingly forgiving process.
Materials:
- A pot with a smooth surface
- Imitation gold leaf sheets
- Metal leaf adhesive size (a special glue for gold leaf)
- A soft, small paintbrush
- A larger, soft, fluffy brush (for burnishing)
- Clear sealant
Instructions:
- Paint the Pot: Paint your pot a base color. Black, white, or a deep jewel tone looks amazing with gold. Let it dry completely.
- Apply Adhesive: Use the small paintbrush to apply a thin layer of the adhesive “size” where you want the gold leaf to stick. You can paint random, abstract splotches or a specific design.
- Wait for it to Get Tacky: Follow the instructions on the adhesive. You need to wait about 15-30 minutes until the glue is clear and tacky, not wet.
- Apply the Gold Leaf: Gently lay a sheet of gold leaf over the tacky area. Use your fingers to press it down lightly. Don’t worry if it cracks or breaks.
- Burnish and Brush: Use the large, fluffy brush to gently rub over the gold leaf. The excess that isn’t stuck to the glue will brush away, leaving behind your gilded design.
- Seal: You must seal the gold leaf to prevent it from tarnishing. Apply a coat of clear sealant.
Decorated pots can host many kinds of plants. Here are some creative suggestions to make the most of them:
- Use them to plant mint in pot for a decorative and edible touch.
- Or bring in greenery with grow curry leaves plant in stylish containers for a refreshing indoor vibe.
- Add seasonal charm by planting marigold seeds to fill your home with color.
- Grow something crunchy — try planting cucumbers in a pot for easy balcony gardening.
- And for a cheerful burst of sunshine, plant sunflowers even in medium-sized decorative pots.
Idea 6: Sharpie & Paint Pen Doodles
You don’t need paintbrushes to be an artist. If you can doodle with a pen, you can decorate a pot.
Materials:
- A light-colored pot with a smooth surface (glazed ceramic or painted terracotta)
- Oil-based paint pens or permanent markers (like Sharpies)
- Clear sealant spray
Instructions:
- Start with a Clean Surface: Make sure your pot is clean and fully dry. If you’re painting a terracotta pot first, make sure you seal it before drawing.
- Doodle Away: Let your imagination run wild! Draw geometric patterns, mandalas, abstract lines, flowers, or write inspirational words.
- Let It Dry: Give the ink plenty of time to dry and set, at least 24 hours.
- Seal to Protect: It is very important to seal your design with a clear spray sealant. This will make your drawing permanent and prevent it from smudging or washing off when you water the plant.
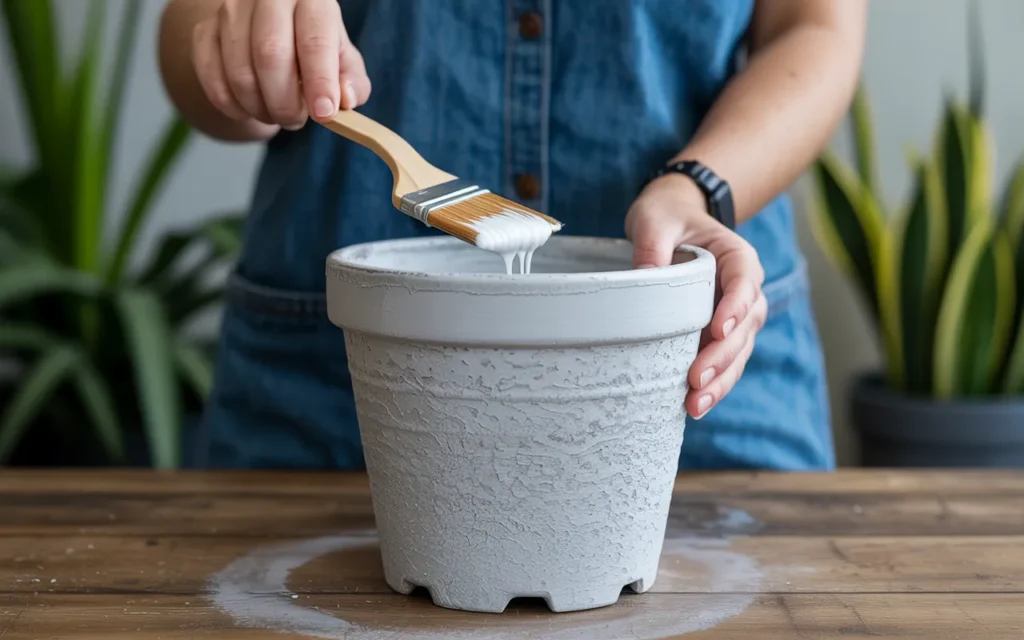
Idea 7: Textured Paint Effect
Create an aged, stone-like, or “artisan pottery” look using a simple trick with paint and baking soda.
Materials:
- A pot of any kind (this is great for cheap plastic pots)
- Acrylic craft paint
- Baking soda
- A paintbrush
- A disposable cup for mixing
Instructions:
- Mix Your Paint: In your cup, mix about 2 parts paint to 1 part baking soda. Stir until it’s fully combined. It will become a thick, mousse-like, gritty paste.
- Apply with Texture: Use your paintbrush to dab and stipple the paint mixture all over the pot. Don’t try to paint smooth strokes. The goal is to create a thick, uneven, textured finish.
- Build It Up: Apply one or two coats, letting it dry in between, until you achieve the look you want. You can even use different colors for a layered effect.
- Seal (Optional but Recommended): While this finish is quite durable, a coat of clear matte sealant can give it extra protection.
Idea 8: Chalkboard Paint Pot
This idea is fun and functional, especially for an herb garden.
Materials:
- A pot with a smooth surface
- Chalkboard paint (spray or brush-on)
- Chalk or a chalk marker
Instructions:
- Apply Chalkboard Paint: Following the directions on the can, apply 2-3 coats of chalkboard paint to your pot, letting it dry completely between coats.
- Condition the Surface: Before you write on it for the first time, you need to “condition” the chalkboard surface. Take a piece of chalk, lay it on its side, and rub it over the entire painted area. Then, erase it with a dry cloth.
- Label Your Plant: Now you can use chalk to write the name of the plant. The best part? You can erase it and change it anytime!
Idea 9: Mosaic with Broken China or Tiles
Turn a broken plate or mug into something beautiful. This project is a bit more involved but creates a stunning, one-of-a-kind piece.
Materials:
- Broken ceramic pieces, sea glass, or small mosaic tiles
- A sturdy pot (terracotta is great)
- Tile adhesive or a very strong craft glue
- Pre-mixed grout
- A sponge and gloves
Instructions:
- Break Your Pieces (Safely!): If using a plate, place it inside a thick towel or canvas bag and carefully tap it with a hammer to break it into small, usable pieces. Always wear safety glasses for this step.
- Glue the Pieces: Apply a dab of tile adhesive to the back of a mosaic piece and press it onto the pot. Continue this process, leaving a small, consistent gap (about ⅛ inch) between each piece. Let the glue dry completely (24 hours).
- Apply the Grout: Put on your gloves. Scoop up the grout and smear it all over the pot, pushing it into all the cracks between your mosaic pieces.
- Clean It Up: After about 15-20 minutes, use a damp sponge to gently wipe the excess grout off the surface of the tiles. Be careful not to pull the grout out from between the cracks.
- Cure and Seal: Let the grout cure for the time recommended on the package. You can then apply a grout sealant for extra protection.
Idea 10: Natural Twig-Covered Pot
Bring the outdoors in with this wonderfully rustic and natural look.
Materials:
- A straight-sided pot or can
- A collection of twigs, all cut to the same height as your pot
- A hot glue gun or strong construction adhesive
- Twine or ribbon
Instructions:
- Gather and Cut: Go on a nature walk and gather straight, thin twigs. Use pruning shears to cut them all to the same length, matching the height of your pot.
- Glue Them On: Apply a vertical line of hot glue to the pot and press a twig firmly into it.
- Repeat: Continue gluing twigs one by one, side-by-side, until the entire pot is covered.
- Add a Finishing Touch: Tie a piece of jute twine or a rustic ribbon around the center of the pot to complete the look.
Conclusion
Decorating plant pots is a joyful and accessible way to customize your living space and connect with your creative side. As you can see, you don’t need fancy skills to learn how to decorate plant pots—just a little time and imagination.
Whether you choose a simple coat of paint or a more intricate mosaic, you’ll be rewarded with a unique piece of functional art that makes both you and your plant happy.
Frequently Asked Questions (FAQs)
1. What kind of paint do you use to decorate plant pots?
Non-toxic, water-based acrylic craft paint is the best and most popular choice. For a permanent design, especially on terracotta, it’s crucial to seal the pot inside and out with a clear, waterproof sealant.
2. How do you permanently paint terracotta pots?
To make the paint permanent, you must first seal the inside of the pot with a waterproof sealant. After painting your design on the outside, you must then seal the outside with 2-3 coats of a clear waterproof spray or brush-on sealer.
3. Do you need to prime pots before painting?
If you are painting on a slick, non-porous surface like plastic or glazed ceramic, using a spray-on primer first will help the paint adhere much better. For porous terracotta, sealing the inside is more important than priming the outside.
4. How can I decorate my pots without painting?
There are many no-paint options! You can wrap them with rope or twine, cover them in fabric using Mod Podge, glue on natural elements like twigs, or create a mosaic with tiles or broken china.
5. What is the easiest way to decorate a plant pot?
The easiest methods are painting a simple design on a terracotta pot, creating a “gold-dipped” look with spray paint and tape, or wrapping a pot with rope using a hot glue gun. These projects require minimal materials and can be done quickly.
6. Can I use Sharpies on plant pots?
Yes, you can use oil-based paint pens or permanent markers like Sharpies. For the design to be permanent and not wash off, you must let the ink cure for 24 hours and then protect it with a clear spray sealant.
7. How do I get a textured look on a plant pot?
A popular and easy trick is to mix acrylic paint with baking soda (about a 2:1 ratio of paint to baking soda). This creates a thick, gritty paste that you can dab onto the pot to create an aged, stone-like texture.