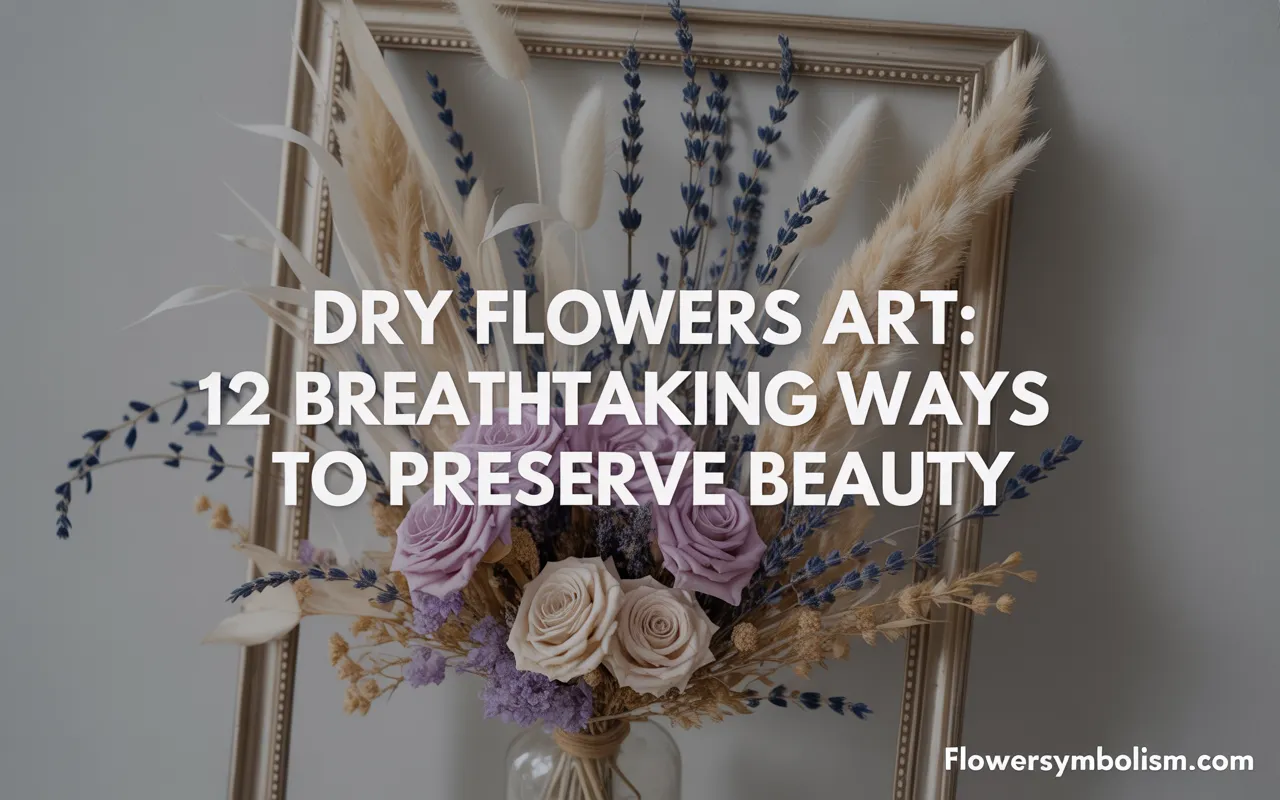
There is something profoundly touching about a flower. It represents a fleeting moment of perfection—a burst of color and life that often fades too quickly.
But what if that moment didn’t have to end? With dry flowers art, you can capture the delicate beauty of nature and transform it into something everlasting.
This isn’t just about saving a bouquet; it’s about reimagining botanicals as a medium for artistic expression.
Creating dry flowers art allows us to slow down and appreciate the intricate details of nature—the curve of a petal, the texture of a leaf, and the subtle shifts in color as blooms dry.
It is a sustainable, creative, and deeply rewarding practice that anyone can start, regardless of artistic experience.
Whether you want to preserve a sentimental wedding bouquet or simply bring a touch of the outdoors into your home, the possibilities are endless.
In this guide, we will explore 12 breathtaking ways to turn dried blooms into masterpieces. From modern resin jewelry to rustic wall hangings, these projects range from simple afternoon crafts to more involved artistic endeavors.
We’ll provide step-by-step instructions, helpful tips, and recommend the best tools to help you succeed. Get ready to unleash your creativity and fill your life with the timeless beauty of dry flowers art.
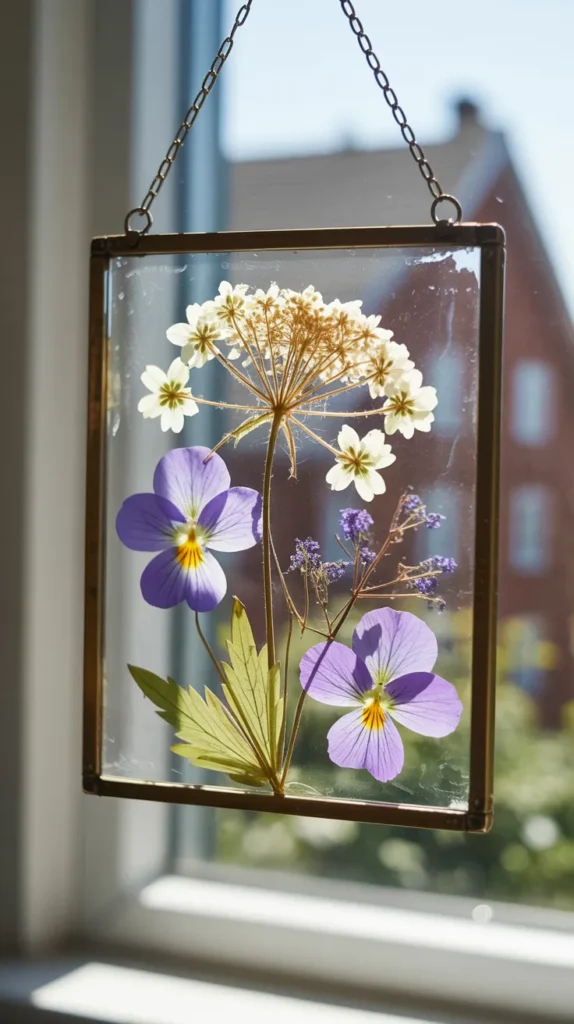
1. The Floating Pressed Flower Frame
One of the most elegant forms of dry flowers art is the floating frame. By sandwiching pressed flowers between two panes of glass, you create the illusion that the botanicals are suspended in mid-air.
This minimalist approach allows the light to shine through the translucent petals, highlighting their delicate veins and structures.
What you’ll need:
- A double-pane floating frame (brass or wood works beautifully)
- Pressed flowers (ferns, pansies, and cosmos work well)
- Tweezers
- Small dots of clear glue (optional)
Step-by-step:
- Prepare your canvas: Clean both sides of the glass panes thoroughly to remove any fingerprints or dust.
- Design your layout: Arrange your pressed flowers on one pane of glass. Play with negative space—sometimes less is more. You can create a symmetrical pattern or a wild, organic meadow scene.
- Secure the blooms: If your flowers are slipping, use a tiny amount of glue. A precision applicator is crucial here. {Bearly Art Precision Craft Glue} is perfect because its ultra-fine metal tip allows you to apply a microscopic dot of glue that won’t squish out and ruin the clean look of the glass.
- Seal the deal: Carefully place the second pane of glass on top and slide it into the frame. Hang it in a window for a stunning stained-glass effect.
2. Resin Floral Coasters
Encasing flowers in resin is a popular way to create functional dry flowers art. These durable, glossy coasters capture the 3D beauty of flowers forever, making them perfect gifts or conversation pieces for your coffee table.
What you’ll need:
- Epoxy resin and hardener
- Silicone coaster molds
- Dried flower heads (roses, strawflowers, or loose petals)
- Gold leaf (optional)
Step-by-Step:
- Dry your flowers first: Fresh flowers will rot in resin. Ensure your blooms are completely dry.
- Mix the resin: Combine your resin and hardener according to the package instructions. Stir slowly to minimize bubbles.
- Pour the base: Pour a thin layer of resin into the mold.
- Arrange the art: Place your dried flowers face down into the wet resin. Add flecks of gold leaf for a touch of luxury.
- Fill and cure: Pour the remaining resin over the flowers until the mold is full. Use a lighter or heat gun to pop surface bubbles. To ensure a crystal-clear, non-yellowing finish that protects your art, use a high-quality resin like {ArtResin Epoxy Resin}. It is formulated to resist UV damage, keeping your floral coasters bright and beautiful for years.
- Demold: After 24-48 hours, pop your coasters out of the molds and enjoy your functional art.

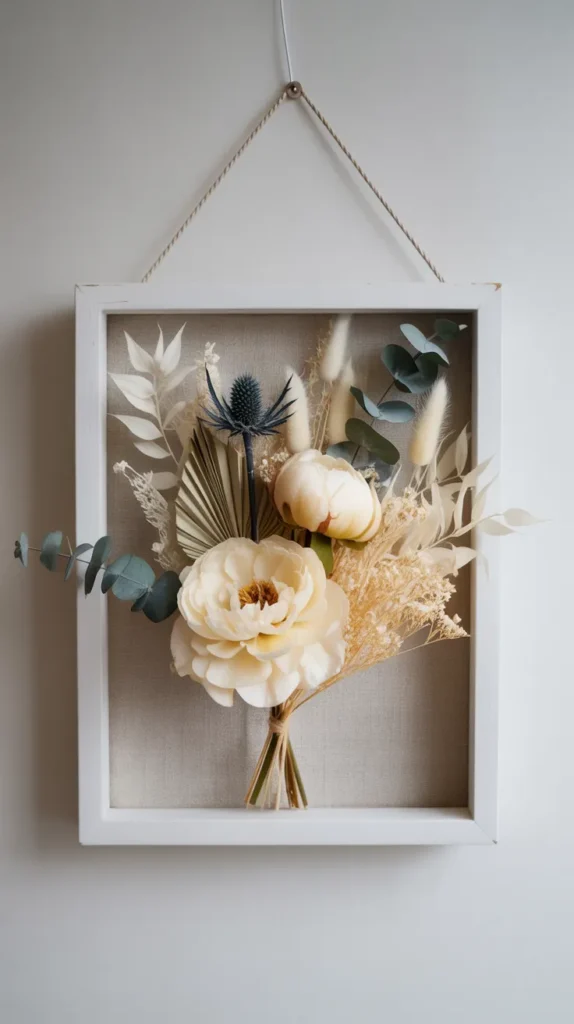
3. Botanical Shadow Boxes
A shadow box allows you to create a multi-dimensional dry flowers art display. Unlike pressed frames, shadow boxes have depth, meaning you can preserve the full, voluminous shape of roses, peonies, or dried seed pods. It’s essentially a 3D collage of nature.
What you’ll need:
- A shadow box frame
- Silica-dried flowers (for 3D shape)
- Hot glue gun
- Pearl-headed pins (optional)
Step-by-Step:
- Preserve the shape: To keep flowers looking lifelike, dry them in silica gel rather than air drying. {Activa Flower Drying Art Silica Gel} is the industry standard for this. Its fine granules surround the petals, drawing out moisture rapidly to preserve the flower’s original shape and vibrant color without shrinking or wrinkling.
- Plan the background: Line the back of the shadow box with linen fabric or vintage paper for a textured backdrop.
- Compose your scene: Arrange your silica-dried flowers. You can create a dense bouquet look or a minimal, museum-specimen style display.
- Attach: Use a hot glue gun to secure sturdy stems, or use pearl-headed pins to gently hold delicate blooms in place, giving them a “floating” appearance within the box.
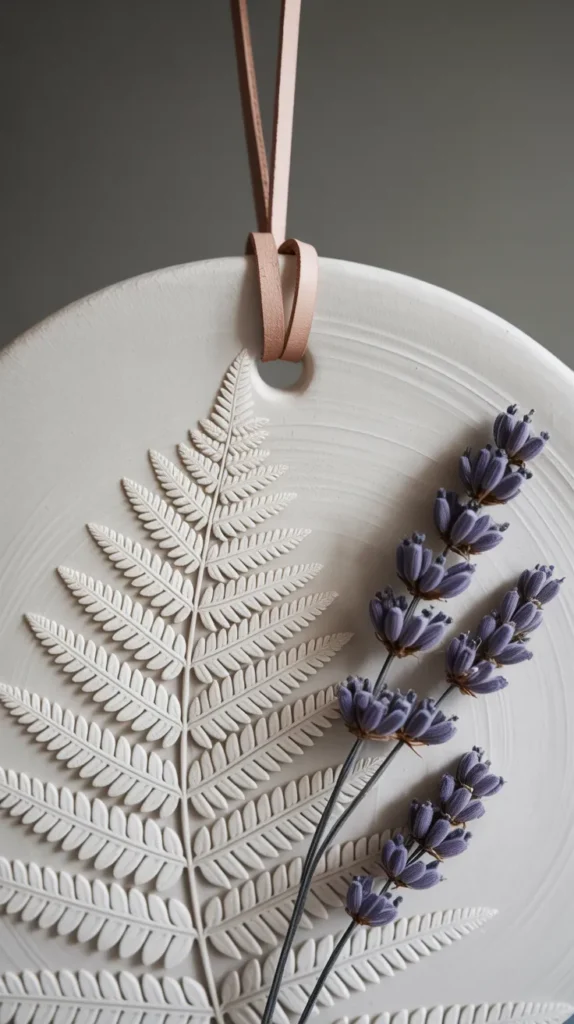
4. Nature-Inspired Clay Impressions
This form of dry flowers art uses the texture of dried botanicals to create beautiful relief patterns in clay. You can make wall hangings, ornaments, or jewelry dishes that carry the ghost-like imprint of your favorite blooms.
What you’ll need:
- Air-dry clay
- Dried flowers with strong textures (lavender, wheat, sturdy stems)
- Rolling pin
- Cookie cutters or a knife
Step-by-Step:
- Roll the clay: Roll out a slab of air-dry clay to about 1/4 inch thickness.
- Make the impression: Arrange your dried flowers on the clay. Gently roll over them with the rolling pin to press them into the surface.
- Reveal: Carefully peel the flowers away to reveal the intricate impression left behind.
- Cut and dry: Cut the clay into your desired shape (circle, square, or organic). Poke a hole if you intend to hang it.
- Finish: Let the clay dry completely. You can leave it raw for a minimalist look or wash a little watercolor paint over the impression to highlight the details.
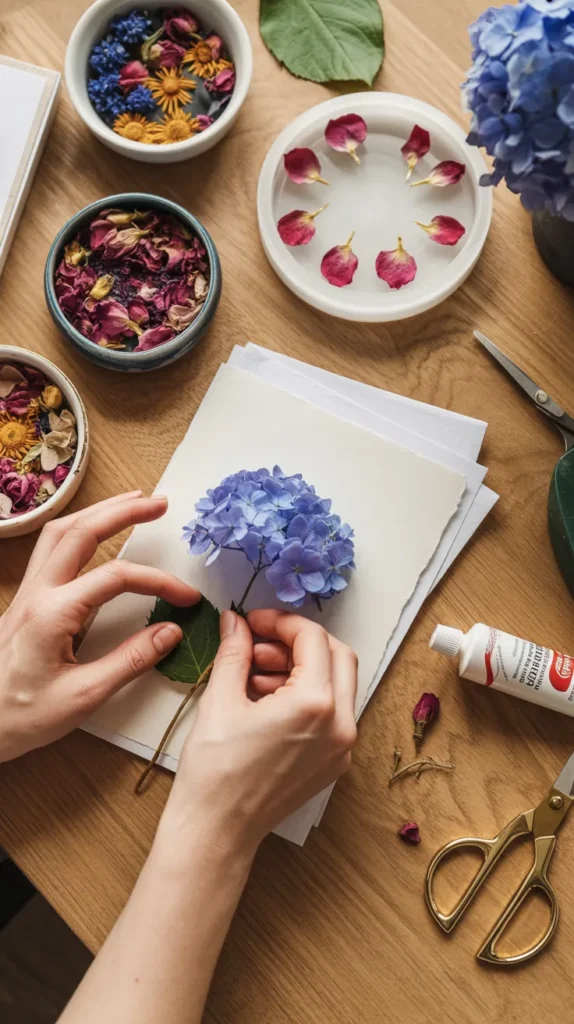
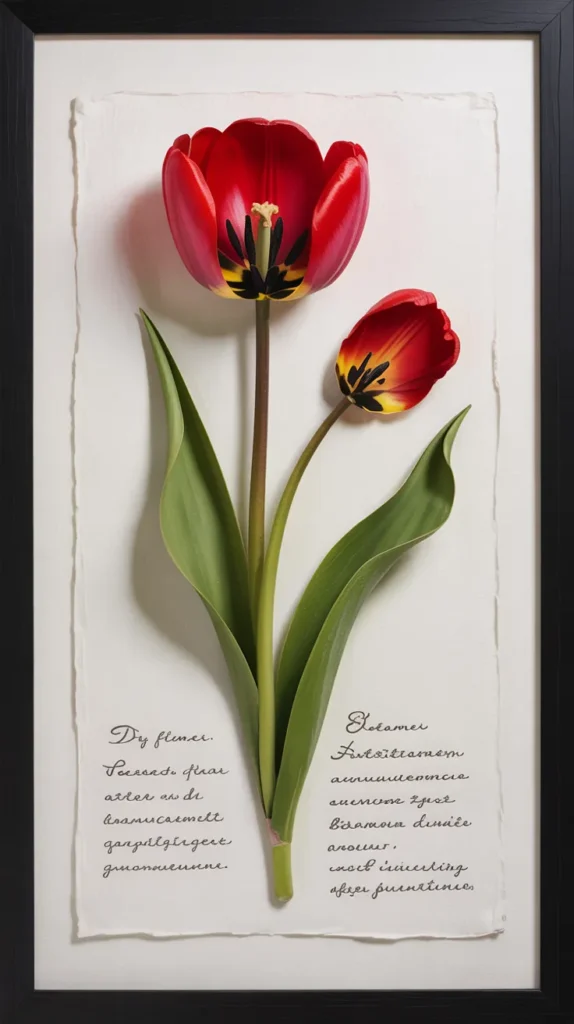
5. The Deconstructed Flower Study
Turn a single flower into a fascinating piece of scientific dry flowers art. This method involves taking a flower apart and drying each component separately—petals, stamen, stem, and leaves—then reassembling them on paper in an exploded view.
What you’ll need:
- A large flower (rose, lily, or tulip)
- Flower press or heavy books
- High-quality art paper
- Craft glue
- Tweezers
Step-by-Step:
- Dissect: Carefully separate the flower into its individual parts.
- Press: Press each piece flat until completely dry.
- Arrangement: On a large sheet of art paper, arrange the pieces in an orderly fashion. You can arrange them in a grid or layout that mimics the flower exploding outward.
- Mount: Glue each delicate piece down.
- Label: Use a fine-tip pen to write the botanical name or date at the bottom for a vintage scientific chart aesthetic.
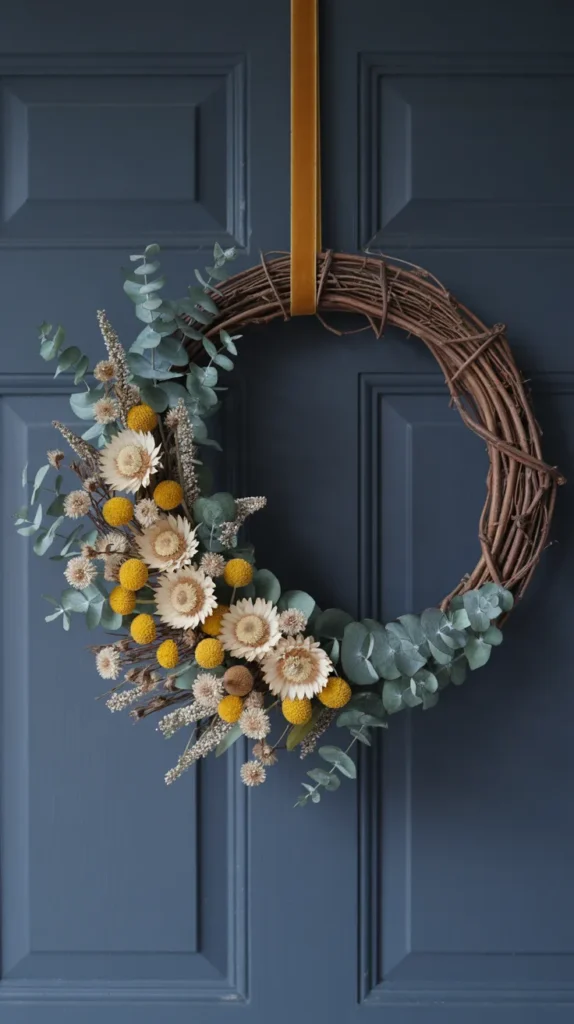
6. Dried Flower Wreaths
Wreaths aren’t just for the holidays. A wreath made of dried flowers is a timeless piece of dry flowers art that adds texture and rustic charm to any room. The key is to embrace asymmetry and wild, organic shapes.
What you’ll need:
- Grapevine or metal hoop base
- Dried greenery (eucalyptus, olive branches)
- Dried focal flowers (strawflowers, protea)
- Floral wire and hot glue
Step-by-Step:
- Build the base: Attach small bunches of dried greenery to your hoop using floral wire. Establish a lush, green foundation.
- Add the drama: Hot glue your focal flowers into the greenery. Group them in clusters for a modern look.
- Secure the bond: When attaching heavier dried items like pinecones or large pods, you need a reliable adhesive. The {Gorilla Dual Temp Mini Hot Glue Gun Kit} is ideal because it offers a precise nozzle for delicate work and a strong bond that ensures your beautiful arrangement won’t fall apart over time.
- Finishing touches: Add a trailing silk ribbon for a soft, romantic finish.
7. Floral Wax Sachets
These are small, scented tablets of wax embedded with dried flowers. They serve as both beautiful hanging ornaments and air fresheners for closets or drawers. They are tiny, fragrant pieces of dry flowers art.
What you’ll need:
- Soy wax or beeswax
- Essential oils
- Silicone molds
- Dried flower petals and buds
Step-by-Step:
- Melt and scent: Melt your wax and stir in your favorite essential oils (lavender or rose are classics).
- Pour: Pour the wax into the molds.
- Decorate: Wait until the wax becomes cloudy and starts to set. Gently press your dried flowers into the surface. If you do it too early, they will sink; too late, and they won’t stick.
- Set: Let them cool completely, then pop them out. Thread a ribbon through the hole to hang.

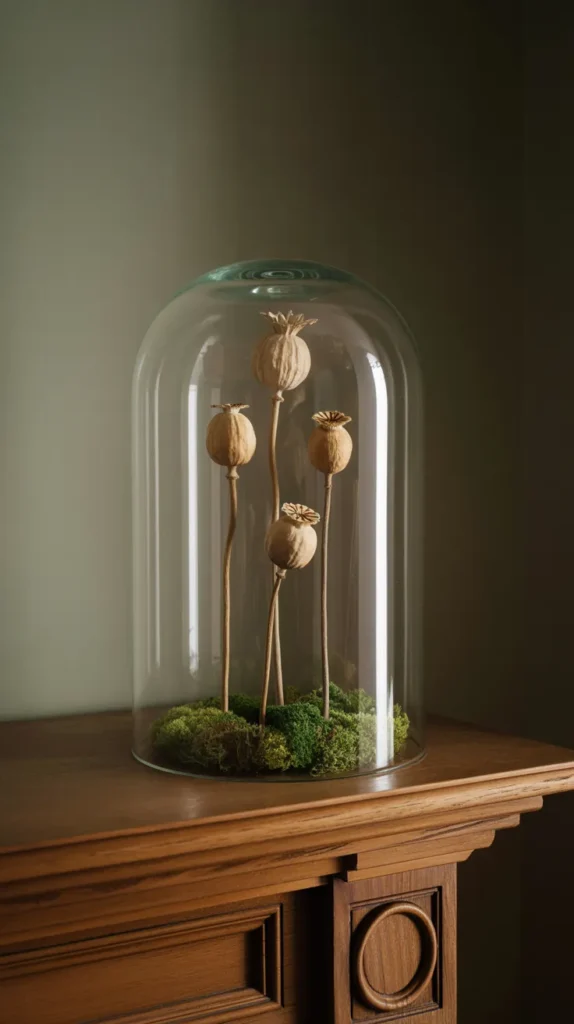
8. Glass Cloche Displays
Create a miniature world under glass. A cloche display treats dried flowers like precious museum specimens. It protects fragile blooms from dust while creating a stunning, enclosed piece of dry flowers art.
What you’ll need:
- A glass cloche with a base
- Floral foam or clay
- Moss
- Tall dried flowers (scabiosa pods, dried poppies)
Step-by-Step:
- The foundation: Secure a small piece of floral foam or clay to the center of the base.
- The landscape: Cover the mechanics with preserved moss to create a natural “ground.”
- The sculpture: Insert your dried stems into the foam. Vary the heights to create interest. A single, dramatic dried poppy pod or a small cluster of dried wildflowers looks enchanting.
- Encase: Place the glass dome over your creation.
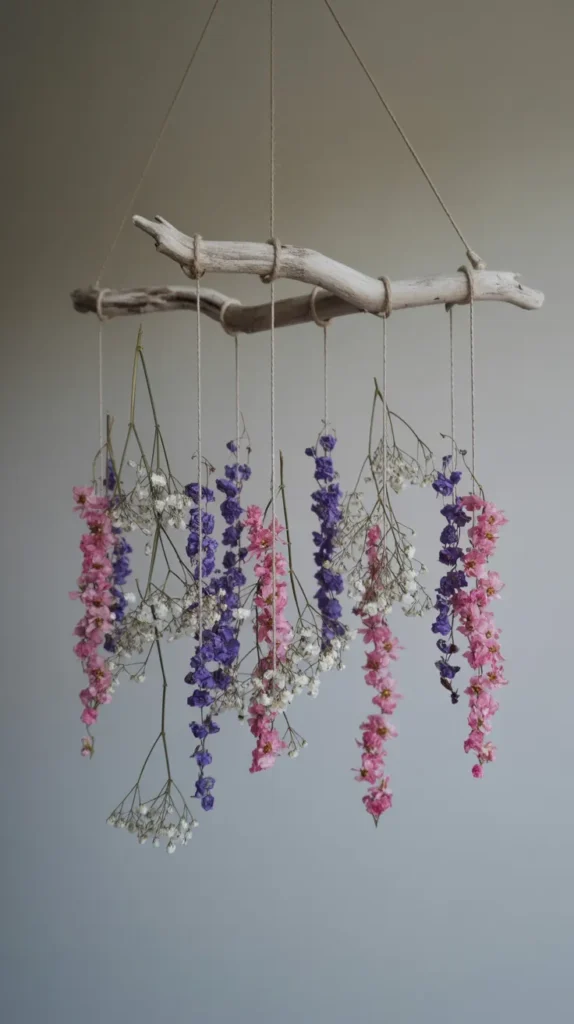
9. Dried Flower Mobiles
Take your dry flowers art to the ceiling with a kinetic mobile. This project uses lightweight dried flowers suspended from a branch or hoop, creating a whimsical, floating garden that moves gently with the air.
What you’ll need:
- A piece of driftwood or a metal hoop
- Clear fishing line or neutral thread
- Lightweight dried flowers (larkspur, baby’s breath, statice)
- Needle
Step-by-Step:
- Prep the stems: Choose flowers that dry well on the stem.
- String them up: Tie a length of fishing line to the stem of each flower. For a “raining flowers” look, you can use a needle to thread the line through the heads of several flowers, stacking them with space in between.
- Attach to base: Tie the lines to your driftwood or hoop at varying lengths.
- Balance: Hang the mobile and adjust the strings until it balances perfectly.
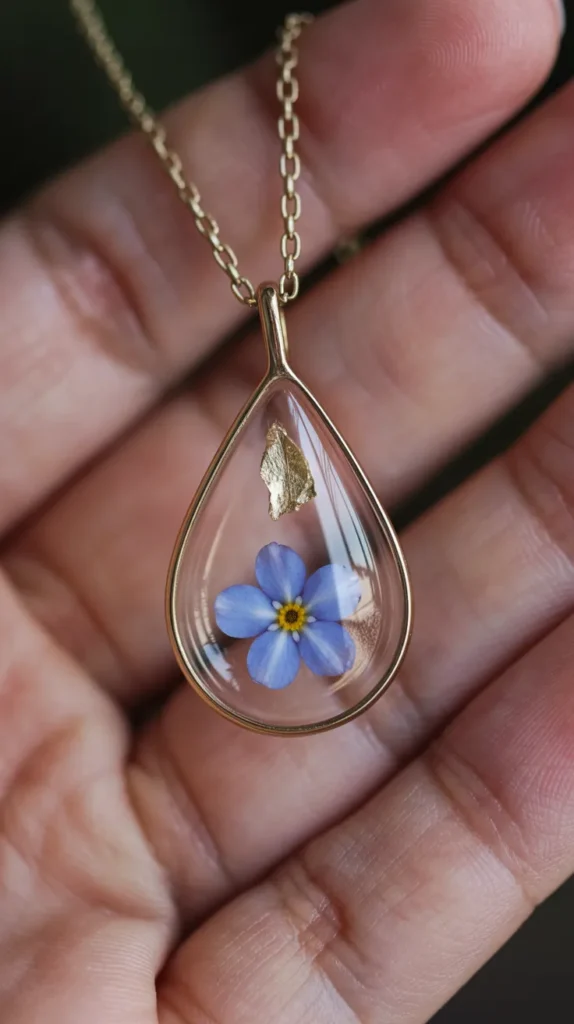
10. Resin Jewelry
Wear your dry flowers art wherever you go. Creating resin jewelry allows you to preserve tiny, perfect details of nature, like a single forget-me-not or a fern leaf, in a wearable pendant or pair of earrings.
What you’ll need:
- Jewelry bezels (open or closed backs)
- UV resin or epoxy resin
- UV lamp (if using UV resin)
- Tiny pressed flowers
Step-by-Step:
- Select tiny blooms: You need very small flowers for jewelry. Pressed Queen Anne’s lace, forget-me-nots, or heather are ideal.
- Layering: Pour a tiny drop of resin into the bezel. Place your flower carefully with tweezers.
- Curing: If using UV resin, cure it under a UV lamp for a minute.
- Dome it: Pour another layer of resin on top to create a domed, magnifying effect. Cure again.
- Assemble: Attach your pendant to a chain or earring hooks.
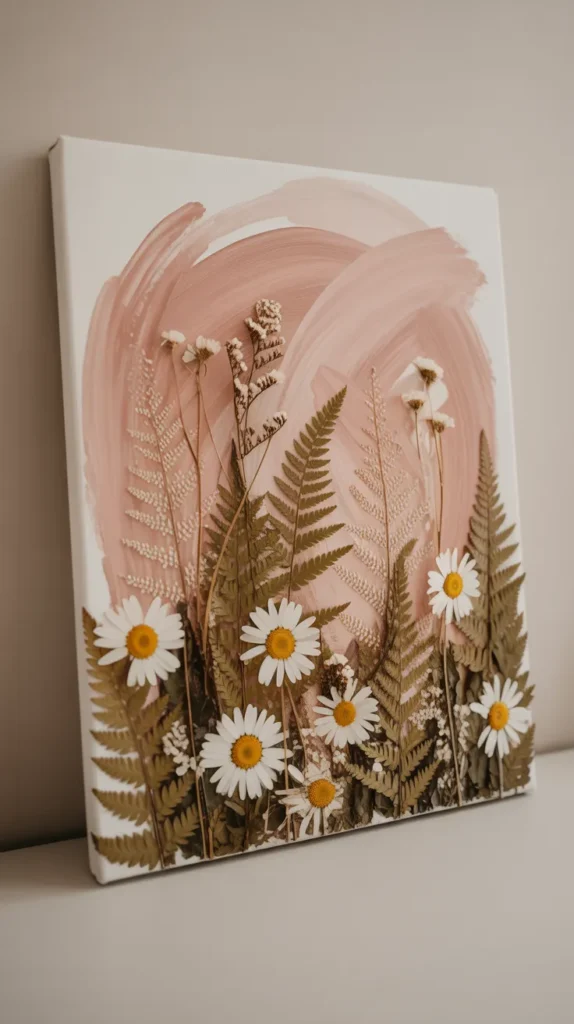
11. Botanical Collage on Canvas
Move beyond the frame and create dry flowers art directly on canvas. This mixed-media approach allows you to paint a background and then layer dried flowers on top for a textured, 3D painting.
What you’ll need:
- Stretched canvas
- Acrylic paints
- Dried flowers and leaves (pressed flat)
- Mod Podge or decoupage glue
Step-by-Step:
- Paint the backdrop: Paint your canvas. A soft, abstract watercolor wash or a solid moody color works well. Let it dry.
- Plan the composition: Lay out your pressed flowers on the canvas. You could create a bouquet shape, a wreath, or an abstract pattern.
- Adhere: Apply decoupage glue to the back of the flowers and press them onto the canvas.
- Seal: Gently brush a coat of sealer over the flowers. {Mod Podge Waterbase Sealer, Glue and Finish} (Matte or Gloss) is the go-to for this. It seals the brittle petals to the canvas, protects them from moisture, and prevents them from crumbling over time, all while drying clear.
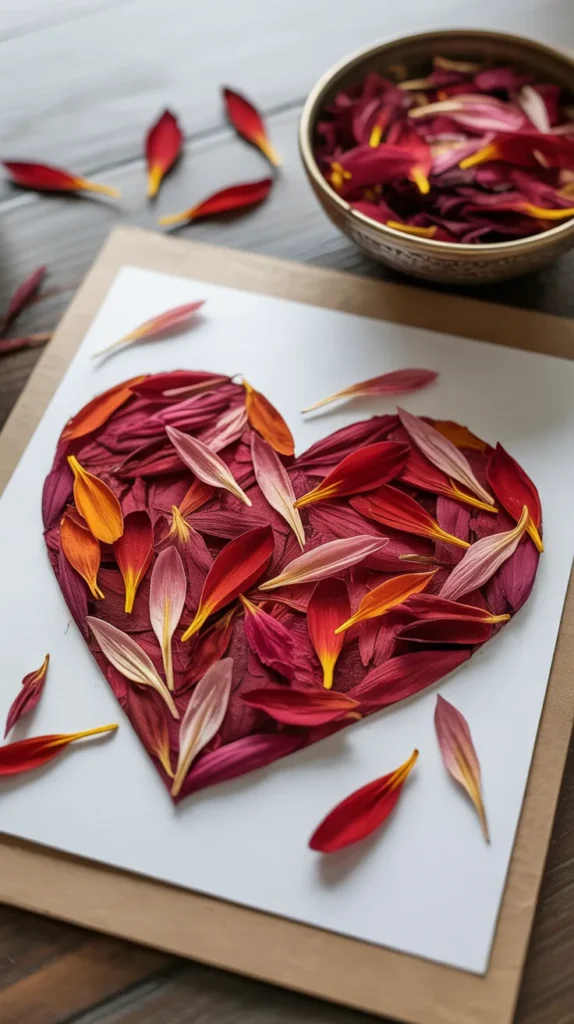
12. Flower Petal Confetti Art
This is a fun, forgiving way to make dry flowers art using petals that might have fallen off other projects. It’s like painting with nature’s confetti.
What you’ll need:
- Heavy cardstock
- Pencil
- Craft glue
- A jar of mixed dried flower petals
Step-by-Step:
- Draw a shape: Lightly sketch a simple shape on your cardstock—a heart, a moon, or a letter of the alphabet.
- Apply glue: Fill the inside of the shape with a generous layer of glue.
- Sprinkle: Take a handful of colorful dried petals and sprinkle them over the glue, pressing down gently.
- Shake off: Let it dry completely, then shake off the excess petals to reveal your textured, colorful shape.
Your Dry Flowers Art Toolkit
To create lasting masterpieces, having the right tools makes all the difference. Here is a summary of the recommended products mentioned in this guide.
| Product Name | Brand | Use |
|---|---|---|
| Precision Craft Glue | Bearly Art | Perfect for applying tiny dots of glue to delicate pressed flowers in floating frames. |
| Epoxy Resin | ArtResin | A high-quality, non-yellowing resin ideal for creating crystal-clear floral coasters. |
| Flower Drying Art Silica Gel | Activa | Essential for drying flowers while preserving their 3D shape for shadow boxes and cloches. |
| Dual Temp Mini Hot Glue Gun | Gorilla | Provides a strong, precise bond for attaching heavier dried elements to wreaths. |
| Waterbase Sealer | Mod Podge | Seals and protects pressed flowers on canvas art, preventing them from crumbling. |
Conclusion: Let Your Creativity Bloom
The world of dry flowers art is a beautiful invitation to extend the life of the blooms we love. It transforms fleeting moments of nature into enduring keepsakes that tell a story.
Whether you choose the precision of a floating frame, the depth of a shadow box, or the functionality of a resin coaster, you are creating something unique and personal.
Don’t be afraid to experiment. Nature is perfectly imperfect, and your art can be too. Start with a simple project, gather some blooms from your garden or a special bouquet, and see where your creativity takes you.
So, grab your glue gun, prep your pressing books, and start preserving. Which of these breathtaking dry flowers art projects will you try first?