There is a quiet, lasting beauty to dried flowers that fresh blooms simply can’t match. It’s a charm that speaks of sun-drenched fields, cherished memories, and the art of appreciating nature in all its forms.
The world of dried floral decor is no longer about dusty, forgotten bouquets; it’s a vibrant and creative space filled with texture, form, and sophisticated color.
Exploring different dry flowers arrangements ideas is a journey into creating sustainable, low-maintenance art for your home.
Unlike fresh flowers that wilt within a week, a dried arrangement can bring joy for years. This makes them not only a beautiful choice but also a conscious one.
They are perfect for anyone who loves the presence of botanicals but doesn’t have the time for the upkeep of fresh flowers. From grand, dramatic installations to small, personal touches, there is a world of possibilities waiting for you.
This guide is designed to be your ultimate source of inspiration, showcasing 12 breathtaking designs to get you started.
We’ll cover a range of styles, from modern minimalist to rustic farmhouse, and provide you with the tips and tricks needed to bring these dry flowers arrangements ideas to life.
Whether you’re a complete beginner or a seasoned crafter, get ready to transform your space with the timeless elegance of preserved blooms.
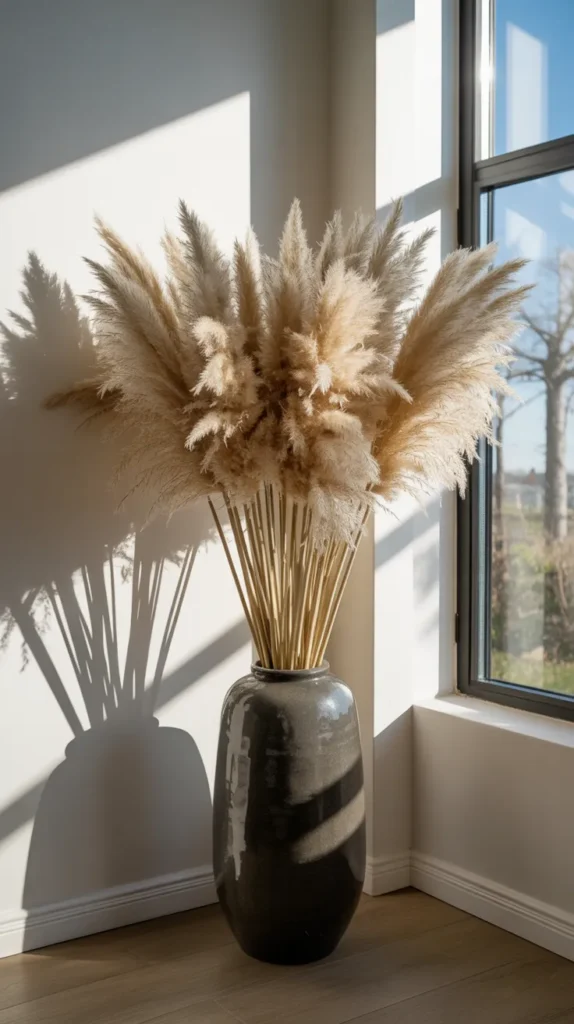
1. The Sculptural Pampas Grass Statement
This is one of the most iconic and impactful dry flowers arrangements ideas out there. A tall, generous bouquet of fluffy pampas grass creates an instant focal point in any room.
It’s all about embracing texture, scale, and a minimalist color palette to create a piece that feels both soft and architectural. It’s perfect for a floor vase in a living room corner, entryway, or bedroom.
Why it’s a great idea:
- Effortlessly Chic: This arrangement delivers maximum style with minimal effort.
- Adds Height and Drama: Tall stems draw the eye upward, making a space feel larger.
- Softens Modern Spaces: The feathery texture adds warmth and softness to rooms with clean lines and hard surfaces.
How to create this look:
- Select Your Pampas: Choose several stems of tall, high-quality pampas grass. They come in various natural shades like beige, sand, and cream, as well as dyed colors like soft pink or gray.
- Fluff and Prep: When you first unbox pampas grass, it will be compressed. Take it outside and gently shake each stem to help the plumes open up. Leaving them in the sun for a few hours also encourages them to expand to their full, fluffy glory.
- Prevent Shedding: Pampas grass has a tendency to shed. To combat this, you can give the plumes a light misting of strong-hold hairspray. For a more permanent and professional solution, a product like {Aleene’s Spray Acrylic Sealer} in a matte finish is ideal. It provides a clear, protective coating that locks the delicate fibers in place without leaving a sticky residue.
- Arrange in a Floor Vase: Place your prepared stems in a tall, heavy vase. A ceramic, stoneware, or even a concrete vase provides the necessary weight to anchor the tall stems and adds to the earthy aesthetic.
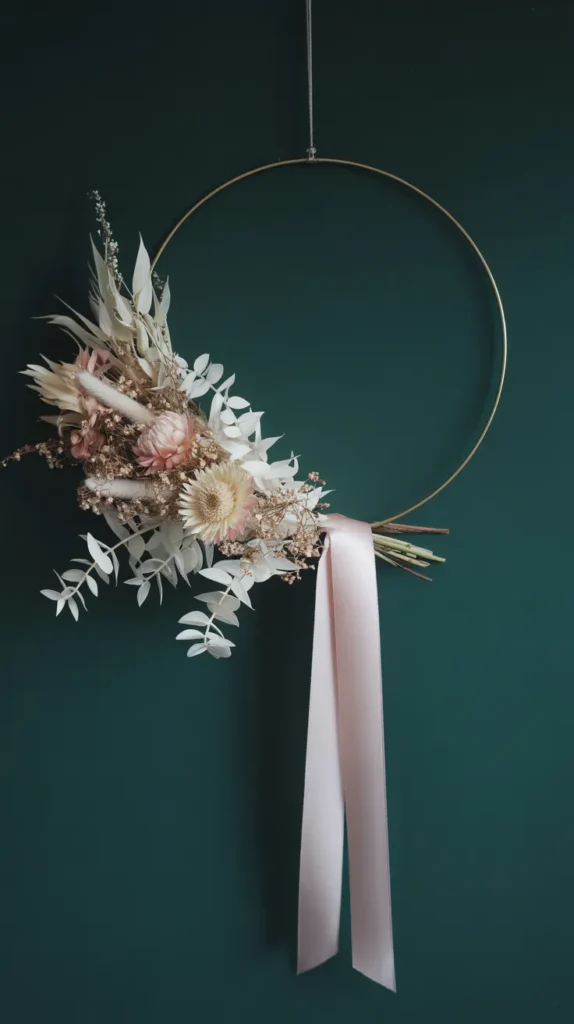
2. The Asymmetrical Hoop Wreath
The traditional wreath has been reimagined in modern dry flowers arrangements ideas. Instead of a full, dense ring, the contemporary floral hoop features an asymmetrical arrangement on a simple metal or wooden hoop, leaving much of the base exposed.
This creates a beautiful contrast between the organic, rustic flowers and the sleek, geometric form of the hoop.
What you’ll need:
- A metal macrame hoop (gold, brass, or black) or a grapevine wreath base.
- A selection of dried flowers (strawflowers, craspedia, ruscus).
- Dried greenery (eucalyptus, olive branches).
- Floral wire and a hot glue gun.
Step-by-Step Instructions:
- Build Your Foundation: Start by attaching small bunches of your dried greenery (like eucalyptus) to one side of the hoop using thin floral wire. Typically, this is done on the bottom-left or bottom-right quadrant.
- Add Filler Flowers: Weave in some of your smaller, filler flowers like statice or ruscus to build up the shape.
- Place Your Focal Flowers: Now, add your more prominent “focal” flowers, like strawflowers or small roses. For a secure and lasting hold, especially with heavier flower heads, a hot glue gun is your best friend. The {Gorilla Dual Temp Mini Hot Glue Gun Kit} is fantastic for this, as its precision nozzle allows for delicate work, and its strong bond ensures your beautiful design won’t fall apart.
- Add a Finishing Touch: For an extra touch of elegance, you can tie a long, flowing silk or velvet ribbon to the floral cluster.
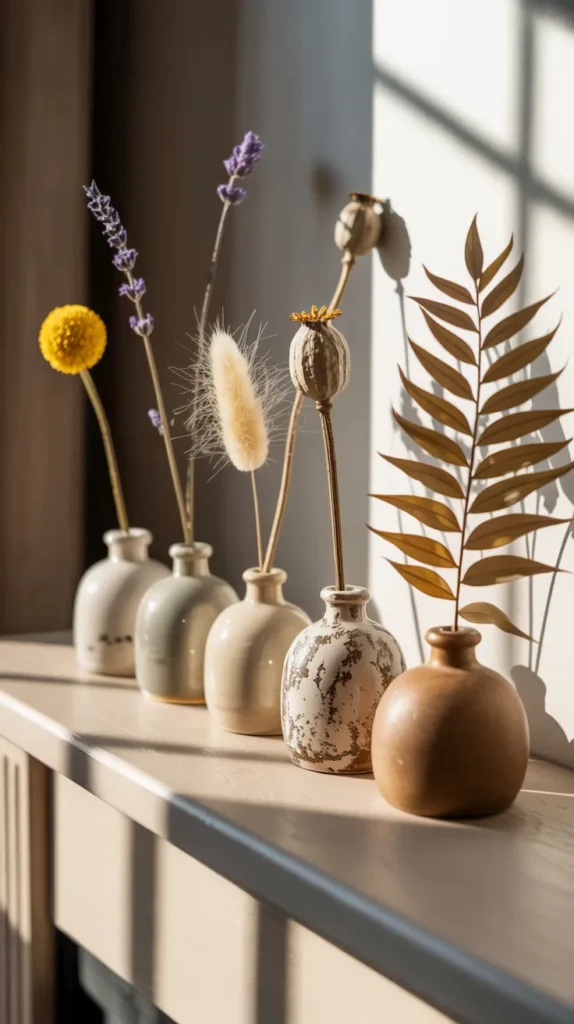
3. The Minimalist Bud Vase Collection
Not all dry flowers arrangements ideas have to be grand gestures. Sometimes, the most beautiful statements are the quietest.
A curated collection of small bud vases, each holding a single, unique dried stem, can create a stunning and sophisticated display on a mantelpiece, a windowsill, or scattered down the center of a dining table.
How to style this look:
- Gather Your Vessels: This is a perfect opportunity to showcase a collection of small bottles and vases. Mix and match different shapes, heights, and materials. Clear glass, amber glass, tiny ceramic pots, and even vintage brass vessels look wonderful together.
- Choose Individual Stems: The beauty of this idea is in celebrating the uniqueness of each botanical. Select your most interesting single stems. A single dried craspedia (billy button) offers a pop of color and a perfect spherical shape. A delicate sprig of lavender adds a hint of purple and a lovely scent. A fluffy bunny tail grass provides softness and texture. Other great options include dried poppy pods, scabiosa pods, or a single fern frond.
- Arrange in Thoughtful Groupings: A classic design principle is to cluster your bud vases in odd numbers—groups of 3, 5, or 7 tend to feel more balanced and natural to the eye. Vary the heights of the vases and stems to create a dynamic and visually interesting vignette.
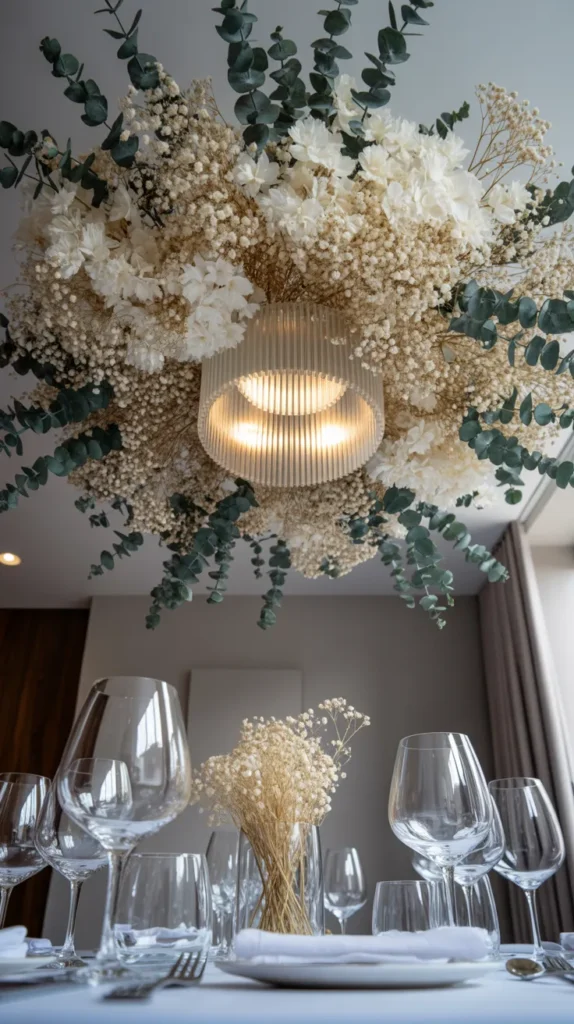
4. The Ethereal Floating Flower Cloud
For a truly show-stopping piece of decor that embodies the dreamier side of dry flowers arrangements ideas, consider creating a hanging floral installation.
This “flower cloud” is a suspended arrangement that floats over a dining table, a bed, or in the corner of a room, creating a magical, fairytale-like atmosphere that is sure to be a conversation starter.
How to build it:
- The Foundation: The best base for a flower cloud is a ball or a rectangular block of chicken wire. It’s lightweight, and the open grid makes it easy to insert stems from all directions to achieve a full, rounded, cloud-like shape.
- The Flowers: The key is to use light, airy, and voluminous dried flowers. Dried baby’s breath (gypsophila) is the star of this show. Dried hydrangeas, smoke bush, sea lavender, and various fluffy grasses also work well to add texture and volume without adding too much weight.
- The Assembly: Securely hang your chicken wire base from the ceiling using strong, clear fishing line attached to ceiling hooks. Start by inserting your longer stems to establish the overall shape and size of your cloud. Then, fill in the gaps with shorter stems until the chicken wire is completely hidden. Work from all angles to ensure it looks good from below.
- The Style: A monochromatic cloud of all-white baby’s breath is classic and ethereal. You can also mix in some colorful dried wildflowers for a “floating meadow” effect or add dried eucalyptus for a touch of green.
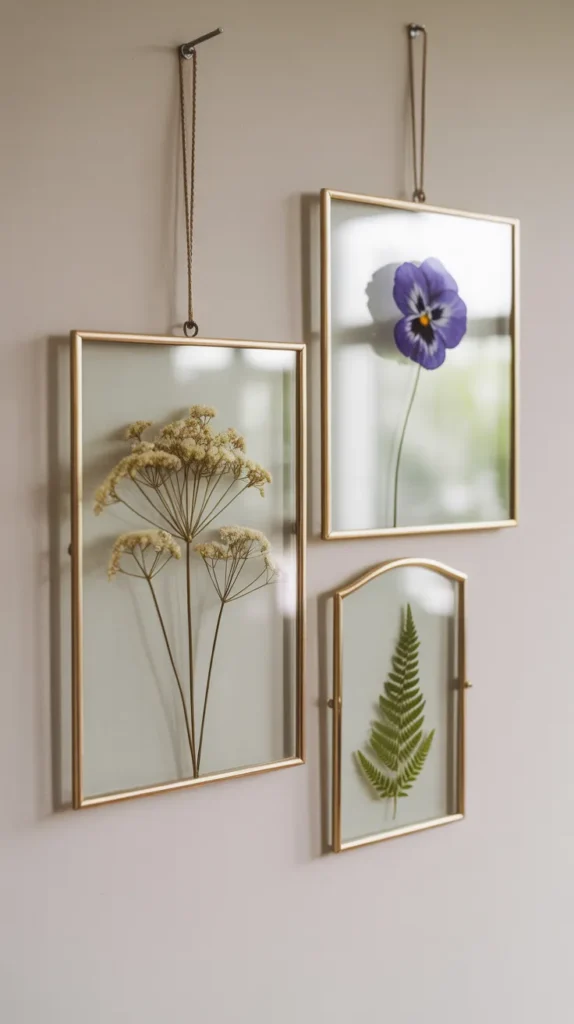
5. The Framed Pressed Flower Gallery Wall
This is a delicate, elegant, and modern take on dry flowers arrangements ideas. By pressing flowers and framing them, you can create a beautiful botanical gallery wall.
Using “floating” frames, where the flowers are sandwiched between two panes of glass, creates a particularly stunning effect, making the botanicals appear to be suspended in mid-air.
How to create this:
- Press Your Flowers: You can press flowers the traditional way inside a heavy book, but this can take weeks. For faster results and much better color retention, a microwave flower press is a fantastic tool. A press like the {Microfleur Max Microwave Flower Press} can dry flowers perfectly in just a few minutes, preserving their vibrant hues.
- Choose Your Frames: Select floating frames with thin metal or wood edges. Brass, gold, and black frames all complement this aesthetic beautifully.
- Arrange and Frame: Carefully clean both glass panes. Use tweezers for precise placement as you arrange your pressed flowers (ferns, cosmos, pansies, and Queen Anne’s lace are all stunning) on one of the panes. To prevent them from slipping over time, use a tiny dot of clear glue. A precision applicator like {Bearly Art Precision Craft Glue} is ideal, as its fine metal tip lets you apply a minuscule amount of glue without any mess.
- Create a Gallery Wall: Hang a collection of these frames in a grid pattern or a more organic cluster to create a beautiful botanical gallery wall in a hallway or above a sofa.
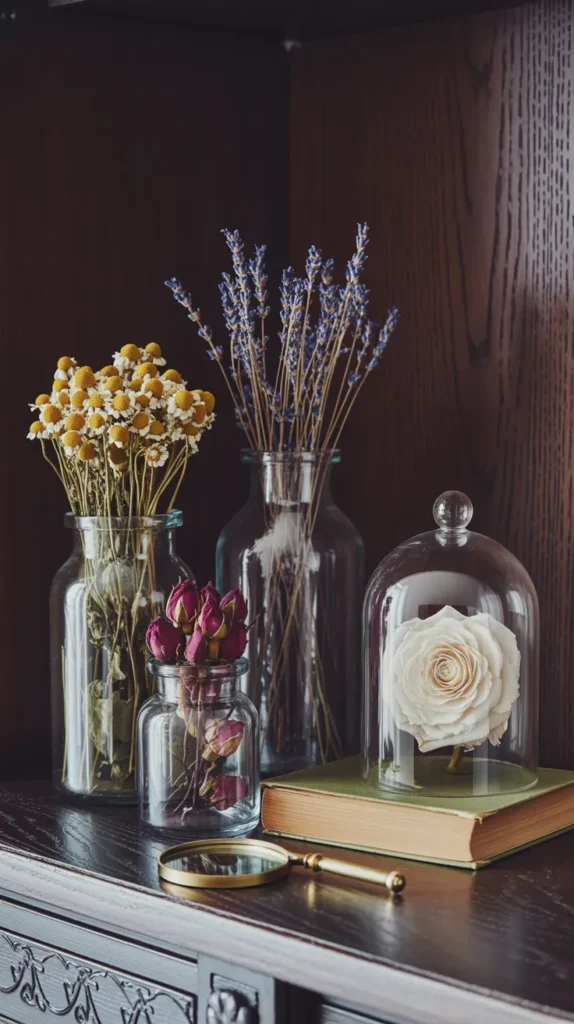
6. The Vintage Apothecary Jar Collection
Channel a vintage, scientific, “cabinet of curiosities” vibe by displaying your dried botanicals in glass apothecary jars or under cloches (bell jars).
This method not only looks incredibly stylish but also protects more fragile specimens from dust and humidity. It’s one of the most charming dry flowers arrangements ideas for a bookshelf or study.
How to style this:
- Select Your Glassware: Collect jars with lids in various shapes and sizes. Clear glass is classic, while amber or green glass adds a moody, vintage feel. A glass cloche with a wooden base is perfect for showcasing a single, special bloom.
- Choose Your Contents: You can fill jars to the brim with loose dried flower heads like rosebuds, chamomile, or lavender for a block of color and texture. Alternatively, you can place a single, perfectly preserved 3D flower, like a silica-dried rose or dahlia, under a glass cloche to elevate it to the status of a scientific specimen.
- The Secret to 3D Flowers: To get those flawlessly shaped 3D flowers for your cloche, you need to use silica gel. A product like {Activa Flower Drying Art Silica Gel} is a must-have. This fine, sand-like desiccant draws moisture out of the petals rapidly, preserving the flower’s natural shape and vibrant color in a way that air-drying simply cannot match.
- Create a Curated Vignette: Arrange a cluster of your filled jars on a bookshelf or sideboard. Style them with antique books, brass objects, and candles to create a beautiful, thoughtful display.
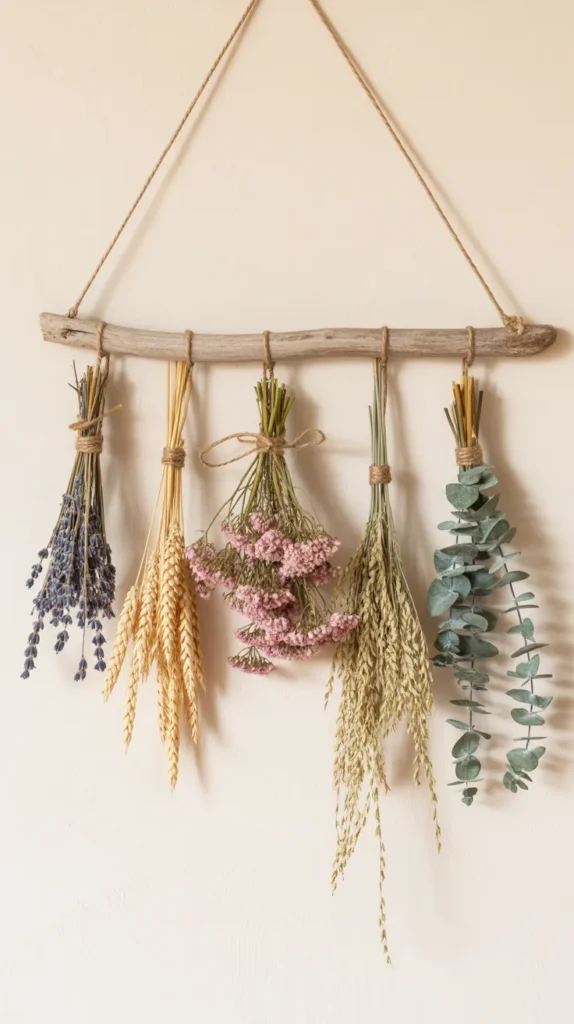
7. The Rustic Wall Hanging or “Swag”
Create a stunning piece of bohemian-inspired art for your walls with a hanging floral tapestry or “swag.”
This simple DIY project uses a found branch or a wooden dowel as a base, with bunches of dried flowers hanging down from it. It’s a fantastic, textural alternative to a traditional framed print and a very creative take on dry flowers arrangements ideas.
How to make it:
- Find Your Base: A beautiful piece of driftwood found on a beach walk provides a natural, organic feel. A clean, simple wooden dowel works well for a more modern, Scandinavian take.
- Create Your Bunches: Make several small, hand-tied bouquets of dried flowers. Flowers with sturdy stems that hang straight, such as lavender, wheat, oats, statice, and eucalyptus, are ideal for this project.
- Assemble the Hanging: Tie each bunch to the branch using a natural fiber like jute twine. You can hang them all at the same length for a neat, uniform look, or vary the lengths to create a more dynamic, cascading effect. To ensure your knots are strong and to enhance the rustic aesthetic, use a quality natural twine. {Kinglake Natural Jute Twine} is an excellent and affordable choice that holds knots well and complements the earthy tones of the botanicals.
- Hang Your Art: Attach a long piece of twine to both ends of the branch and hang it on a prominent wall, such as above a bed or a couch.
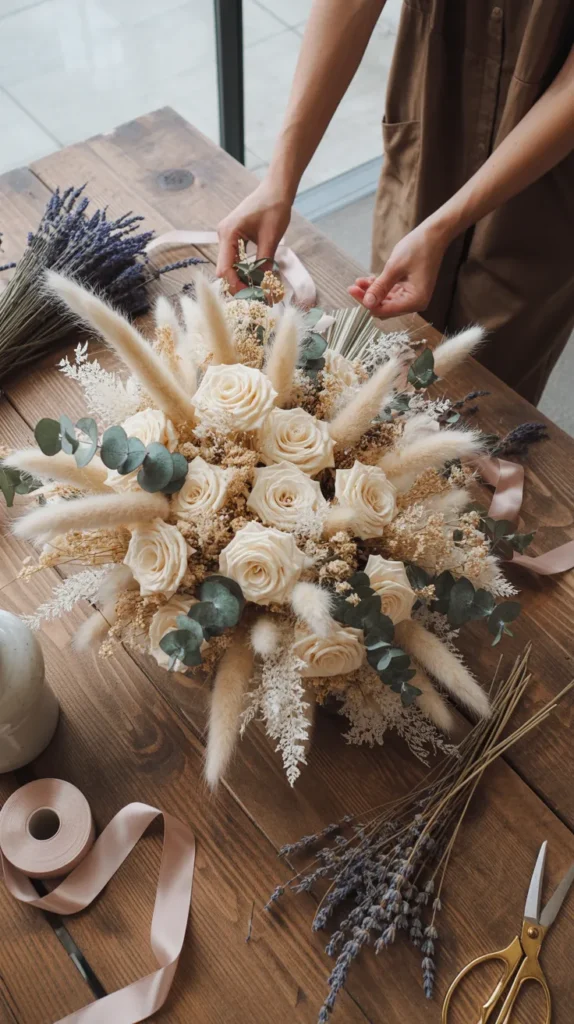
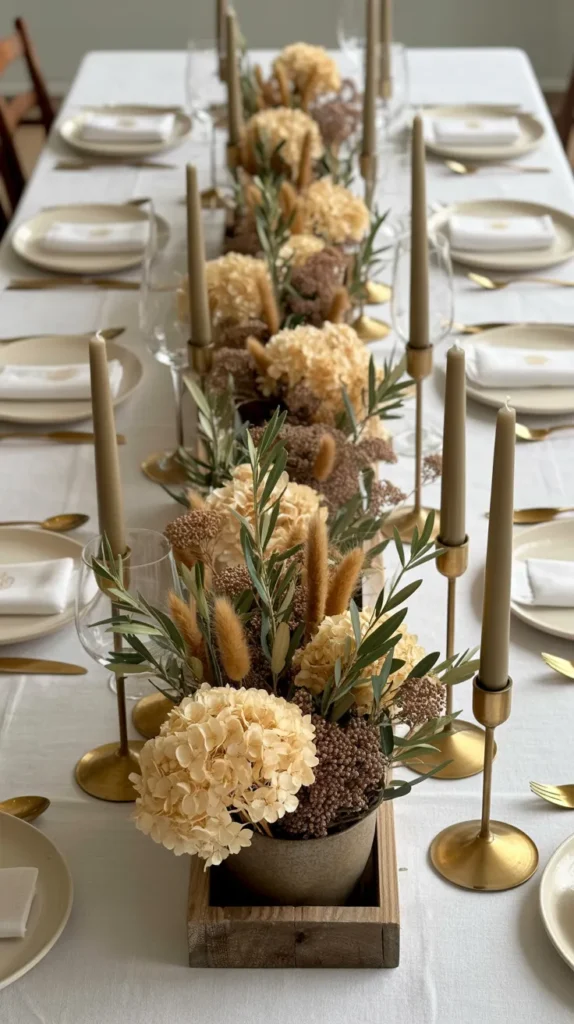
8. The Everlasting Centerpiece for Your Table
A centerpiece made from dried flowers is a game-changer for home decor. It provides the beauty of a floral arrangement without any of the maintenance—no changing water, no trimming stems, no wilting. It will look stunning indefinitely, making it a perfect, sustainable option for a dining table, coffee table, or console.
How to create it:
- Choose a Low Vessel: For a dining table centerpiece, a long, low trough-style vase or a rustic wooden box works well. This ensures guests can easily see and talk to each other across the table. For a coffee table, a round, shallow bowl is a great choice.
- Build Your Foundation: You can use a block of dry floral foam as your base, secured in your vessel. Start by inserting your greenery (like preserved eucalyptus or olive branches) and filler flowers to establish the overall shape and size of the arrangement.
- Add Texture and Color: Once you have your shape, add your focal flowers and textural elements. Mix spiky sea holly, soft bunny tails, round craspedia, and structural poppy pods to create a rich, visually interesting composition.
- Make it Seasonal: The beauty of a dried centerpiece is that it’s not static. You can easily add or swap out elements to match the seasons—add some dried orange slices for autumn, mini pumpkins for Halloween, or some red-berried stems for the holidays.
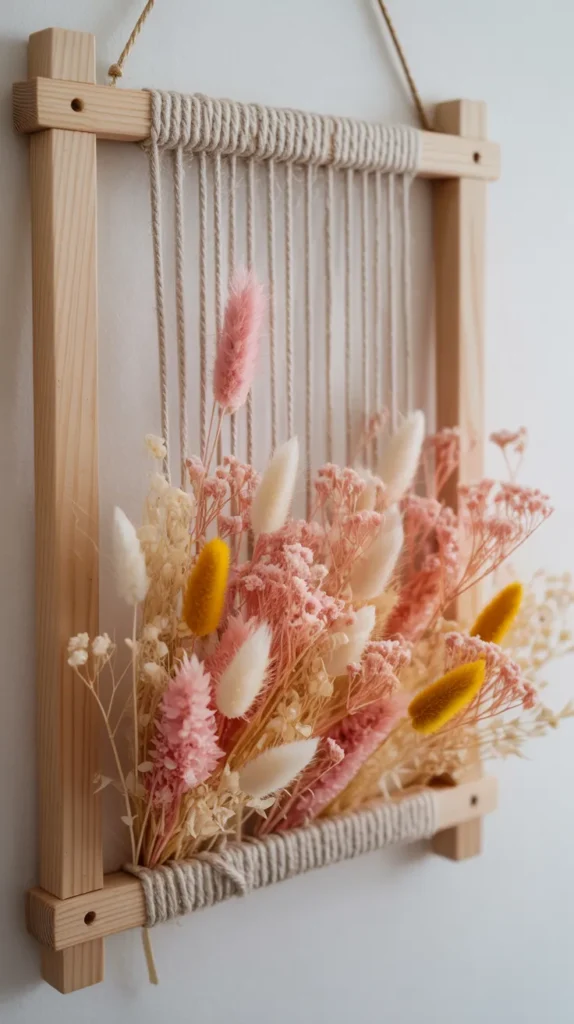
9. The Textural Woven Flower Display
This is a unique and artistic way to display dried flowers, weaving them into a frame to create a piece of textured art. It’s a meditative and creative project that results in a one-of-a-kind display.
What you’ll need:
- An empty wooden picture frame.
- Twine or string.
- A variety of dried flower stems with small heads.
How to create it:
- Create Your Loom: Tightly wrap twine vertically around your empty frame, creating a series of parallel strings like a loom.
- Weave Your Flowers: Start at the bottom and begin weaving your dried flower stems horizontally through the twine, going over and under the strings.
- Build Up Layers: Continue weaving different types of flowers, grasses, and leaves, pushing them down to create a dense, textural tapestry of botanicals. Play with different colors and textures to create patterns.
- Display: Once your frame is filled, you can lean it against a wall on a shelf or attach a hanger to the back.
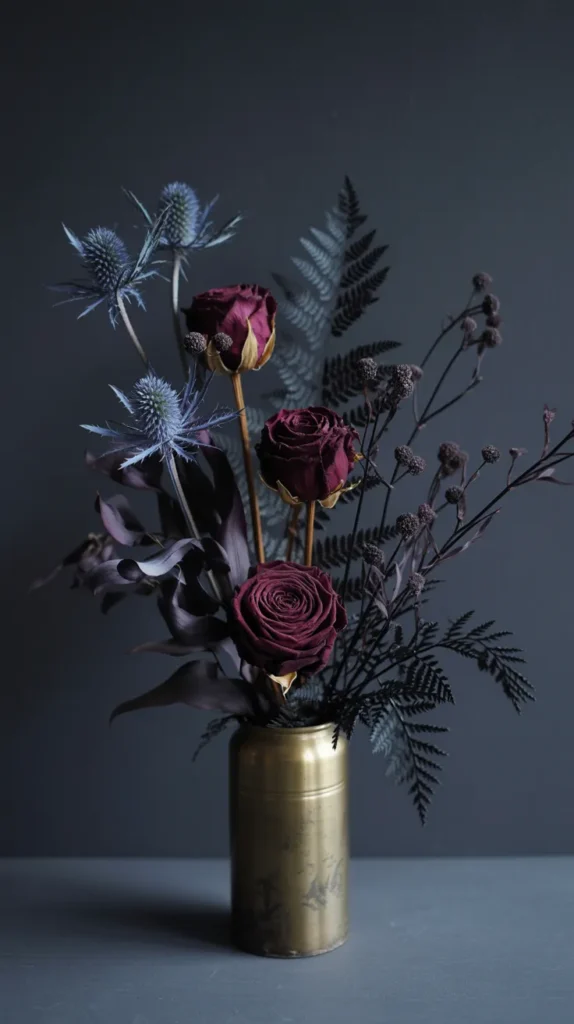
10. The Moody and Dramatic Tonal Arrangement
While many popular dry flowers arrangements ideas focus on light, neutral tones, a dark, moody arrangement can be incredibly dramatic and sophisticated. This style uses deep, rich colors like burgundy, deep purple, and even black to create an arrangement that feels opulent and mysterious.
What to use:
- Dark Flowers: Look for naturally dark dried flowers like deep burgundy or nearly black scabiosa pods, dark red air-dried roses, or dark purple statice.
- Dark Foliage: Dried eucalyptus often takes on a beautiful silvery-black hue. You can also find preserved foliage that has been dyed black or deep red.
- Interesting Textures: Add dark, spiky thistle, black-dyed bunny tail grass, or dark palm spears.
- DIY Color: To achieve the perfect dark palette, you can use spray paint. A product like {Rust-Oleum Painter’s Touch 2X Ultra Cover} in a matte black or deep burgundy is perfect for coloring dried elements like palm spears or grasses.
How to style it:
A moody arrangement looks stunning against a light-colored wall, where its dark silhouette can truly stand out.
Alternatively, placing it in a room with dark walls creates a very rich, enveloping atmosphere. A brass, copper, or dark metal vase complements this style beautifully.
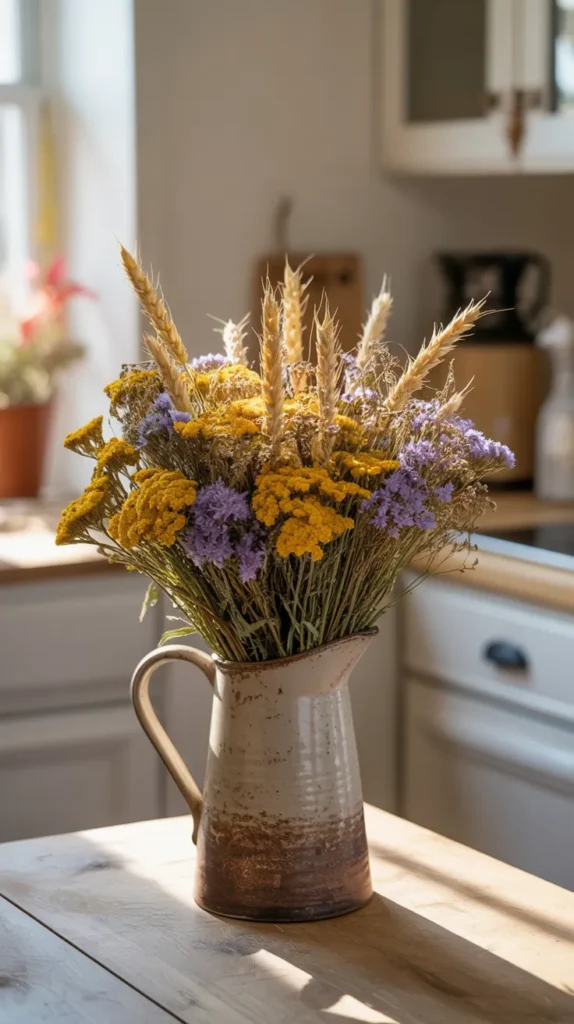
11. The Cheerful Dried Wildflower Bouquet
Capture the joyful, untamed spirit of a summer meadow with a loose, airy bouquet filled with a variety of colorful dried wildflowers.
This style is less structured and more organic, celebrating the natural diversity of a field in bloom. It’s perfect for adding a touch of rustic, cottage-core charm to your home.
What you’ll need:
- A mix of colorful dried wildflowers: Think yellow yarrow, purple statice, yellow craspedia (billy buttons), and blue or purple larkspur.
- Textural grasses for movement: Soft bunny tail grass, golden wheat, or natural oats.
- Dried greenery for a base: Silver-dollar eucalyptus or delicate fern leaves.
How to arrange it:
- Start with Greenery: Begin by creating a loose base with your dried eucalyptus or ferns in your hand.
- Add Grasses: Weave in your textural grasses to create height and airy movement.
- Place Your Colors: Dot your colorful wildflowers throughout the arrangement. Don’t try to make it perfectly symmetrical. The charm of this style is in its “just-gathered” look.
- Tie and Display: Secure the stems with a piece of rustic jute twine. This type of bouquet looks beautiful in a simple glass jar, a vintage pitcher, or a woven basket.
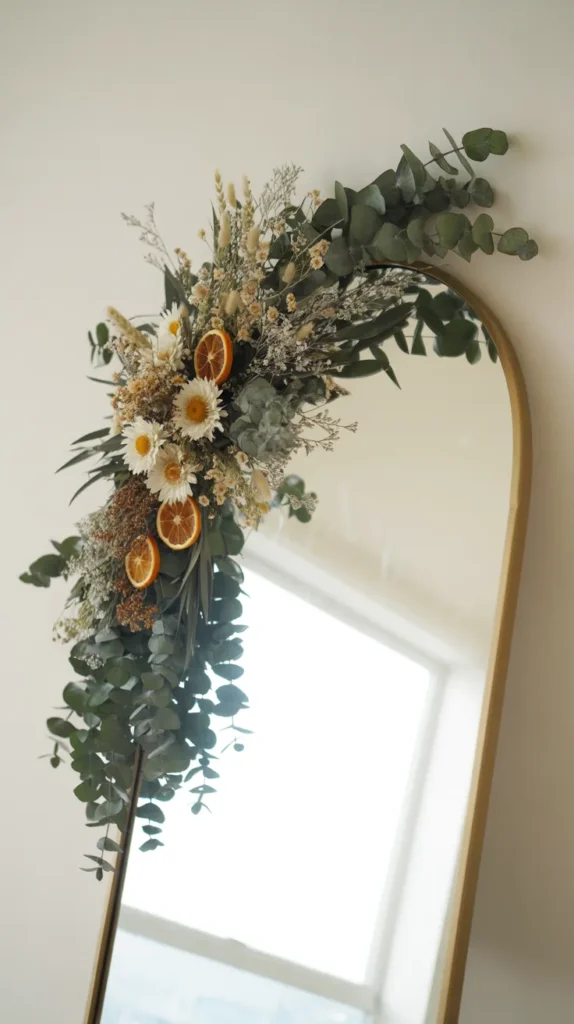
12. The Delicate Dried Flower Garland
Drape a textural garland of dried botanicals over a mirror, a headboard, a mantelpiece, or a window frame for a soft, romantic touch.
This is a simple and forgiving project that adds a beautiful layer of natural beauty to any surface and is one of the most versatile dry flowers arrangements ideas.
How to make this:
- The Base: Start with a long piece of sturdy jute twine or a flexible, pre-made garland base like faux eucalyptus.
- The Materials: Gather small, lightweight dried elements. Sprigs of lavender, small bundles of bunny tail grass, dried eucalyptus pods, strawflowers, and even dried orange slices work well.
- The Assembly: Use thin floral wire or a hot glue gun to attach your dried elements along the length of the twine or garland base. Overlap them, pointing them in the same direction to create a full, lush look.
- Drape and Enjoy: Drape your finished creation over a large mirror or window frame. The way it frames the object adds a beautiful, soft layer to your decor and can be changed out with the seasons.
Your Dried Flower Arrangement Toolkit
To help you bring these ideas to life, having a few key supplies on hand can make all the difference. Here is a summary of the useful products mentioned in this guide.
| Product Name | Brand | Use |
|---|---|---|
| Spray Acrylic Sealer | Aleene’s | Essential for sealing fluffy grasses like pampas to prevent messy shedding. |
| Dual Temp Mini Hot Glue Gun | Gorilla | Provides a strong, precise bond for attaching flowers and heavier elements to wreaths. |
| Max Microwave Flower Press | Microfleur | Perfect for pressing flowers in minutes, not weeks, with superior color retention for framing projects. |
| Precision Craft Glue | Bearly Art | A fine-tipped glue perfect for neatly securing delicate pressed flowers in framed art. |
| Flower Drying Art Silica Gel | Activa | The best method for preserving the 3D shape and vibrant color of flowers for cloche displays. |
| Natural Jute Twine | Kinglake | Ideal for tying bunches for wall hangings and adding a perfect rustic touch to any project. |
| Painter’s Touch 2X Ultra Cover | Rust-Oleum | A spray paint perfect for dyeing dried elements to create a custom, moody color palette. |
Conclusion: Let Your Home Bloom with Everlasting Beauty
Exploring these dry flowers arrangements ideas is a wonderful way to bring lasting, sustainable beauty into your home. It’s a craft that allows you to play with color, texture, and form, resulting in a piece of decor that is uniquely you and tells a story.
Whether you prefer the bold, fluffy statement of pampas grass or the delicate, romantic charm of a floral garland, there is a style of dried arrangement waiting for you.
We hope these 12 designs have sparked your imagination and shown you the incredible versatility and artistry of dried botanicals.
You don’t need to be a professional florist to create something truly stunning. The beauty of these arrangements is that their imperfections are part of their charm.
So, gather some stems, find a beautiful vase, and start creating. It’s time to fill your home with arrangements that you can cherish for years to come. Which of these breathtaking designs will you create first?