
There’s a special kind of magic in pressing flowers. It’s a gentle art form that captures a fleeting moment of natural beauty, transforming a vibrant, living bloom into a delicate, paper-thin treasure that can be kept forever.
This timeless practice opens the door to a world of enchanting dried pressed flower crafts, allowing you to bring a piece of the garden into your home in the most creative ways.
Working with pressed flowers is like painting with nature’s own palette. The colors, shapes, and translucent qualities of the petals offer endless possibilities for creating personal, one-of-a-kind art.
It’s a craft that is wonderfully accessible, requiring little more than a few flowers, a heavy book, and a spark of imagination.
You can preserve blooms from a special bouquet, collect wildflowers on a nature walk, or press flowers from your own garden.
This guide is your complete resource for diving into the beautiful world of floral preservation. We will explore 12 enchanting DIY ideas that are perfect for beginners and seasoned crafters alike.
From elegant wall art and custom jewelry to personalized stationery and home decor, you’ll discover just how versatile these papery-thin botanicals can be.
We’ll also share our favorite tips, tricks, and tool recommendations to ensure your projects are a blooming success. Let’s get pressing!
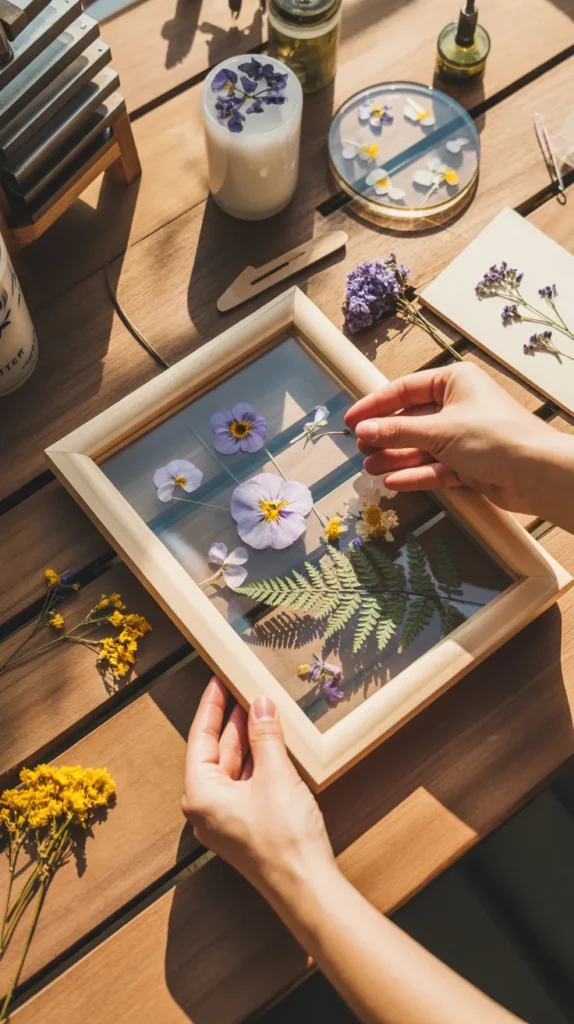
1. Floating Glass Frames
This is perhaps the most elegant and modern way to display the delicate beauty of your pressed botanicals.
By sandwiching flowers between two panes of glass, you create a “floating” effect that makes the flowers appear suspended in mid-air. This minimalist approach to dried pressed flower crafts turns a simple fern or pansy into a piece of gallery-worthy art.
To create this look, you’ll need a floating frame, which can be found at most craft or home decor stores. Carefully open the frame and clean both panes of glass.
Plan your composition by laying your pressed flowers out on one of the glass panes. You could create a symmetrical pattern, a cascading design from one corner, or a simple, striking display with a single, perfect bloom.
Once you are happy with the arrangement, place the second pane of glass on top, secure it within the frame, and your stunning piece is ready to hang. This project is all about celebrating the way light can pass through the tissue-thin, colorful petals.

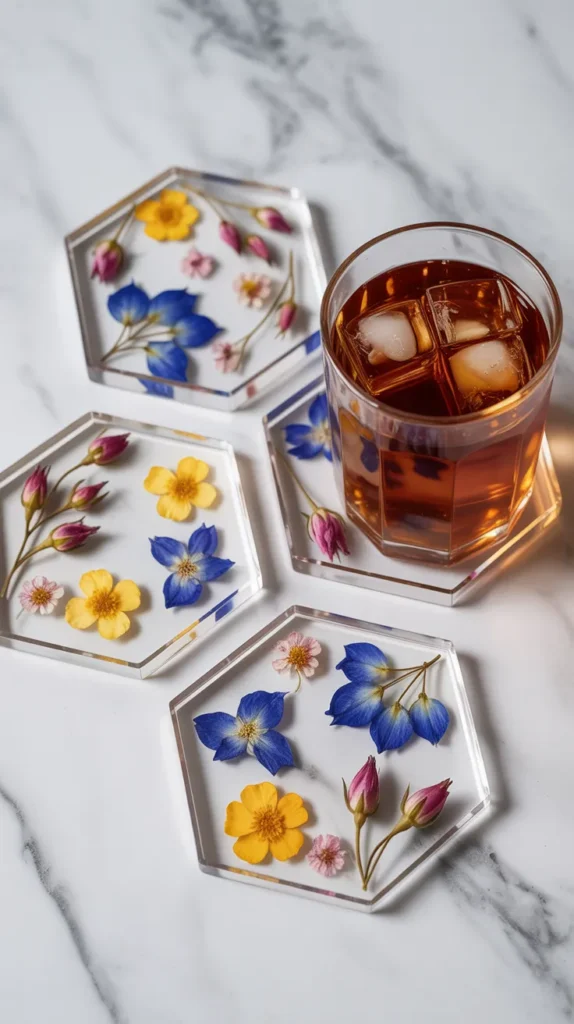
2. Botanical Resin Coasters
Capture your favorite blooms in crystal-clear resin to create functional art for your coffee table.
Resin coasters are one of the most popular dried pressed flower crafts because they are not only beautiful but also durable and practical. Each coaster becomes a tiny, preserved garden, protecting your furniture in the most stylish way possible.
For this project, you’ll need a two-part epoxy resin, silicone coaster molds, and a selection of small, flat pressed flowers.
Arrange your flowers face-down in the bottom of the mold. Get creative with your designs—you can add flakes of gold leaf for a touch of glamour.
Mix your resin according to the manufacturer’s instructions, a crucial step for a proper cure. A high-quality resin like {ArtResin Epoxy Resin} is a great investment for this project; it’s designed to be non-yellowing and is certified non-toxic when used as directed, making it ideal for items that will be handled regularly.
Slowly pour the resin over your flowers, use a toothpick to pop any air bubbles, and let it cure for 24-48 hours before demolding your stunning, custom coasters.
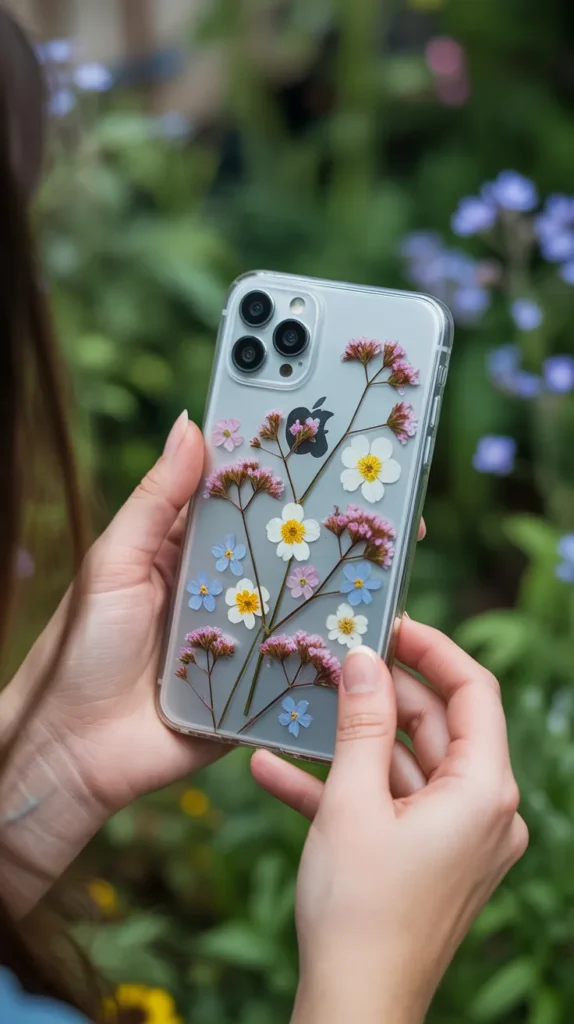
3. Personalized Pressed Flower Phone Case
Carry a piece of a secret garden with you wherever you go. This modern craft allows you to personalize your most-used accessory with the timeless beauty of nature. It’s a simple yet highly effective project that brings a bespoke, botanical touch to your technology.
All you need is a clear phone case that fits your device. Carefully arrange your favorite small, pressed flowers on the inside of the case.
Think about the color of your phone, as it will become the background for your design. Once you are satisfied with your floral layout, you have a choice.
For a non-permanent design that you can change with the seasons, simply snap your phone into the case.
The pressure is usually enough to hold the delicate flowers in place. For a more permanent solution, you can seal the flowers by painting a thin layer of clear resin over them or by using a strong, clear-drying craft glue.
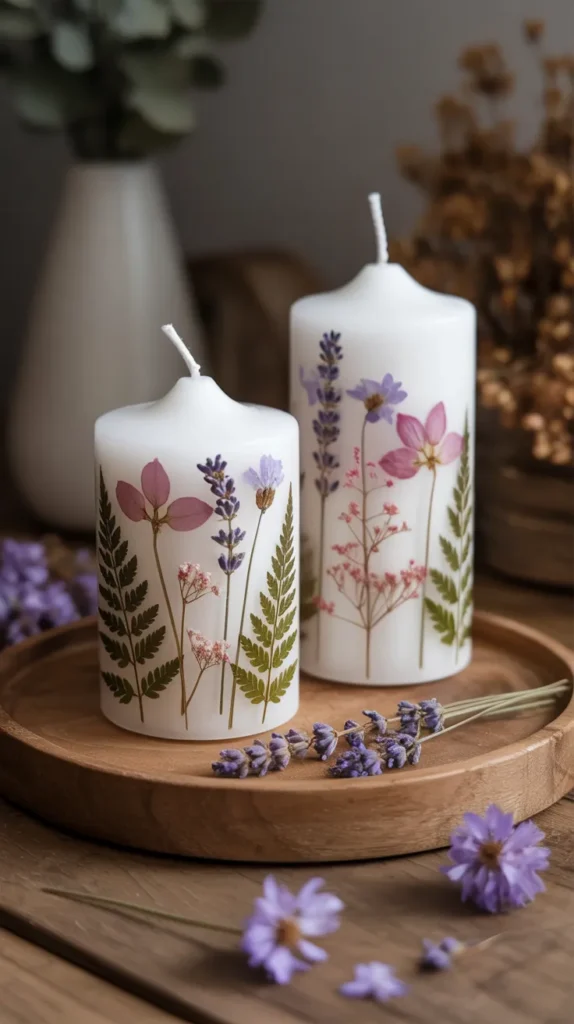
4. Decorated Pillar Candles
Infuse the warm, ambient glow of candlelight with the delicate charm of the garden. Decorating plain pillar candles with pressed flowers is a simple, elegant craft that results in a beautiful piece of home decor. This is one of the most romantic dried pressed flower crafts and makes for a wonderful, thoughtful handmade gift.
For this no-mess project, you’ll need a plain wax pillar candle, a selection of small, flat pressed flowers, and another plain candle (a taper or tea light) to use as a heat source. Hold a pressed flower against the side of your main pillar candle where you’d like it to be.
Gently heat an old metal spoon over the flame of your second candle. Once the spoon is warm, carefully rub the back of the spoon over the pressed flower.
The heat from the spoon will melt the wax of the pillar candle just enough to embed the flower seamlessly onto the surface. Repeat this process, layering flowers and leaves until you achieve your desired design.
5. Handmade Botanical Bookmarks
Encourage a love for both reading and nature with a beautiful, handmade bookmark. This is a classic and beloved craft that is perfect for using up smaller pressed flowers and leaves.
They are quick to make, look professionally done with a few simple tricks, and are always a cherished gift for any bookworm.
Start by cutting a piece of heavy cardstock to your desired bookmark size. Arrange your pressed flowers on the cardstock; a simple cascade down the center or a small cluster at the top both look beautiful.
Use a dab from a glue stick to hold them in place. To protect the delicate flowers and ensure your bookmark lasts through many reading adventures, you can laminate it.
If you don’t have a laminating machine, a great DIY hack is to use wide, clear packing tape to carefully cover both sides. Trim the edges, punch a hole at the top, and add a silky tassel to finish it off.
For a truly perfect hole, a handheld punch like the {Bostitch Office 1-Hole Punch} is a great tool. It’s much easier for both kids and adults to use than scissors and creates a clean circle every time.

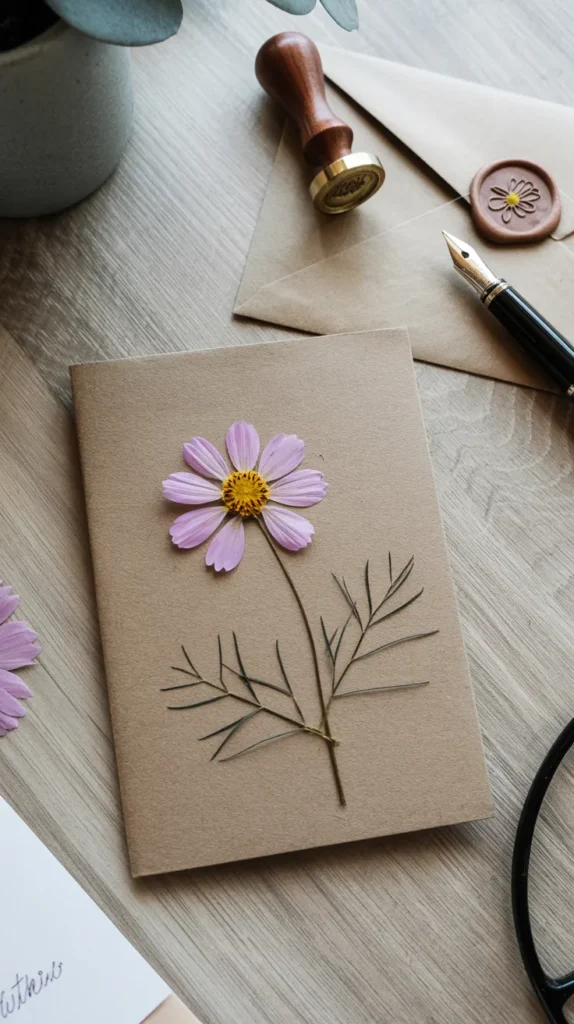
6. Custom Stationery and Greeting cards
Elevate your letter-writing with handmade stationery that is as beautiful as your words. Adding real pressed flowers to blank cards, envelopes, and notepaper adds a personal, luxurious touch that is sure to make the recipient feel special.
This is one of the most versatile dried pressed flower crafts, perfect for thank-you notes, wedding invitations, or just because.
Choose high-quality blank cardstock for your base. Using a fine-tipped glue applicator, apply a tiny amount of clear-drying glue to the back of a pressed flower and carefully place it on your card.
You can create a simple corner design, a border, or a central “bouquet.” You can even use a fine-liner pen to draw stems and leaves to connect your flowers.
A set of waterproof, archival ink pens like the {Sakura Pigma Micron Pen Set} is perfect for this. The ink won’t bleed if it accidentally gets wet, and the various tip sizes allow you to draw everything from bold stems to whisper-thin tendrils.
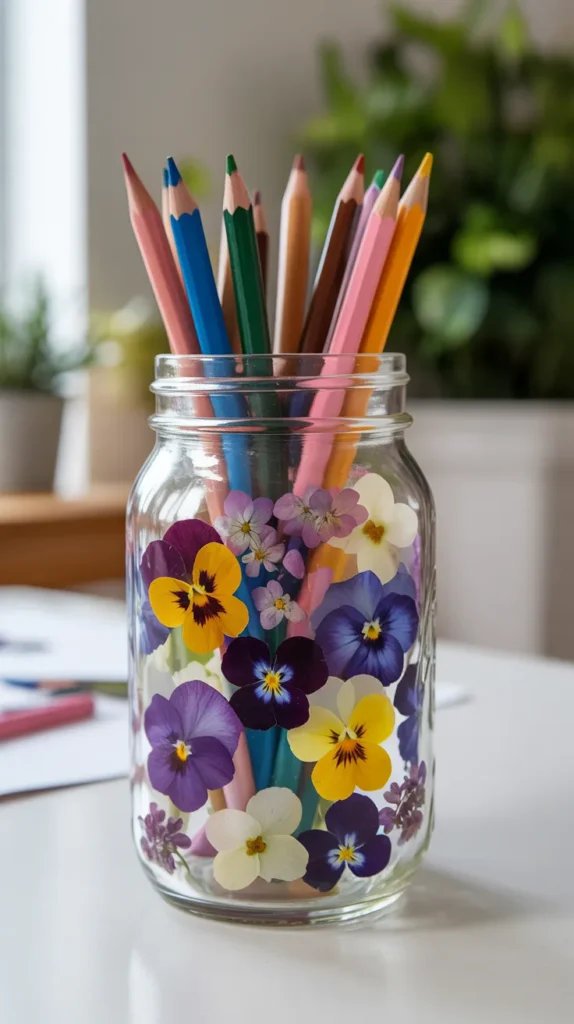
7. Decoupage Floral Jars and Vases
Give plain glass jars or simple vases a stunning botanical makeover using the art of decoupage. This technique allows you to cover a surface with paper cutouts—or in this case, flower petals—to create a beautiful, textured finish. It’s a fantastic way to upcycle glass jars and create charming decorative pieces.
You’ll need a clean glass jar, a selection of colorful pressed flowers, and a decoupage medium. {Mod Podge Waterbase Sealer, Glue and Finish} is the go-to for this type of project because it acts as the glue, the sealer, and the finish all in one, and it dries completely clear.
Using a soft paintbrush, apply a thin layer of Mod Podge onto a section of the glass. Gently place a pressed flower on the wet medium, and then paint another thin layer over the top to seal it in. Repeat this process until your jar is covered in a beautiful collage of flowers.
Once dry, it can be used as a pencil holder, a makeup brush holder, or a lantern with a battery-operated tea light inside.
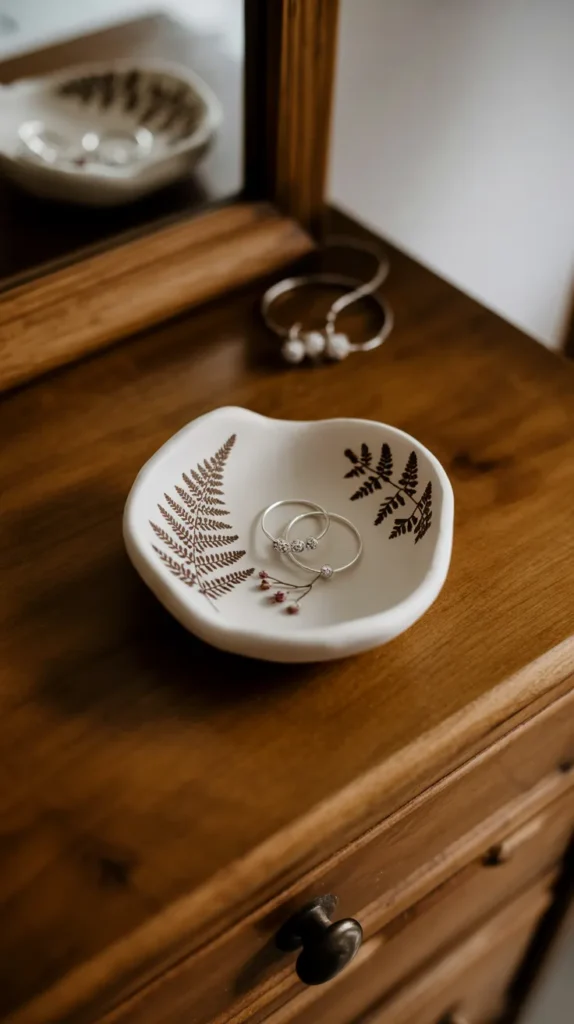
8. Clay Jewelry Dishes
Create a beautiful, handcrafted dish to hold your rings, earrings, or other small treasures. By impressing flowers into air-dry clay, you create a permanent, fossil-like record of the bloom’s delicate shape and texture. This is a wonderfully tactile project that combines sculpture with botanical art.
Take a piece of air-dry clay and roll it out flat, about a quarter-inch thick. Gently press your flowers into the surface of the clay.
You can use a rolling pin to ensure you get a deep, clear impression. Once you’re happy with the pattern, you can drape the clay circle over an upside-down bowl to give it a dish shape as it dries.
After the clay is completely dry (it may take 24-48 hours), you can paint inside the impressions with watercolor or acrylic paint to bring the flowers back to life, or leave them as subtle, elegant indentations. For a durable, waterproof finish, seal the dish with a clear acrylic sealer.
{Krylon Crystal Clear Acrylic Spray Finish} is a great option because it provides a protective, non-yellowing coating in a simple spray application.
9. Floral-Embellished Wax Seals
Add a touch of old-world romance to your letters, invitations, or gift wrap with wax seals embedded with tiny flower fragments.
This is a small detail that makes a huge impact, showing incredible thought and care. It’s a sophisticated addition to your repertoire of dried pressed flower crafts.
You’ll need a wax seal stamp, sealing wax beads, and very small dried flower petals or fragments. Melt the wax beads in a small spoon over a candle.
Pour a small puddle of the melted wax onto your envelope flap. Quickly sprinkle a few tiny flower fragments onto the hot wax, then firmly press your stamp into the center. Hold it for a few seconds, then lift to reveal a beautiful seal with flowers peeking out from the edges.

10. Botanical Wall Tapestry
Create a large-scale piece of art that makes a stunning, bohemian focal point for any room. This wall hanging uses a simple embroidery hoop and a piece of translucent fabric to create a giant, circular “frame” for a floating floral arrangement.
Stretch a piece of tulle or sheer organza tightly in a large embroidery hoop. This will be your canvas.
Plan your design, then carefully glue your pressed flowers onto the taut fabric using a clear-drying fabric glue. Create a design that flows and feels organic, like a crescent of flowers sweeping across one side of the hoop.
The translucent fabric disappears against the wall, making the flowers look like they are floating in a circle. It’s a breathtakingly beautiful and unique piece of home decor.

11. Custom Drink Stirrers
Elevate your next cocktail party or brunch with these incredibly chic and custom drink stirrers. By encasing small pressed flowers in resin on the end of a stick, you create a unique and beautiful accessory for any beverage.
For this project, you’ll need resin, small decorative molds (small circles or squares work well), and clear acrylic drink stirrer sticks.
Place a small pressed flower in the bottom of the mold. Mix and pour a small amount of resin over it. Gently place the end of the acrylic stick into the resin, ensuring it is submerged but not touching the bottom.
Let it cure fully. The result is a set of beautiful, reusable drink stirrers that are sure to be a conversation starter.

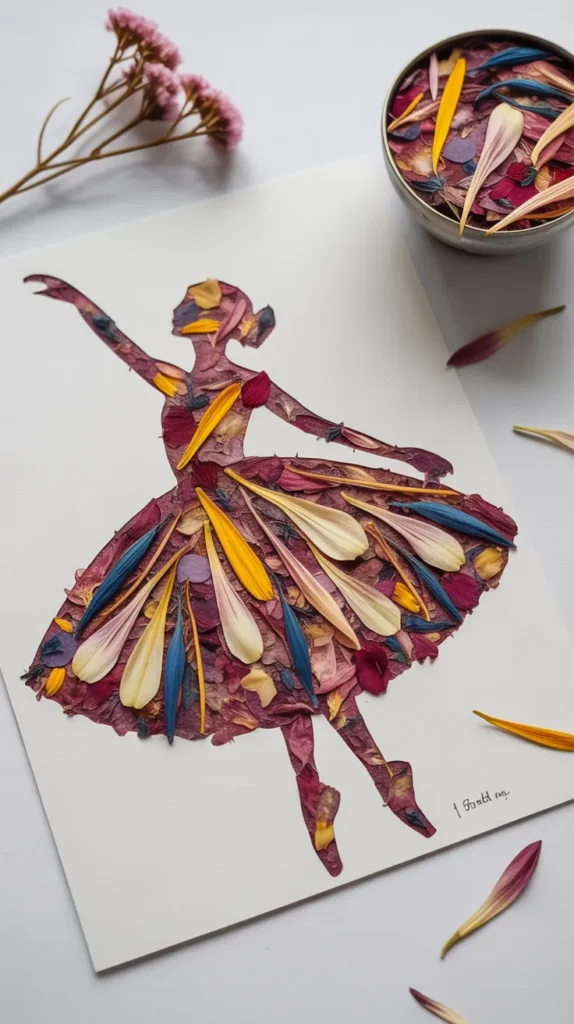
12. Flower Petal “Confetti” Art
This is a wonderfully freeing and expressive project that feels like painting, but with petals instead of paint. It’s a fantastic way to use up broken petals or flowers that didn’t press perfectly. It’s one of the most forgiving and creative dried pressed flower crafts.
On a piece of heavy cardstock or a small canvas, draw a simple silhouette—a heart, an animal, a letter, or a dress shape.
Fill a small bowl with a mix of colorful dried flower petals. Apply a layer of craft glue inside your drawn shape.
Then, let your creativity run wild by sprinkling the “petal confetti” over the glued area. Gently press the petals down, then shake off the excess.
The result is a beautiful, textured, mosaic-like piece of art. {Elmer’s CraftBond Tacky Glue} is excellent for this, as its thick consistency prevents the petals from sliding around while you work.
Your Pressed Flower Crafting Toolkit
Having the right tools can make your crafting projects more enjoyable and lead to more beautiful results. Here are some of the essential supplies mentioned in this guide.
| Product Name | Brand | Use |
|---|---|---|
| Epoxy Resin | ArtResin | For creating professional, crystal-clear, and non-yellowing resin crafts like coasters and jewelry. |
| 1-Hole Punch | Bostitch Office | Creates clean, perfect holes in handmade bookmarks for adding tassels or ribbons. |
| Pigma Micron Pen Set | Sakura | Archival, waterproof ink pens ideal for drawing stems and details on stationery. |
| Waterbase Sealer, Glue and Finish | Mod Podge | The perfect all-in-one medium for decoupaging pressed flowers onto jars and candles. |
| Crystal Clear Acrylic Spray Finish | Krylon | An easy-to-use spray that seals and protects air-dry clay projects like jewelry dishes. |
| CraftBond Tacky Glue | Elmer’s | A thick, tacky glue that’s perfect for holding petals in place for “confetti” art projects. |
Conclusion: Preserving Beauty, One Petal at a Time
The world of dried pressed flower crafts is a gateway to connecting with nature on a deeper, more creative level.
It encourages us to slow down, to observe the tiny details of a petal, and to find a way to make fleeting beauty last a lifetime. Each creation holds a story—of a garden, a season, or a special moment.
We hope these 12 enchanting ideas have inspired you to start pressing your own flowers and turning them into personal works of art.
Whether you are creating a simple bookmark or an elaborate wall hanging, the process itself is a mindful and rewarding experience.
So, gather some blooms, find a heavy book, and start preserving. Your next masterpiece is waiting in a flower bed near you. Which of these beautiful projects will you be trying first?