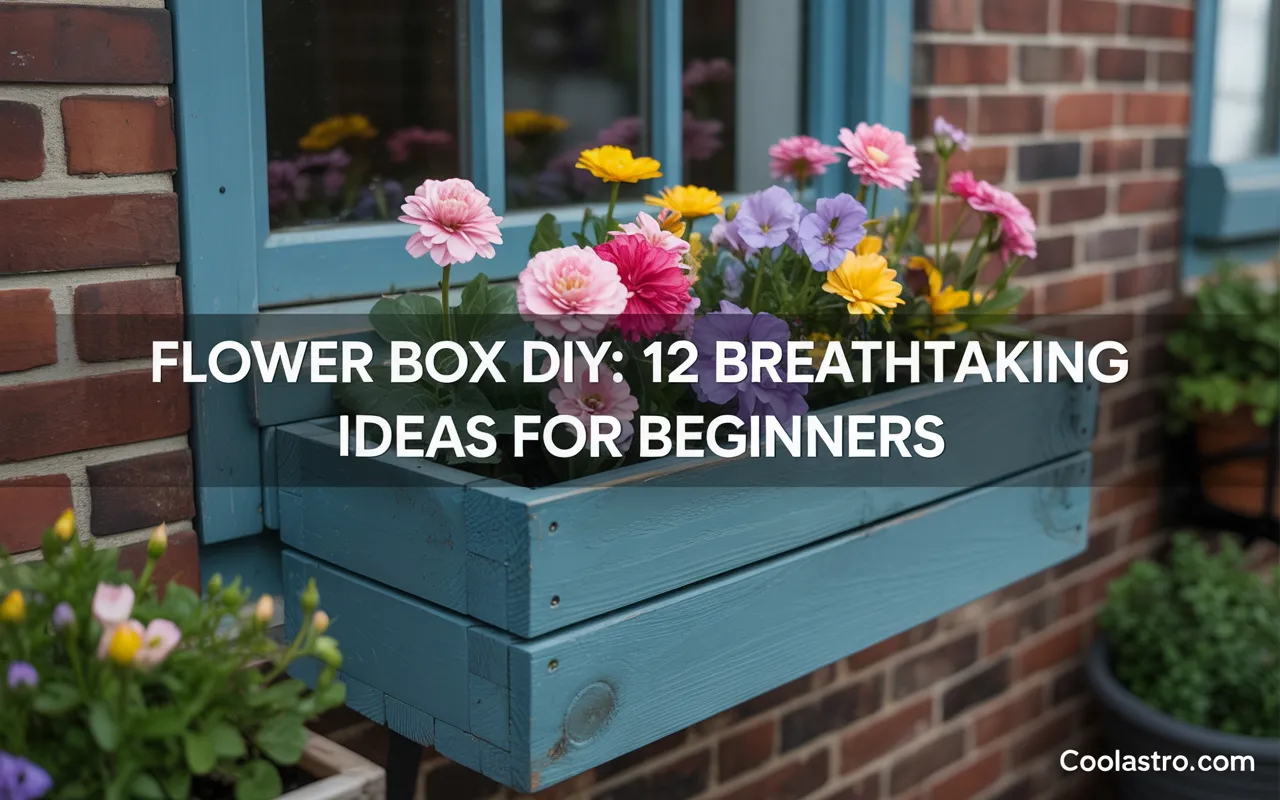
There’s a special kind of magic in creating something beautiful with your own two hands. It’s a feeling of pride, a sense of accomplishment, and a deep connection to your home.
When you add the vibrant life of flowers to that equation, you get something truly special: a flower box DIY project.
It’s more than just building a container for plants; it’s about crafting a piece of your home’s personality, a welcoming splash of color that greets you and your guests every single day.
You don’t need to be a master woodworker or a seasoned gardener to create something breathtaking.
This guide is designed for complete beginners, walking you through twelve stunning flower box DIY ideas that are as simple as they are beautiful.
We’ll explore different styles, from rustic pallet designs to sleek modern planters, and give you the confidence to start your own project.
Get ready to unlock your creativity, get your hands a little dirty, and build a flower box that will bring you joy for seasons to come.
Essential Tools for Your Flower Box DIY Project
Before you start cutting and building, having the right tools and supplies on hand will make your flower box DIY journey infinitely more enjoyable and successful.
These hand-picked products are perfect for beginners and will help you achieve a professional, long-lasting finish.
- {BLACK+DECKER 20V MAX Cordless Drill & Project Kit} by BLACK+DECKER: This is the number one tool for any beginner DIYer. This all-in-one kit includes a reliable cordless drill for assembling your box, plus all the essential hand tools like a hammer, screwdrivers, and pliers. It’s the perfect starter pack for this project and many more.
- {Kreg Pocket-Hole Jig 320} by Kreg: Want to build a sturdy flower box with no visible screws on the outside? This little tool is your secret weapon. A pocket-hole jig allows you to create incredibly strong, hidden joints with ease. It’s a game-changer for making your flower box DIY projects look clean and professional.
- {Minwax Wood Finish Penetrating Interior Wood Stain} by Minwax: To give your wooden flower box a rich color and protect it from the elements, a quality wood stain is essential. Minwax offers a huge range of colors, from classic oak to deep espresso, allowing you to perfectly match your home’s style.
- {Gorilla Ultimate Waterproof Wood Glue} by Gorilla: For a flower box that will stand up to watering and weather, you need more than just screws. This waterproof wood glue creates an incredibly strong bond, sealing your joints and ensuring your creation lasts for years.
- {Varathane Water-Based Spar Urethane} by Varathane: This is the crucial final step for protecting your outdoor flower box DIY project. A spar urethane provides a clear, waterproof, and UV-resistant topcoat that protects the wood from sun damage, rain, and temperature changes, preventing rot and decay.
- {Fiskars Softgrip Bypass Pruner} by Fiskars: Once your flower box is built and planted, you’ll need to care for your flowers. A good pair of pruners is essential for deadheading spent blooms, trimming back overgrowth, and keeping your floral display looking lush and tidy.
- {Miracle-Gro Potting Mix} by Miracle-Gro: Don’t forget about the flowers! This potting mix is specifically designed to help plants in containers thrive. It’s packed with nutrients that feed your plants for months, ensuring your beautiful new flower box is filled with healthy, vibrant blooms.
12 Breathtaking Flower Box DIY Ideas
Ready to find the perfect project? Here are twelve inspiring flower box DIY ideas, each with a unique style and perfect for beginners.
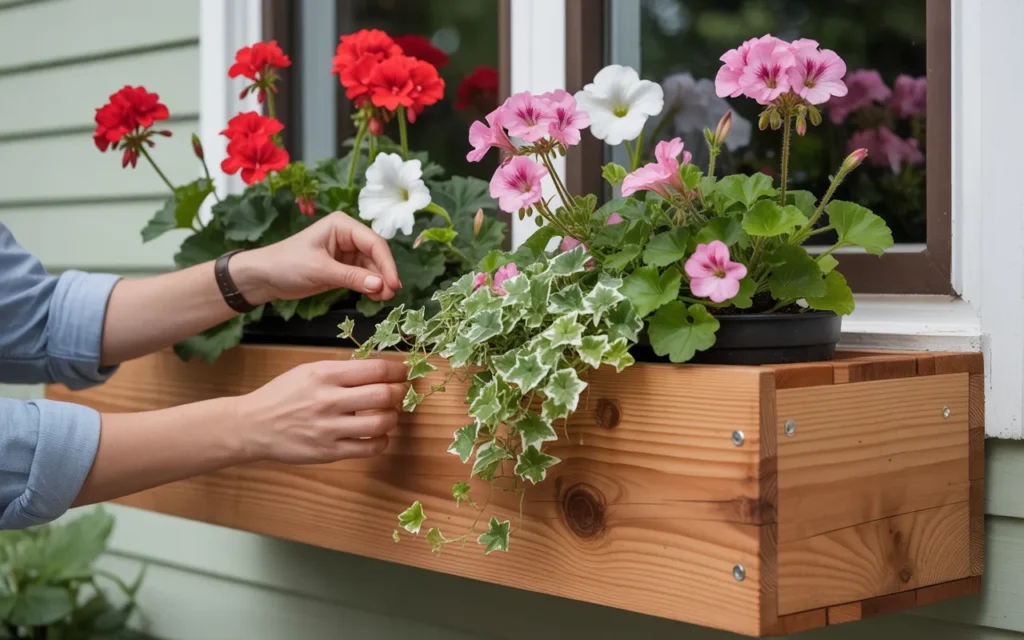
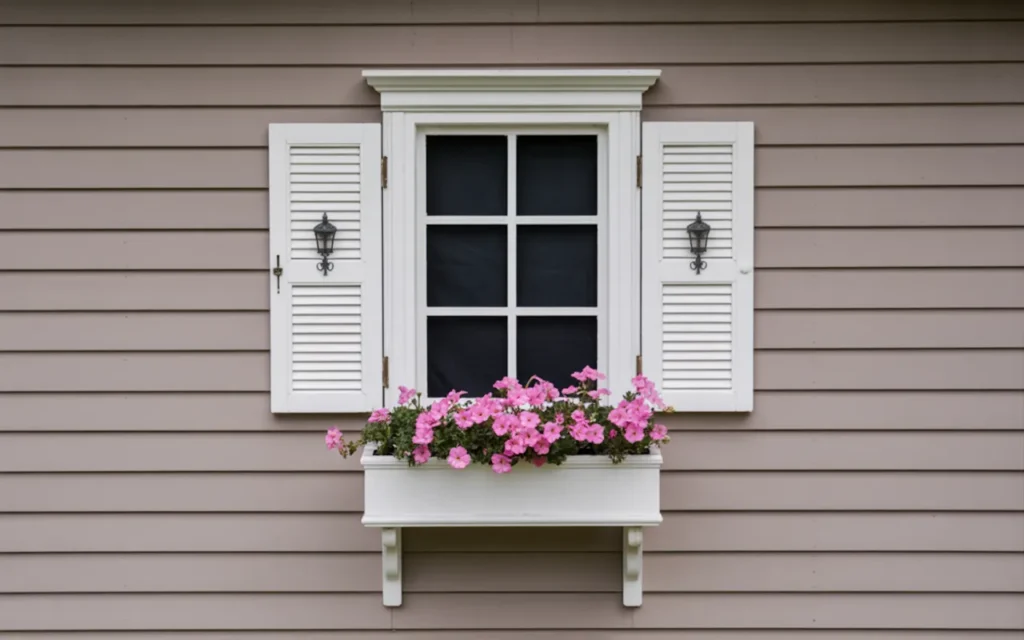
1. The Classic Cedar Window Box
This is the quintessential flower box DIY project and a fantastic place for a beginner to start. Cedar is naturally resistant to rot and insects, making it an excellent choice for outdoor projects.
The design is simple: a basic rectangular box made from five pieces of cedar fence pickets or 1×6 boards. It’s an iconic look that adds instant charm and curb appeal to any home.
To build it, you’ll cut one piece for the bottom and four pieces for the sides. You can assemble it with waterproof wood glue and outdoor screws.
The real beauty of this project is its simplicity and timeless appeal. You can leave the cedar to weather naturally to a beautiful silvery-gray, or apply a stain or sealer to maintain its warm, reddish tone.
Drill a few drainage holes in the bottom, mount it under a window, and fill it with classic flowers like geraniums or petunias for a look that never goes out of style.
2. The Rustic Pallet Wood Planter
For a project that is both budget-friendly and full of rustic character, a pallet wood flower box DIY is a perfect choice.
Reclaimed pallet wood often has a weathered texture, interesting markings, and a story to tell. You can typically find pallets for free from local businesses (just be sure to look for the “HT” stamp, which means it was heat-treated, not chemically treated).
To create this planter, you’ll first need to carefully disassemble the pallet. Then, you can use the planks to construct a simple box.
The varied tones and imperfections of the wood are what give this project its charm, so don’t worry about making everything perfect.
You can sand the wood lightly to remove splinters or leave it rough for a more rugged look. This style pairs wonderfully with wildflowers, daisies, or herbs for a truly authentic, farmhouse feel.
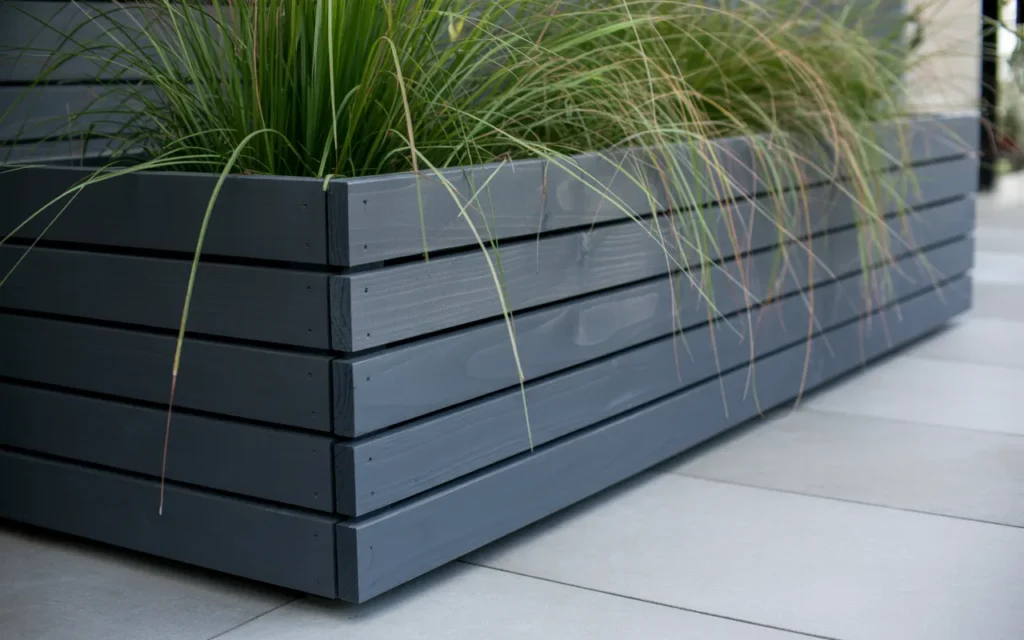
3. The Modern Slatted Planter Box
If your home has a more contemporary aesthetic, this modern flower box DIY will fit right in. This design features clean lines and a slatted construction that adds texture and architectural interest. It’s typically made from weather-resistant wood like cedar or redwood, cut into thin strips (or “slats”).
You’ll first build a basic inner frame for the box. Then, you’ll attach the horizontal slats to the outside of the frame, leaving a small, uniform gap between each one.
This creates a sophisticated, high-end look. You can stain the wood a dark color like black or deep espresso for a dramatic effect, or use a natural finish to highlight the wood’s beauty.
This style looks stunning when planted with sculptural plants like ornamental grasses, succulents, or a single variety of flowers like all-white petunias.
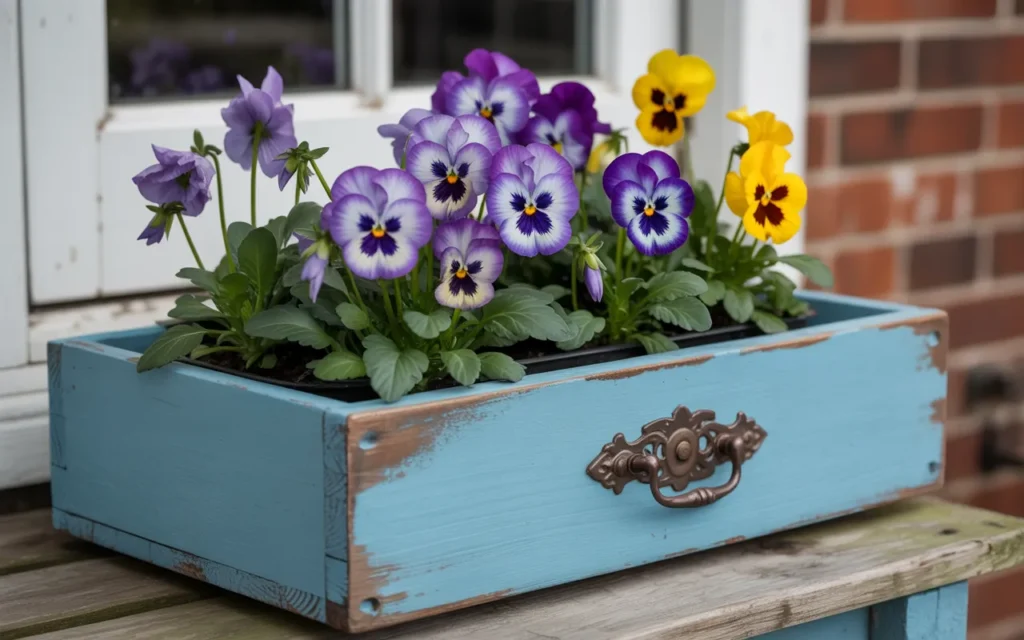
4. The Upcycled Drawer Planter
Give an old piece of furniture a new lease on life with this clever and whimsical flower box DIY idea. An old dresser drawer, especially one with interesting details like a vintage handle or dovetail joints, can be transformed into a unique and charming planter.
This is a fantastic upcycling project that adds a touch of quirky personality to your porch or garden.
The process is incredibly simple. First, make sure the drawer is structurally sound. You may need to reinforce the bottom with some extra wood or brackets.
It’s crucial to drill several drainage holes in the bottom.
To protect the wood from moisture, you can line the inside with a heavy-duty plastic liner (poke holes in the liner that align with your drainage holes) or paint the interior with a waterproof sealant.
Paint the outside a fun, bright color or distress it for a shabby-chic look.
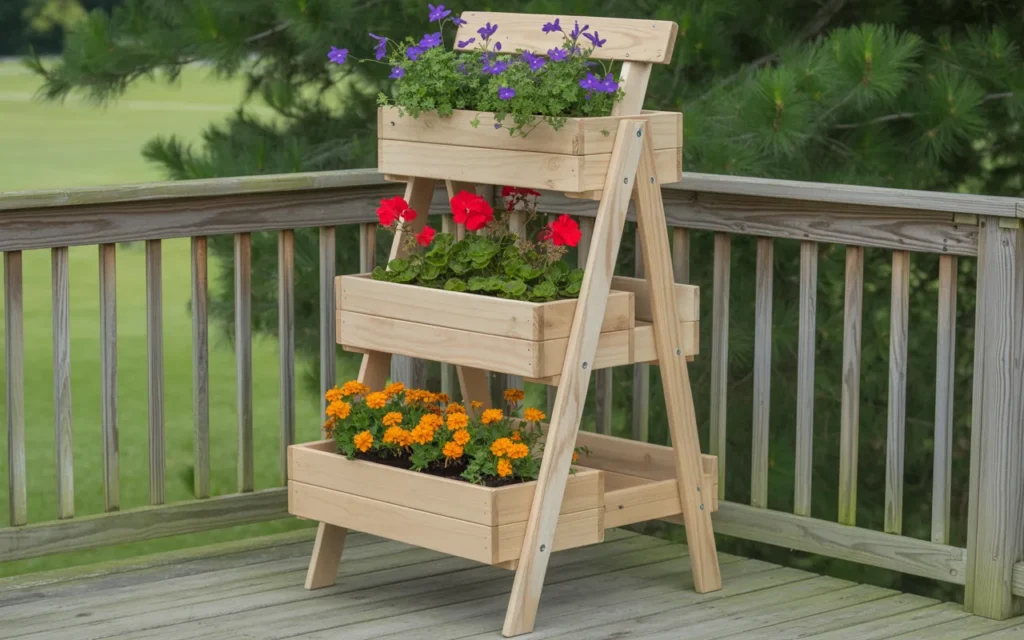
5. The Tiered Ladder Planter
When you’re short on horizontal space, go vertical! A tiered or ladder-style planter allows you to display multiple flower boxes in a small footprint, making it perfect for balconies, small patios, or a corner of your deck.
This flower box DIY project involves building a simple A-frame structure that supports several staggered planter boxes.
You can build the A-frame from 2x4s and the individual boxes from 1×6 cedar or pine boards. The boxes get progressively smaller as they go up, or you can make them all the same size.
This design is not only space-efficient but also creates a stunning visual display.
You can use it to create a vertical herb garden, a strawberry patch, or a cascade of colorful annuals. Paint or stain it to match your exterior for a custom look.
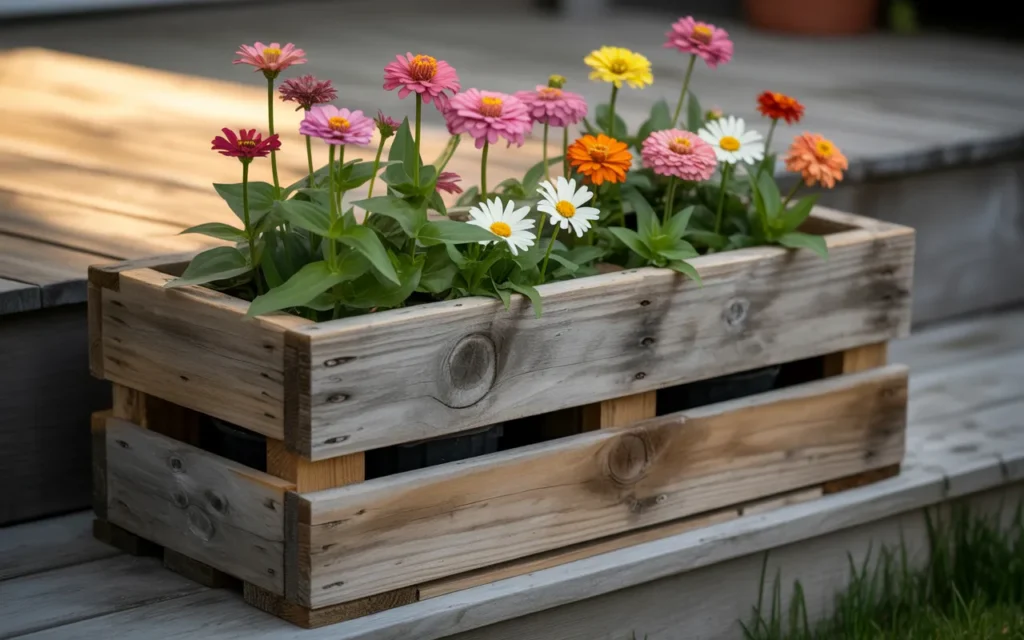
6. The Faux Vintage Crate Planter
Get the vintage farmhouse look without having to hunt for an authentic antique crate. This flower box DIY project involves building a simple wooden box and adding details to make it look like a vintage crate.
It’s a fun project that combines basic woodworking with a bit of creative finishing.
Build a simple box from inexpensive pine boards. The magic is in the details. You can create faux-slatted sides by routing shallow grooves into a solid piece of wood or by using very thin planks.
The best part is adding a custom “label.” Use a stencil and some black paint to add a farm name, a product like “Fresh Flowers,” or a location and year to give it that authentic, old-timey feel. Lightly sand and distress the paint to complete the aged look.

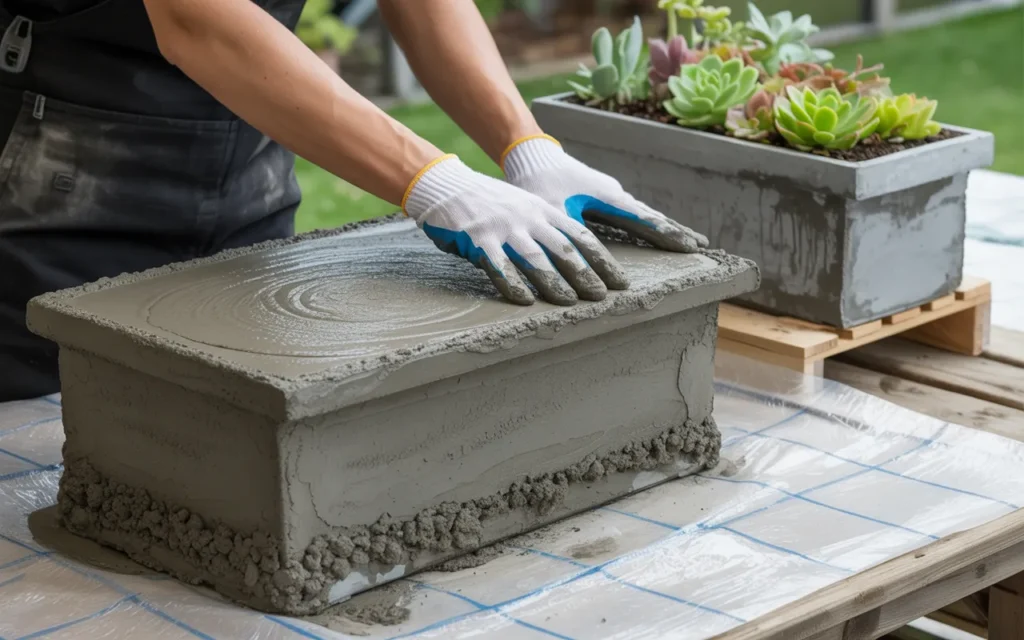
7. The Concrete Planter Box
For a truly durable and modern-looking flower box, try working with concrete. While it might sound intimidating, creating a concrete planter is a surprisingly straightforward flower box DIY project.
The process involves creating a mold and pouring in a concrete mix. The result is a heavy, substantial planter with a cool, industrial-chic vibe.
You can create a mold from melamine board or even use two different-sized cardboard boxes (one inside the other) for a simpler, one-time mold.
Mix a batch of quick-setting concrete according to the package directions, pour it into the mold, and let it cure completely.
Once you remove the mold, you’ll have a sleek, modern planter that will last for decades. The raw, gray texture of the concrete is beautiful on its own and provides a stunning contrast to soft flowers or vibrant green plants.
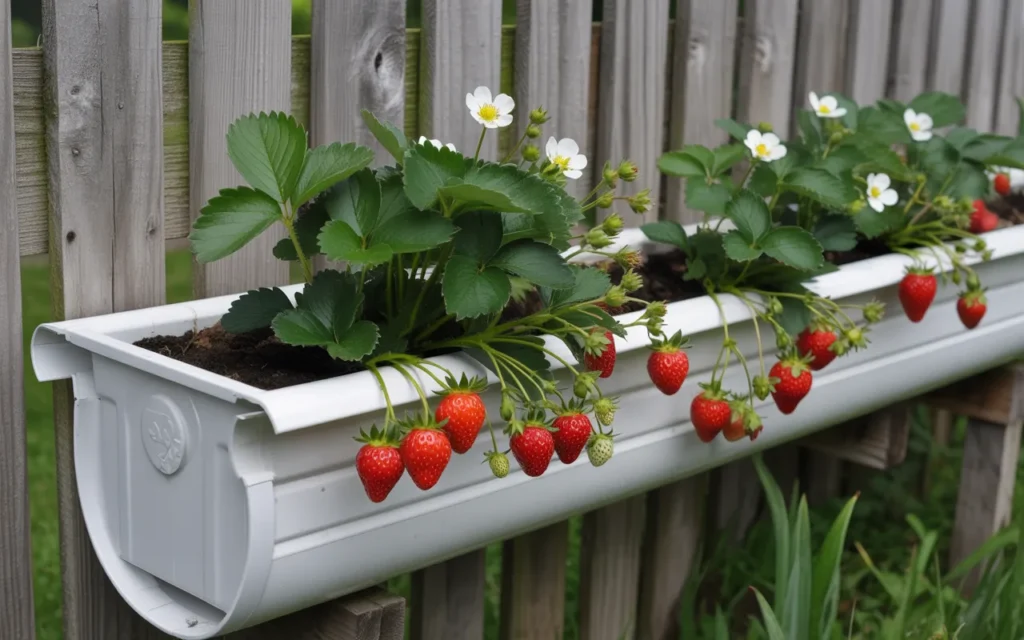
8. The Hanging Gutter Planter
This is an ingenious and incredibly space-saving flower box DIY idea, perfect for mounting along a fence, wall, or balcony railing.
It involves repurposing a section of vinyl rain gutter into a long, narrow planter. Gutters are inexpensive, lightweight, and the perfect shape for holding soil and plants.
Simply purchase a length of standard vinyl gutter and the corresponding end caps. Cut the gutter to your desired length using a hacksaw.
Glue the end caps on with PVC cement or a strong, waterproof adhesive. You’ll then need to drill drainage holes every 6-8 inches along the bottom.
You can mount the gutter directly to a wall or fence using gutter hangers. This is a fantastic solution for growing strawberries, lettuce, herbs, or shallow-rooted annuals like pansies and alyssum.
9. The Self-Watering Planter Box
If you’re a busy person or tend to forget to water your plants, a self-watering flower box DIY project is a lifesaver.
This clever design incorporates a hidden water reservoir at the bottom of the planter that wicks moisture up into the soil as needed, keeping your plants perfectly hydrated.
You can build a standard wooden box, but with a taller design. The trick is to create a false bottom inside the box, a few inches up from the actual bottom.
This lower section will be your water reservoir. You’ll then use a “wicking system”—such as PVC pipes filled with soil or fabric wicks that dangle into the water—to draw the water up into the main soil compartment.
A small fill tube running to the reservoir allows you to easily add more water. This project takes a bit more planning but pays off with healthier plants and less watering work.
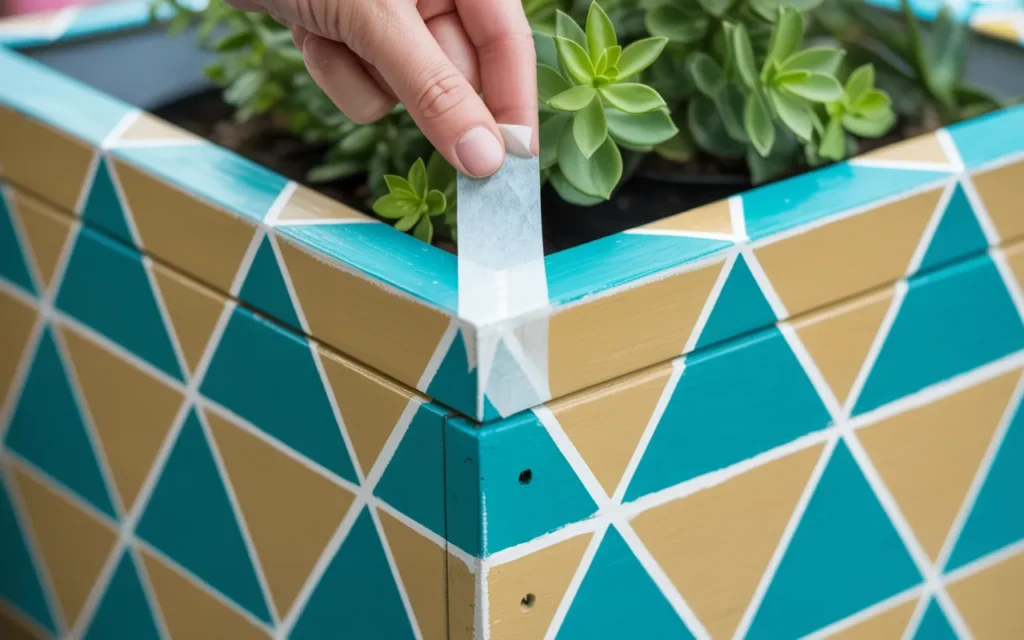
10. The Painted Geometric Pattern Box
Transform a basic, inexpensive wooden planter into a work of art with a little bit of painter’s tape and some colorful paint.
This flower box DIY is less about woodworking and more about creative expression. It’s a perfect project for adding a pop of modern style and personality to your outdoor space.
Start with a simple, pre-made wooden box or build one from pine. Sand it smooth and apply a base coat of paint.
Once it’s dry, use high-quality painter’s tape to mask off a geometric pattern. Think triangles, chevrons, stripes, or abstract shapes.
Paint the un-taped sections with contrasting colors. For a trendy look, use a mix of pastels, metallics, and bold colors. Once the paint is dry, carefully peel off the tape to reveal your crisp, clean design.
11. The Window Frame Illusion Box
This is a whimsical and highly creative flower box DIY that adds architectural interest to a blank wall. The project involves building a decorative window frame and mounting a flower box beneath it, creating the charming illusion of a cottage window.
Build a simple window frame—a basic rectangle with one or two cross pieces to create “panes”—out of 1×3 or 1×4 boards.
You can leave the panes open, back them with a mirror to reflect the sky, or even insert a piece of chalkboard for messages.
Build a separate, matching flower box to mount directly underneath it. For extra charm, you can even build a pair of small, decorative shutters to flank your “window.” Paint the whole assembly in coordinating colors for a truly eye-catching feature.
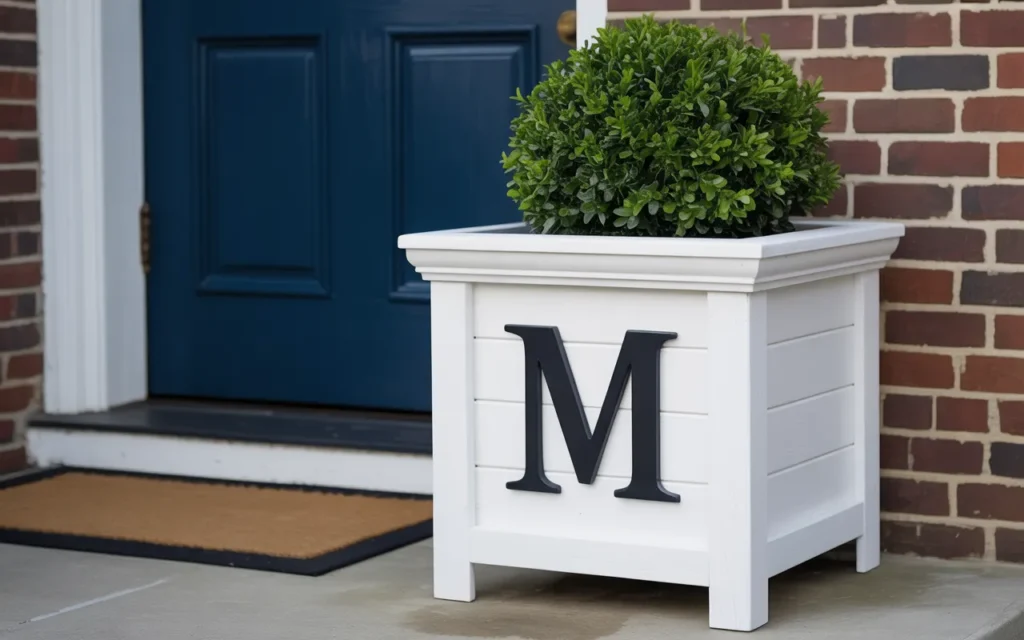
12. The Monogrammed Planter Box
Add a personal and elegant touch to your front porch with a monogrammed flower box DIY. This project involves adding a large, stylish initial to the front of a custom-built planter, creating a piece that is both beautiful and uniquely yours.
Build a square or rectangular planter box from high-quality wood. The key is to create a slightly recessed or framed-out panel on the front face where the monogram will go.
This adds a level of dimension and sophistication. You can purchase a large, pre-made wooden letter from a craft store.
Paint or stain the box and the letter in contrasting colors (e.g., a white box with a black letter, or a dark-stained box with a white letter). Attach the letter to the center of the front panel for a classy, personalized welcome.
Recommended Product Summary
Here is a quick reference table of the essential products that will help you tackle any of these fun and rewarding flower box DIY projects.
| Product Name | Brand | Use Case |
|---|---|---|
| {BLACK+DECKER 20V MAX Cordless Drill Kit} | BLACK+DECKER | All-in-one kit for drilling, driving, and basic assembly. |
| {Kreg Pocket-Hole Jig 320} | Kreg | Creating strong, hidden joints for a professional look. |
| {Minwax Wood Finish Penetrating Stain} | Minwax | Staining the wood to your desired color. |
| {Gorilla Ultimate Waterproof Wood Glue} | Gorilla | Ensuring a strong, weather-resistant bond for all joints. |
| {Varathane Water-Based Spar Urethane} | Varathane | Applying a final clear coat to protect against sun and rain. |
| {Fiskars Softgrip Bypass Pruner} | Fiskars | Keeping your finished planter’s flowers healthy and tidy. |
| {Miracle-Gro Potting Mix} | Miracle-Gro | Providing the perfect soil and nutrients for your plants. |
It’s Time to Build Your Beauty
A blank space on your porch, a bare wall, or an empty spot under a window is not a problem—it’s an opportunity. It’s a chance to create something with your own hands that will bring life, color, and personality to your home.
A flower box DIY project is the perfect way to start your journey into woodworking and gardening. Don’t be afraid to make mistakes; every cut and screw is part of the learning process.
So choose the idea that excites you most, gather your tools, and start building. The satisfaction of filling your own handmade flower box with beautiful blooms is a reward you’ll get to enjoy all season long.