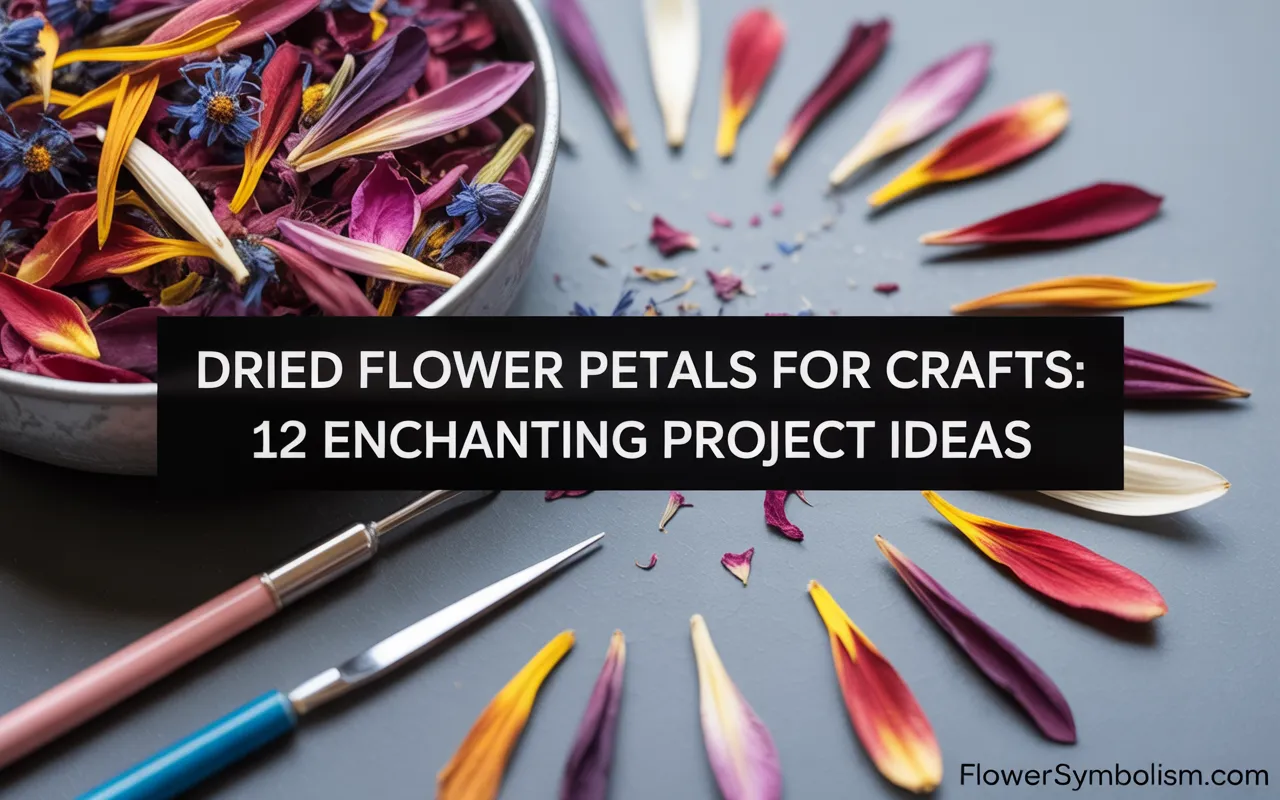
There’s a special kind of magic in a handful of dried flower petals. They are like nature’s confetti—tiny, colorful whispers of a summer garden, a cherished bouquet, or a walk in the woods.
While whole dried flowers are beautiful, focusing on just the petals opens up a unique world of creativity. Using dried flower petals for crafts allows you to play with color, texture, and light in a way that feels both delicate and expressive.
Crafting with loose petals is wonderfully accessible for everyone. You can gather them from your own garden as flowers begin to fade, save them from a special occasion bouquet, or buy them in colorful, pre-dried assortments.
These projects often require simple tools you may already have, making it an easy and affordable hobby to start. It’s a chance to slow down, connect with nature, and create something truly personal and beautiful.
This guide is your ultimate resource for getting started. We will explore 12 enchanting project ideas that transform simple petals into stunning home decor, personal accessories, and thoughtful handmade gifts.
From luminous resin art to fragrant bath treats, we have a project for every skill level and style. Get ready to turn a simple handful of petals into a work of art!
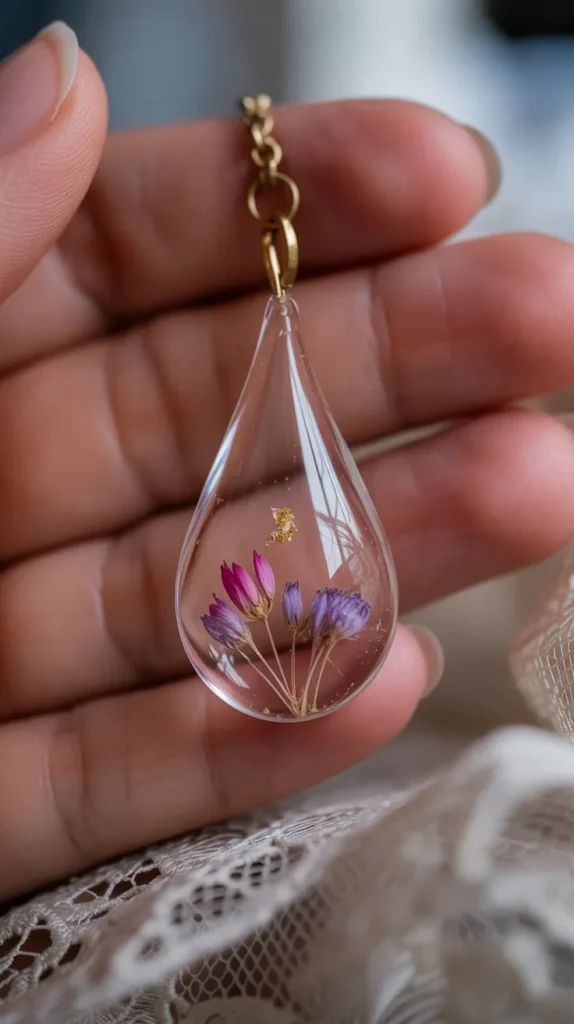
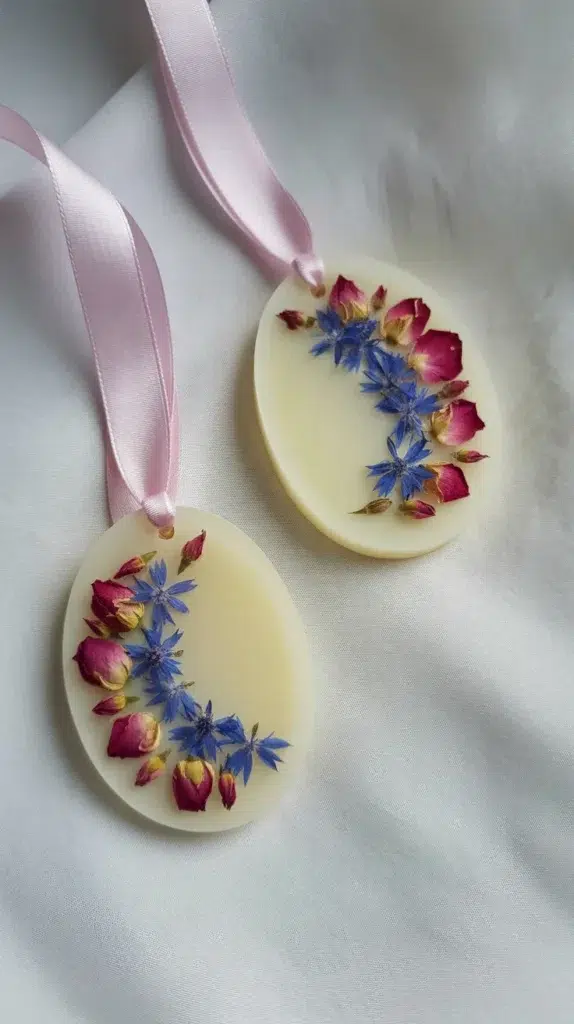
1. Luminous Resin Jewelry
Capture the paper-thin beauty of flower petals forever by encasing them in crystal-clear resin. This project allows you to create bespoke, wearable art in the form of pendants, earrings, or charms.
It’s one of the most popular uses for dried flower petals for crafts because the results are professional-looking, durable, and make for deeply meaningful gifts. Imagine wearing a tiny piece of your wedding bouquet or a petal from your garden.
What You’ll Need:
- Epoxy resin and hardener
- Silicone jewelry molds (pendants, earrings, etc.)
- Small, dried flower petals (hydrangea, verbena, delphinium work well)
- Jewelry findings (bails, earring hooks, necklace chains)
- Tweezers
Step-by-Step:
- Using tweezers, carefully arrange your chosen petals inside your silicone mold. Remember that you are working upside down, so the bottom of the mold will be the front of your piece.
- For a truly professional and lasting piece, a quality resin is essential. {ArtResin Epoxy Resin} is an excellent choice for jewelry as it is formulated to be non-yellowing and is certified non-toxic when used as directed, making it safe for items worn against the skin.
- Mix your resin and hardener according to the package instructions—this step is crucial for a proper cure.
- Slowly pour the resin into the mold, covering the petals. Use a toothpick to gently move petals or pop any tiny air bubbles that rise to the surface.
- Let the resin cure in a warm, dust-free place for 24-48 hours.
- Once fully cured, demold your beautiful resin piece. Attach a bail to the back with a strong glue, thread a chain through it, and your unique piece of floral jewelry is complete.
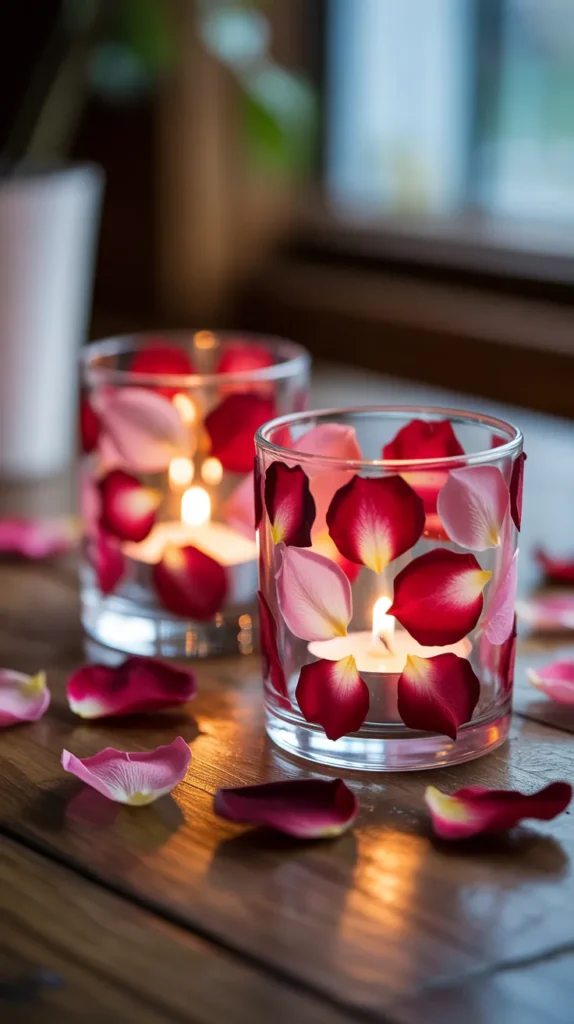
2. Decoupage Floral Votive Holders
Transform plain glass votive holders or recycled jars into romantic, glowing lanterns. This simple decoupage technique uses dried flower petals to create a beautiful stained-glass effect when a candle is lit inside. It’s a perfect beginner project for anyone new to dried flower petals for crafts.
What You’ll Need:
- Clean glass votive holders or small jars
- Colorful dried flower petals (translucent ones like bougainvillea work wonderfully)
- A decoupage medium
- A small, soft paintbrush
- Battery-operated tea lights
Step-by-Step:
- Start with a clean, dry glass surface.
- Using your paintbrush, apply a thin, even layer of a decoupage medium like {Mod Podge Waterbase Sealer, Glue and Finish} to a small section of the glass. This all-in-one product is a crafter’s best friend, acting as both the glue and the final protective sealer.
- Gently press a petal onto the wet medium.
- Carefully paint another thin layer of Mod Podge over the top of the petal to seal it in place. Be gentle to avoid tearing the delicate petal.
- Continue this process, overlapping petals and working in small sections, until the entire surface is covered in a beautiful floral collage.
- The Mod Podge will look milky at first but will dry to a clear, durable finish. Let it dry completely, then pop in a battery-operated tea light for a safe and magical glow.
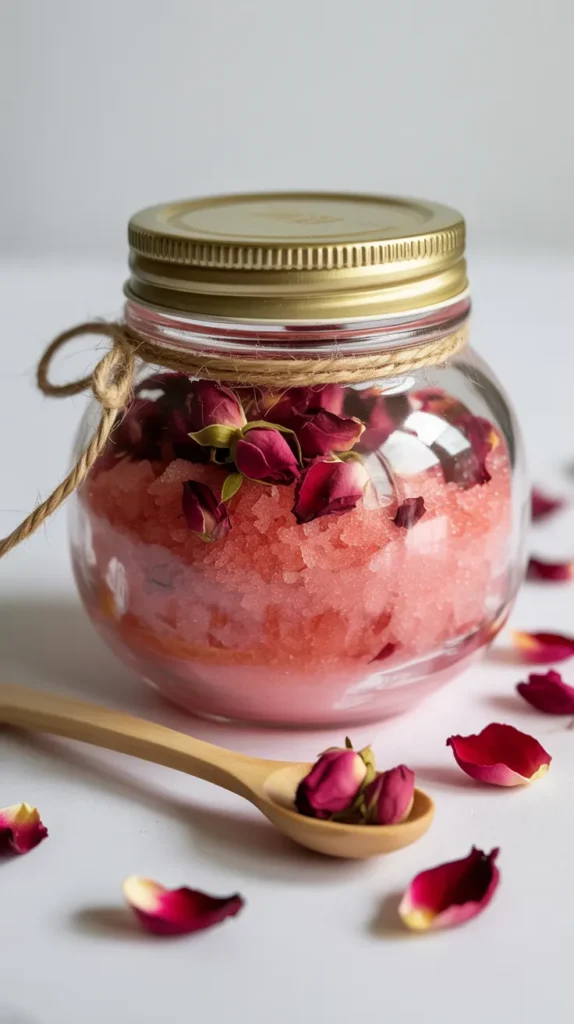
3. Romantic Rose Petal Sugar Scrub
Create a luxurious, pampering sugar scrub that looks as beautiful as it feels. This is an incredibly simple DIY project that combines gentle exfoliation with the classic, romantic scent of roses. Packaged in a pretty jar, it makes for a stunning and thoughtful handmade gift.
What You’ll Need:
- 1 cup of granulated sugar
- 1/2 cup of a carrier oil (coconut, sweet almond, or jojoba oil work well)
- 1/4 cup of finely crushed dried rose petals
- A few drops of rose essential oil (optional)
- A clean jar with a lid
Step-by-Step:
- In a mixing bowl, combine the sugar and the crushed dried rose petals.
- Slowly pour in the carrier oil, stirring until the mixture has the consistency of damp sand.
- If desired, add a few drops of rose essential oil to enhance the fragrance and stir well.
- Spoon your beautiful, fragrant scrub into a clean, dry jar. It’s ready to use for a spa-like experience at home.
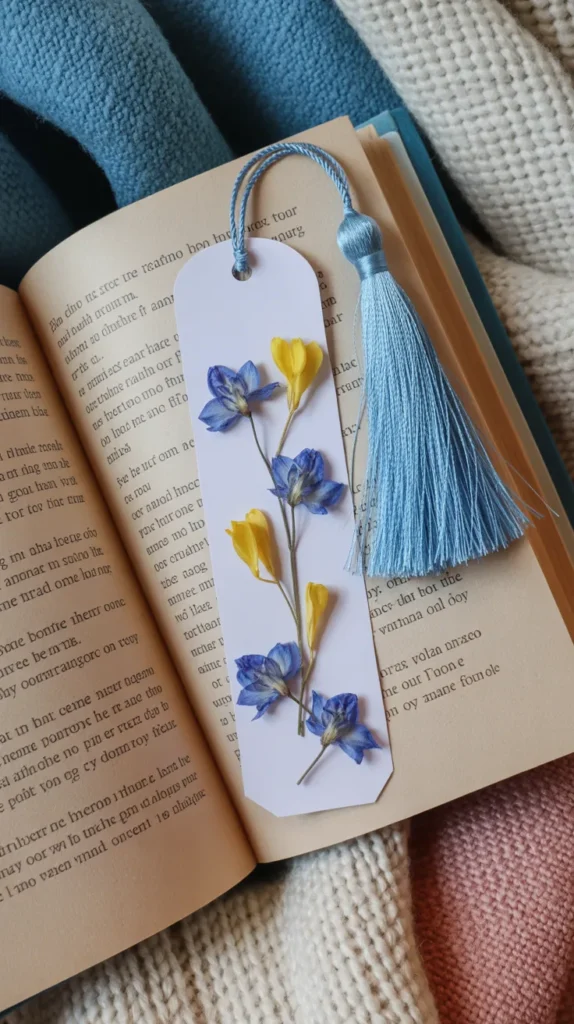
4. Laminated Flower Petal Bookmarks
A beautiful bookmark makes reading feel even more special. This quick and satisfying project turns loose petals into a practical and charming gift for any book lover. It’s an ideal entry-level project for those just starting to explore dried flower petals for crafts.
What You’ll Need:
- Heavy cardstock, cut into a bookmark shape
- A variety of pressed, flat dried petals
- A glue stick
- A laminator or clear, wide packing tape
- A hole punch and a tassel or ribbon
Step-by-Step:
- Arrange your petals on the cardstock strip to create a design. A simple line of colorful petals or a small cluster at the top both look elegant.
- Use a small dab from a glue stick to tack each petal in place so they don’t shift.
- To protect the delicate petals and make the bookmark durable, you can laminate it. If you don’t have a laminator, a great DIY hack is to carefully “laminate” both sides with clear packing tape.
- Trim the excess plastic from the edges for a clean, sealed finish.
- Punch a hole at the top. To make this easy and get a perfect result, a simple tool like the {Bostitch Office 1-Hole Punch} is fantastic. It’s easy to use and creates a clean circle every time.
- Thread a silky tassel or a piece of ribbon through the hole to complete your beautiful botanical bookmark.
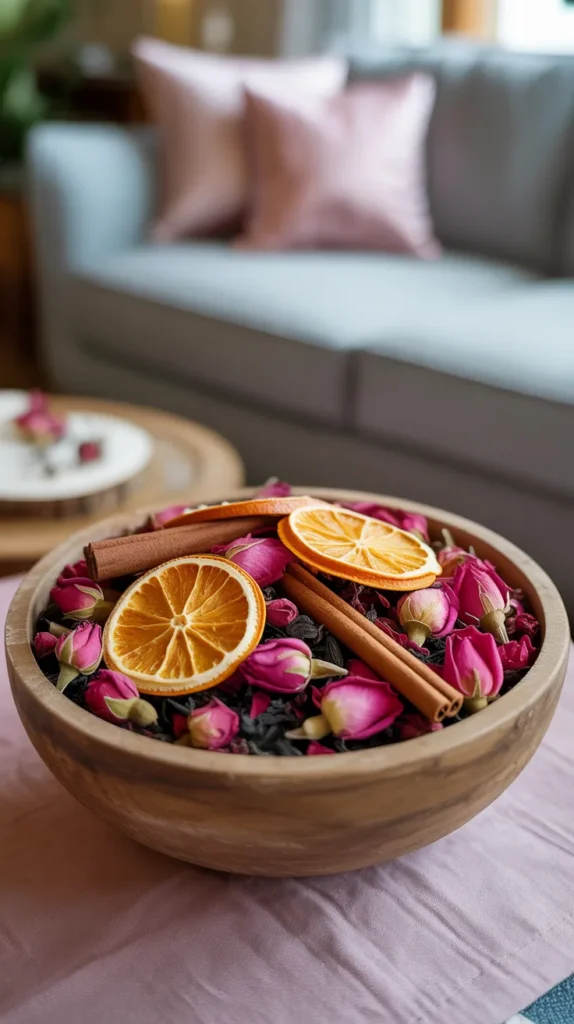
5. DIY Potpourri with Spices and Oils
Creating your own potpourri is a classic way to use dried flower petals for crafts. It allows you to create a signature fragrance for your home using all-natural ingredients.
Displayed in a beautiful bowl, it becomes a piece of decor that engages both the eyes and the nose.
What You’ll Need:
- A generous amount of dried flower petals (roses, lavender, and hibiscus are great)
- Other natural elements like dried orange slices, cinnamon sticks, star anise
- Essential oils to enhance the scent
- A scent fixative, like orris root powder
Step-by-Step:
- In a large bowl, gently combine your dried petals with your other chosen botanicals and spices.
- To amplify and prolong the scent, add a few drops of essential oils that complement your mix—rose oil for floral notes, cinnamon for warmth, or sweet orange for a citrusy lift.
- The secret to long-lasting potpourri is a fixative. Sprinkling in a tablespoon of {Orris Root Powder by Starwest Botanicals} helps to absorb the essential oils and release them slowly over time, making your fragrance last for months instead of weeks.
- Stir everything together, then place the mixture in a sealed container for a few days to a week to let the scents fully meld and mature.
- Display your custom potpourri in a decorative bowl or sachet bags.
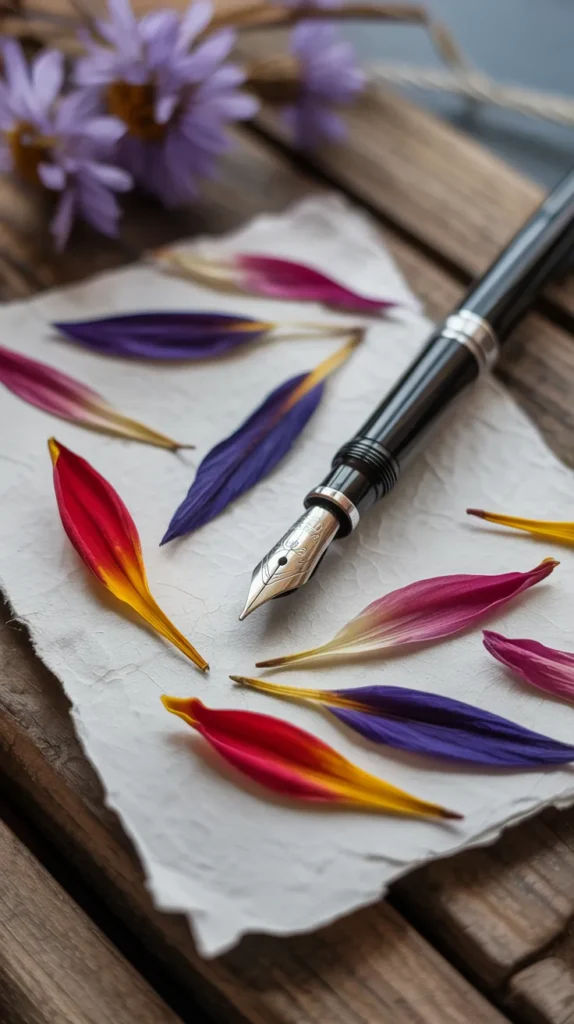
6. Petal-Infused Handmade Paper
This is a more involved but incredibly rewarding craft that results in stunning, one-of-a-kind textured paper. Embedding petals directly into the paper pulp creates a beautiful stationery that is perfect for writing special letters, creating unique art, or making gift tags.
What You’ll Need:
- A paper making kit (which includes a mold and deckle)
- Recycled paper scraps (like junk mail or newspaper)
- A blender
- A tub or basin large enough to fit your mold
- Dried flower petals
Step-by-Step:
- Tear your recycled paper into small pieces, soak them in water, and then blend them to create a smooth paper pulp, or “slurry.”
- Pour the slurry into your basin and add more water.
- Gently stir in your dried flower petals.
- Slide your mold and deckle into the slurry and lift it out, capturing a layer of pulp and petals.
- Let the water drain, then carefully transfer the wet sheet of paper onto a piece of felt or an absorbent towel by flipping the mold over. This process is called “couching.”
- Press the water out and let the paper dry completely. A beginner-friendly kit like the {Wooden Paper Making Kit by Caydo} makes this process much less intimidating, providing the essential tools to get started.
7. Floral Wax Tablets (Scented Sachets)
These beautiful, solid wax air fresheners are a wonderful way to bring a gentle, natural fragrance to small spaces like closets and drawers.
Decorating the surface with colorful dried petals turns them into miniature works of art that are almost too pretty to hide away.
What You’ll Need:
- Soy wax flakes and a small amount of beeswax (for hardness)
- Essential oils for fragrance
- Dried flower petals for decoration
- A silicone mold (soap or muffin top molds are a good size)
Step-by-Step:
- In a double boiler or a microwave-safe bowl, melt the soy wax and beeswax together.
- Once melted, remove the wax from the heat and let it cool slightly before stirring in your essential oils. This prevents the heat from burning off the delicate fragrance.
- Pour the scented wax into your silicone molds.
- Wait for a few minutes until the wax is semi-set (it will look opaque but still be soft to the touch).
- Gently press your dried flower petals onto the surface in a beautiful, artistic design.
- Let the tablets cool completely and harden, then pop them out of the molds. You can poke a hole through the top with a skewer before the wax is fully hard and thread a ribbon through for hanging.
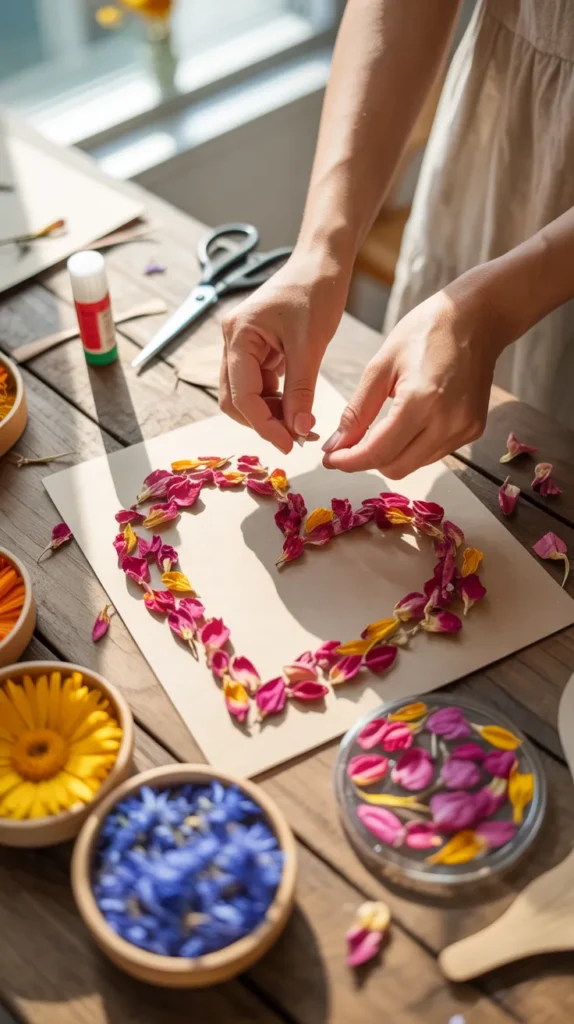
8. Flower Petal “Confetti” Art
This is a wonderfully freeing and expressive project that feels like painting, but with petals instead of paint. It’s a fantastic way to use up broken petals or a mix of colors. It’s one of the most forgiving and creative ways to use dried flower petals for crafts.
What You’ll Need:
- A piece of heavy cardstock or a small canvas
- A pencil
- A thick, tacky craft glue
- A mix of colorful dried flower petals
Step-by-Step:
- On your cardstock or canvas, lightly draw a simple silhouette—a heart, a moon, an animal, or a letter.
- Fill a small bowl with your mix of “petal confetti.”
- Apply a layer of craft glue inside your drawn shape. A thick glue like {Elmer’s CraftBond Tacky Glue} works well because it grabs the petals and prevents them from sliding around.
- Generously sprinkle the petals over the glued area. Don’t be shy—cover it completely!
- Gently press the petals down into the glue to ensure they are secure.
- Let the glue dry completely (this may take a few hours), then hold your artwork upright and shake off the excess petals to reveal your beautiful, textured creation.
9. Sustainable Celebration Confetti Poppers
Make your celebrations more beautiful and environmentally friendly. Dried flower petals are a stunning and biodegradable alternative to paper or plastic confetti, perfect for weddings, birthdays, or any special moment.
What You’ll Need:
- Clear, food-safe push-pop containers
- A large quantity of small, colorful petals (bougainvillea, delphinium, and rose work well)
Step-by-Step:
- Gather your dried petals. You can use a mix of colors or create a specific color palette to match your party’s theme.
- Simply fill the push-pop containers with the petal confetti.
- You can add a custom sticker to the outside for the occasion, with a fun message like “Toss Me!” or “Happy Birthday!”
- When it’s time to celebrate, guests just push the stick up, releasing a beautiful and fragrant shower of natural confetti.

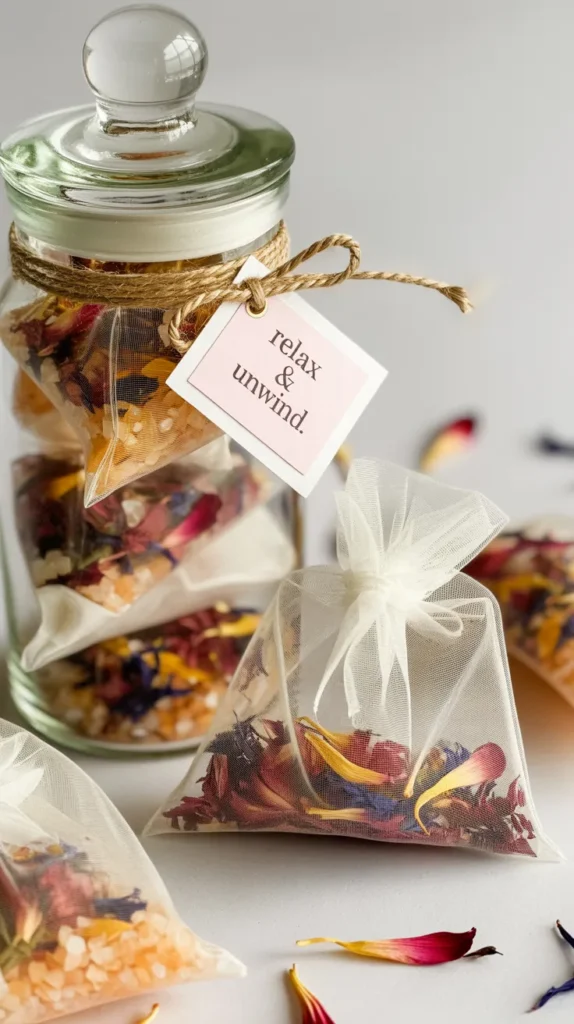
10. Luxurious Floral Bath Teas
For those who love the idea of a floral bath but dislike the cleanup, bath teas are the perfect solution. This craft involves packaging your bath salt and petal mixture into large tea bags, creating a mess-free, spa-like experience.
What You’ll Need:
- Epsom salts
- Dried, skin-safe flower petals (calendula, rose, chamomile, lavender)
- Large, fillable drawstring tea bags
Step-by-Step:
- In a bowl, mix your Epsom salts and dried flower petals. You can also add other ingredients like powdered milk or colloidal oatmeal for extra skin-soothing benefits.
- Spoon the mixture into large, empty tea bags. A great option is the {Tiesta Tea Disposable Tea Filter Bags}, as they are generously sized and have a convenient drawstring to keep all the botanicals contained.
- Store the filled bags in an airtight jar to keep them fresh.
- To use, simply toss one bag into a warm bath. The salts will dissolve and the floral essences will infuse the water without leaving any petals behind in the drain.
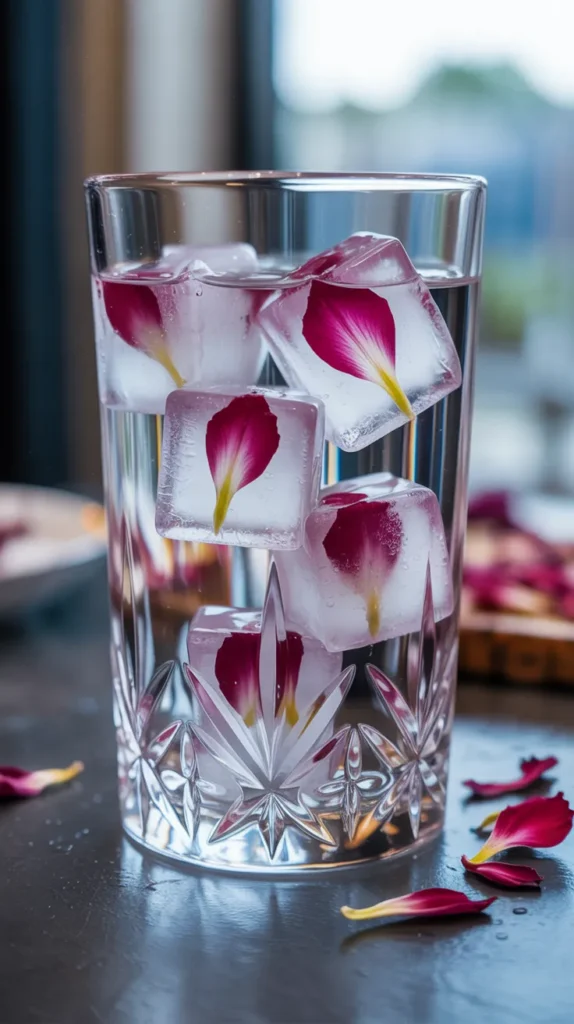
11. Floral Ice Cubes for Elegant Drinks
This is not a permanent craft, but it’s an enchanting and incredibly simple DIY idea that will elevate any gathering. Floral ice cubes are an easy way to make your beverages look stunning and add a touch of sophistication to a party or brunch.
What You’ll Need:
- An ice cube tray (silicone trays for large, clear cubes work best)
- Water
- Small, edible dried flower petals (rose, hibiscus, cornflower, calendula)
Step-by-Step:
- For the clearest possible ice, use distilled water that has been boiled and then cooled. This removes impurities and excess air.
- Place one or two dried petals into each compartment of your ice cube tray.
- Fill the tray halfway with the cooled, distilled water and freeze. This first freeze will anchor the petal in the middle of the cube.
- Once the first layer is frozen, fill the rest of the tray with water and freeze again.
- Pop out your beautiful floral ice cubes and add them to sparkling water, lemonade, or a craft cocktail for an instant “wow” factor.
Your Dried Petal Crafting Toolkit
You don’t need a lot of fancy equipment to get started, but having a few key supplies can make your projects easier and more professional. Here are some of the beginner-friendly products mentioned in this guide.
| Product Name | Brand | Use |
|---|---|---|
| Epoxy Resin | ArtResin | For creating professional, crystal-clear, non-yellowing resin jewelry and coasters. |
| Waterbase Sealer, Glue and Finish | Mod Podge | The perfect all-in-one glue and sealer for decoupaging petals onto glass votives. |
| 1-Hole Punch | Bostitch Office | A simple tool for creating clean, perfect holes in handmade bookmarks for adding tassels. |
| Orris Root Powder | Starwest Botanicals | A natural fixative that helps your homemade potpourri retain its beautiful scent for longer. |
| Wooden Paper Making Kit | Caydo | A beginner-friendly kit for creating your own beautiful, petal-infused handmade paper. |
| CraftBond Tacky Glue | Elmer’s | A thick, tacky glue that’s perfect for holding petals securely for “confetti” art projects. |
| Disposable Tea Filter Bags | Tiesta Tea | Large, fillable tea bags perfect for creating mess-free, floral-infused bath soaks. |
Conclusion: Finding Beauty in the Smallest Pieces
The art of using dried flower petals for crafts teaches us to find immense beauty in the small, the delicate, and the overlooked.
It’s a craft that is sustainable, affordable, and deeply personal. It transforms a fleeting moment of natural beauty into a lasting treasure you can see, touch, and enjoy every day.
We hope these 12 enchanting ideas have sparked your imagination and encouraged you to start your own collection of petals.
Whether you’re making a gift for a loved one or a beautiful piece of decor for your own home, the process of creating with nature’s confetti is a reward in itself.
So, the next time a flower in your garden starts to fade, don’t be sad. Gather its petals and give it a second, everlasting life. Which of these beautiful ideas will you try first?