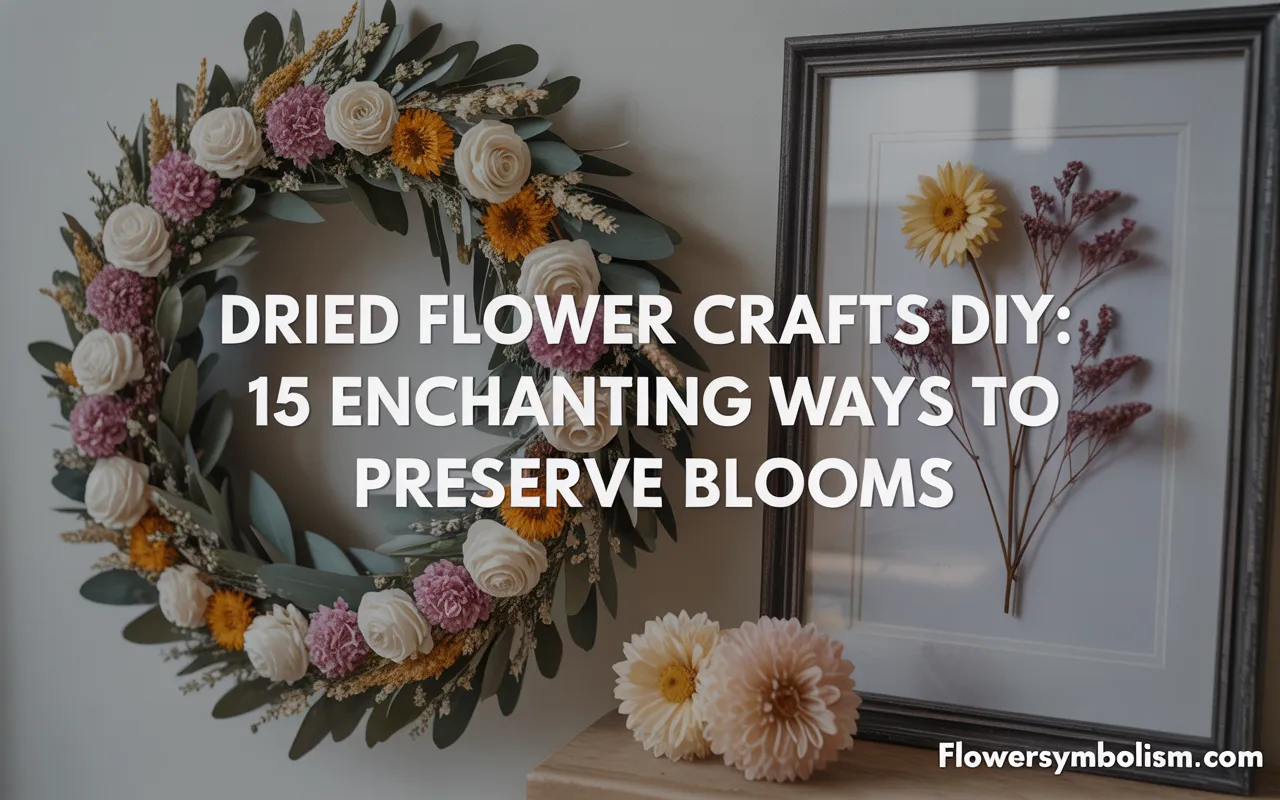
There is a unique and quiet beauty in dried flowers. They hold the memory of a sun-drenched garden or a special bouquet, preserving a fleeting moment of nature’s artistry for years to come.
Diving into the world of dried flower crafts DIY is a wonderful way to bring that everlasting charm into your home, creating personal, sustainable, and stunning pieces of decor with your own two hands.
The best part about this creative hobby is its accessibility. You don’t need a fancy studio or years of experience to make something truly beautiful.
The natural elegance of the flowers does most of the work for you. It’s a mindful and relaxing process that allows you to connect with the seasons, whether you’re gathering blooms from your backyard or finding new ways to treasure a gifted bouquet.
This guide is your ultimate starting point for all things dried and beautiful. We’re going to explore 15 enchanting DIY ideas that prove anyone can be a floral artist.
From elegant wall art and custom jewelry to simple home decor accents, we have a project for every skill level.
We’ll provide clear, step-by-step instructions and recommend a few key supplies to help make your journey into dried flower crafts DIY a blooming success. Let’s get started!
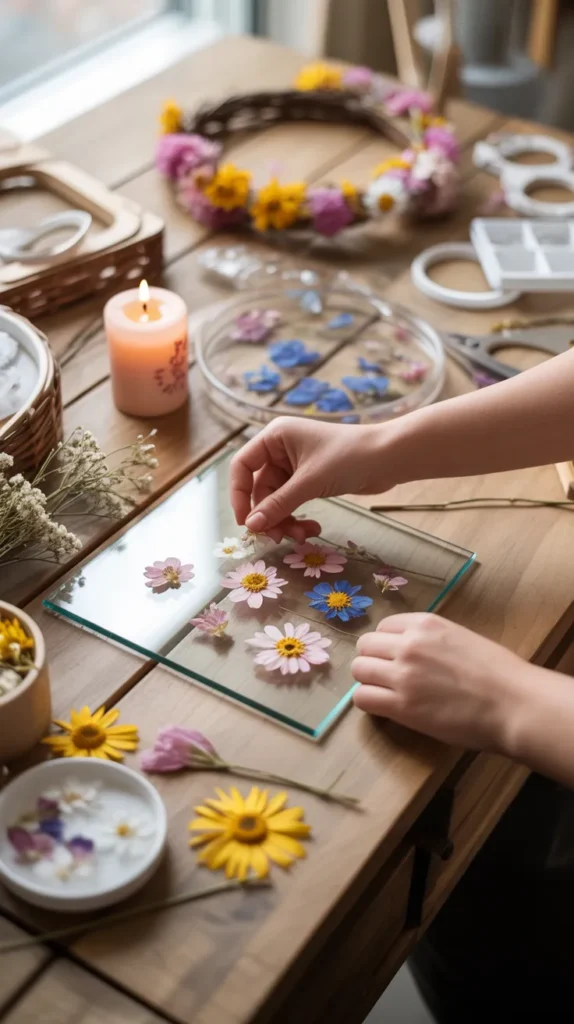
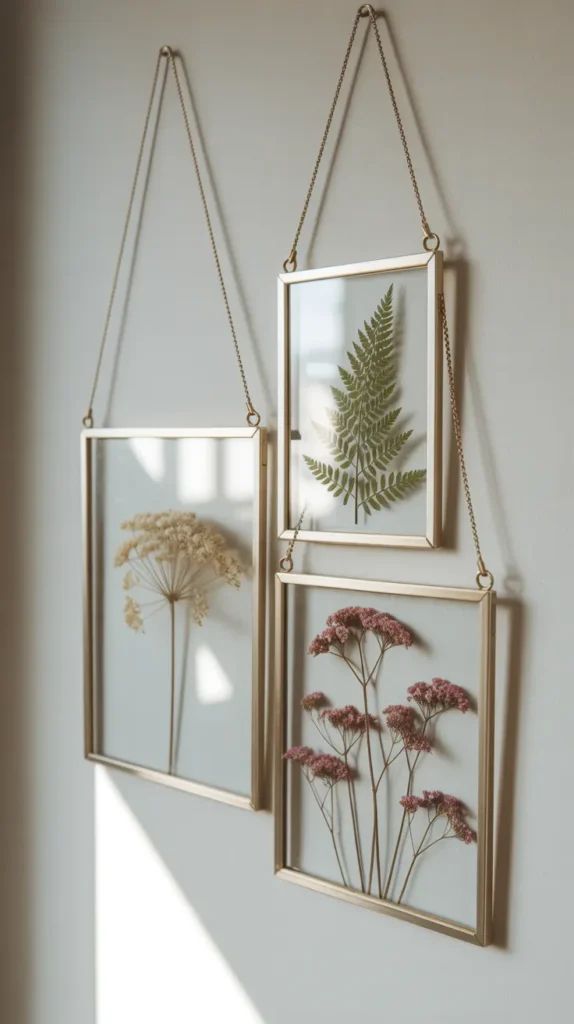
1. Elegant Floating Glass Frames
This is a modern and sophisticated way to showcase the delicate, paper-thin beauty of pressed flowers. By sandwiching botanicals between two panes of glass in a “floating” frame, you create the illusion that they are suspended in mid-air. It’s a minimalist approach that turns a simple flower into a piece of high-end art.
What You’ll Need:
- A floating frame (with two glass panes)
- A variety of pressed flowers and leaves
- Tweezers for precise placement
Step-by-Step:
- First, you’ll need to press your flowers. You can do this the traditional way inside a heavy book, which takes a few weeks. For faster, more vibrant results, a dedicated press is a great tool.
- Carefully clean both panes of glass from your frame.
- Plan your composition. You can create a cascading design, a symmetrical pattern, or a simple layout with a single, stunning bloom like a pansy or cosmos.
- Use tweezers to carefully arrange your pressed flowers on one of the glass panes.
- Place the second pane of glass on top, secure it within the frame, and your masterpiece is ready to hang and admire. This project is all about celebrating the light that shines through the translucent petals.
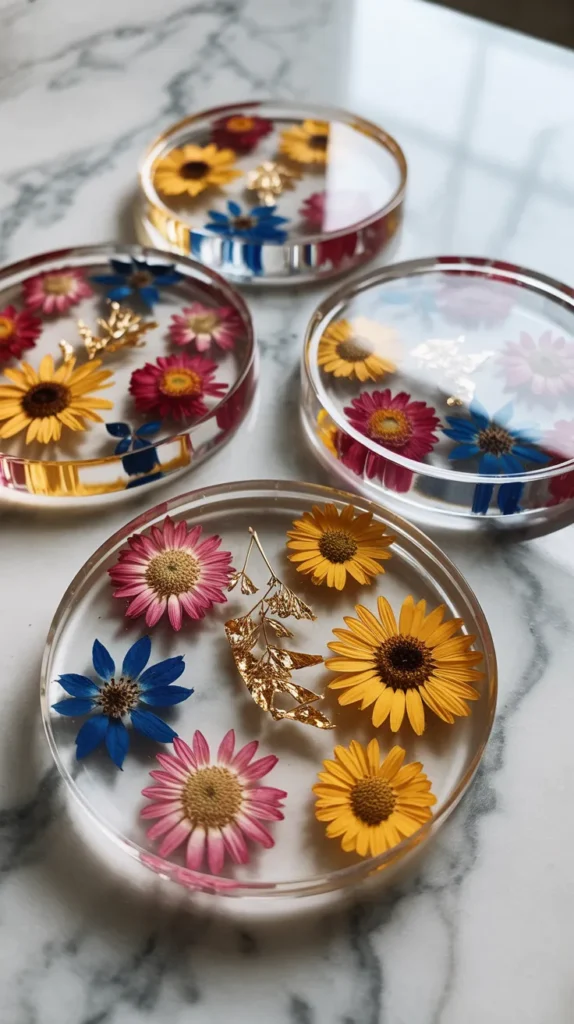
2. Crystal-Clear Resin Coasters
Capture the beauty of dried flowers forever by encasing them in crystal-clear resin. This is one of the most popular dried flower crafts DIY because it creates items that are both stunningly beautiful and incredibly practical. Each coaster becomes a tiny, preserved garden for your coffee table.
What You’ll Need:
- Epoxy resin and hardener
- Silicone coaster molds
- A variety of small dried flowers or petals
- A mixing cup and stick
Step-by-Step:
- Choose your dried flowers. Small, flat pressed flowers work well, as do tiny, 3D silica-dried buds. Arrange them face-down in the bottom of your coaster mold. You can also add flakes of gold leaf for extra sparkle.
- To create a professional-looking and long-lasting product, using a high-quality resin is key. {ArtResin Epoxy Resin} is a fantastic choice for beginners because it is formulated to be non-yellowing and is certified non-toxic when cured, making it safe for home-use items.
- Mix the resin and hardener according to the package directions.
- Slowly pour the mixed resin over the flowers in the mold. Use a toothpick to gently pop any air bubbles that rise to the surface.
- Let the coasters cure for 24-48 hours in a dust-free area before demolding your beautiful, functional art.
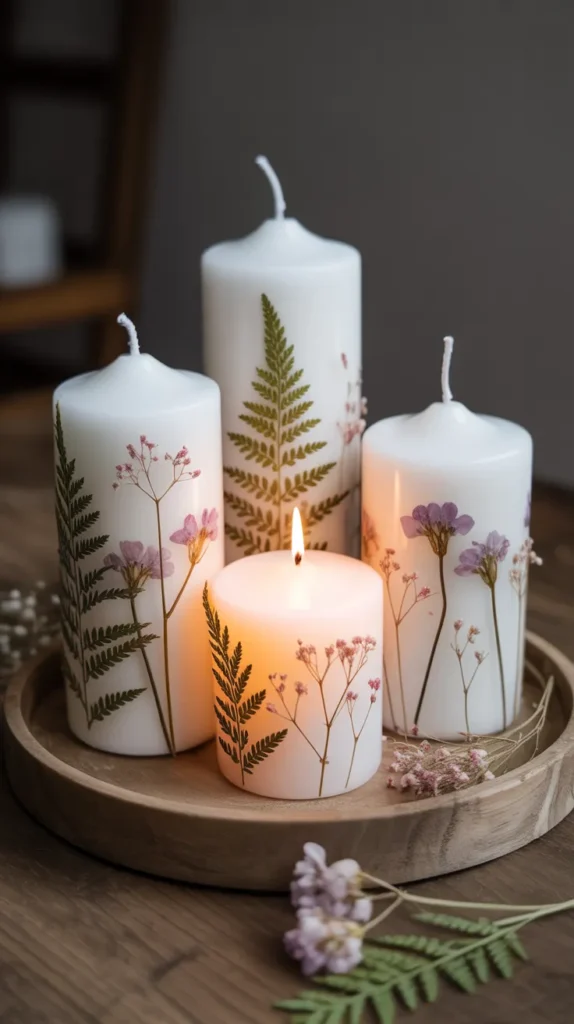
3. Romantic Decorated Pillar Candles
Infuse the warm glow of candlelight with the subtle beauty of dried botanicals. Decorating a plain pillar candle is a surprisingly easy craft that results in an elegant, gift-worthy piece of home decor. This is one of the most charming and romantic dried flower crafts DIY you can try.
What You’ll Need:
- A plain wax pillar candle
- Small, flat pressed flowers and leaves
- An old metal spoon
- A second, unscented candle (like a tea light) for a heat source
Step-by-Step:
- Choose a pressed flower and decide where you want to place it on your pillar candle.
- Hold the flower in place with your finger.
- Gently heat the back of the metal spoon over the flame of your second candle for a few seconds.
- Carefully rub the back of the hot spoon over the flower. The heat will melt the wax of the pillar candle just enough to seamlessly embed the flower onto the surface.
- Repeat this process with different flowers and leaves until you’ve created a design you love.
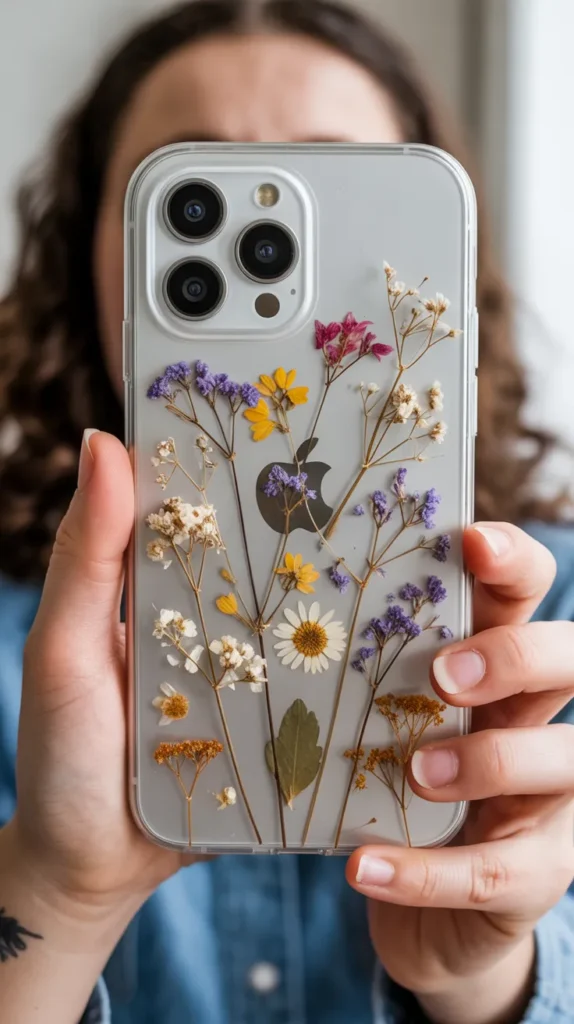
4. Personalized Pressed Flower Phone Case
Carry a small, secret garden with you everywhere you go. Creating a custom phone case is a modern and popular project that lets you personalize your most-used accessory. It’s a simple dried flower crafts DIY project with a stunning, high-impact result.
What You’ll Need:
- A clear phone case that fits your phone
- A variety of small, pressed flowers
- Tweezers
- (Optional) Resin or clear craft glue
Step-by-Step:
- Clean the inside of your clear phone case.
- Use tweezers to arrange your small, pressed flowers on the inside of the case. Think about how the colors will look against the color of your phone.
- For a temporary design that you can change out, simply snap your phone into the case. The pressure will hold the flowers in place.
- For a more permanent solution, you can secure the flowers. A precision applicator glue is perfect for this. {Bearly Art Precision Craft Glue} has a tiny metal tip that allows you to apply a very small, controlled dot of glue to hold each delicate petal in place without making a mess. Once glued, let it dry before putting your phone in.
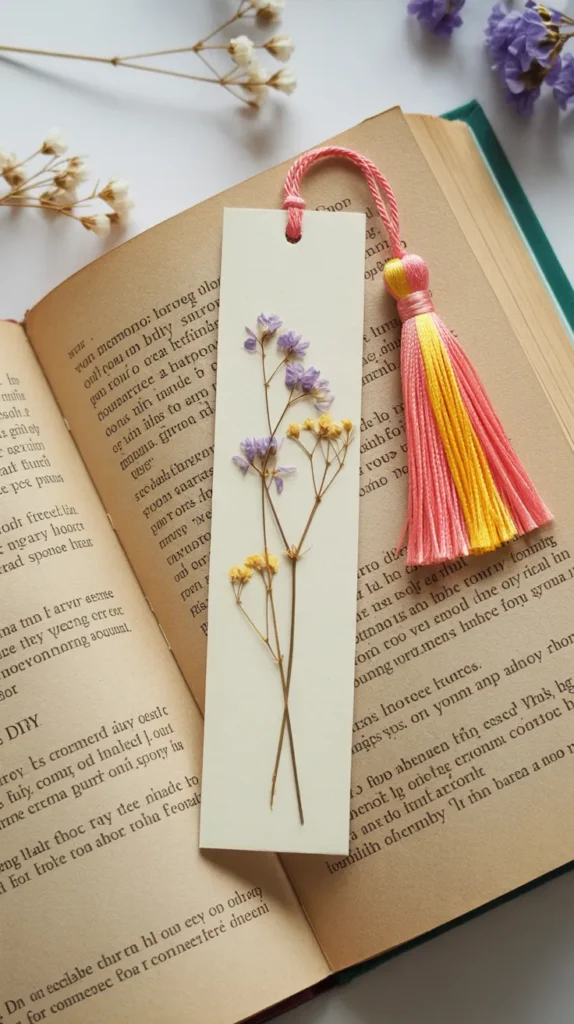
5. Handmade Laminated Bookmarks
For the book lover, there is no sweeter gift than a handmade bookmark. This simple craft turns pressed flowers and petals into a beautiful and practical way to mark your page. It’s a quick, satisfying, and very beginner-friendly project.
What You’ll Need:
- Heavy cardstock cut into bookmark-sized strips
- Small pressed flowers and leaves
- A glue stick
- Clear packing tape or a laminator
- A hole punch and ribbon or a tassel
Step-by-Step:
- Arrange your pressed flowers on the cardstock strip. A simple design often has the most impact.
- Use a small dab from a glue stick to tack the flowers in place so they don’t shift.
- To make your bookmark durable, you can laminate it. If you don’t have a laminator, carefully covering both sides with wide, clear packing tape is an excellent DIY hack.
- Trim the excess tape from the edges.
- Punch a hole at the top and thread a beautiful ribbon or a premade tassel through it to complete your creation.
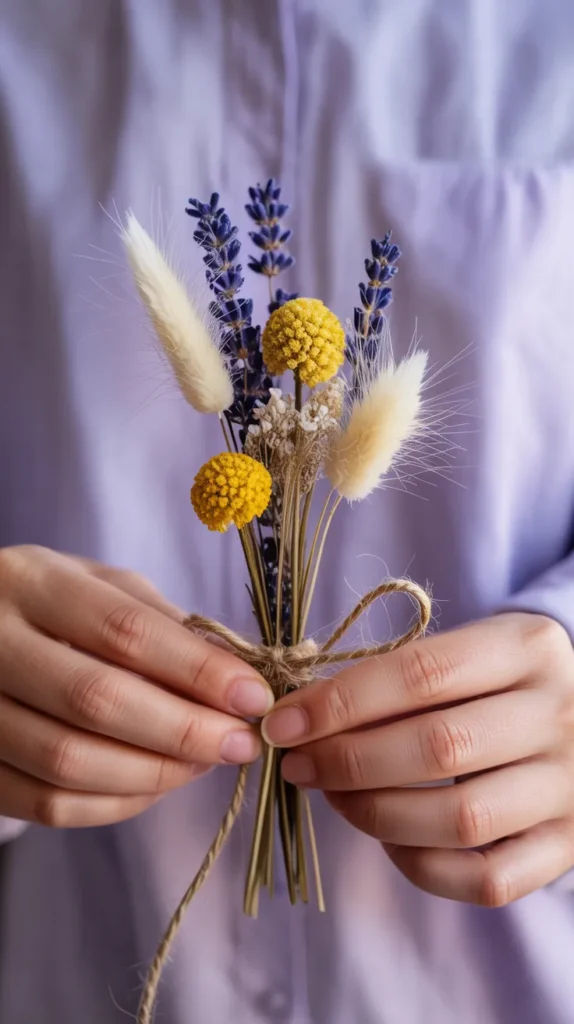
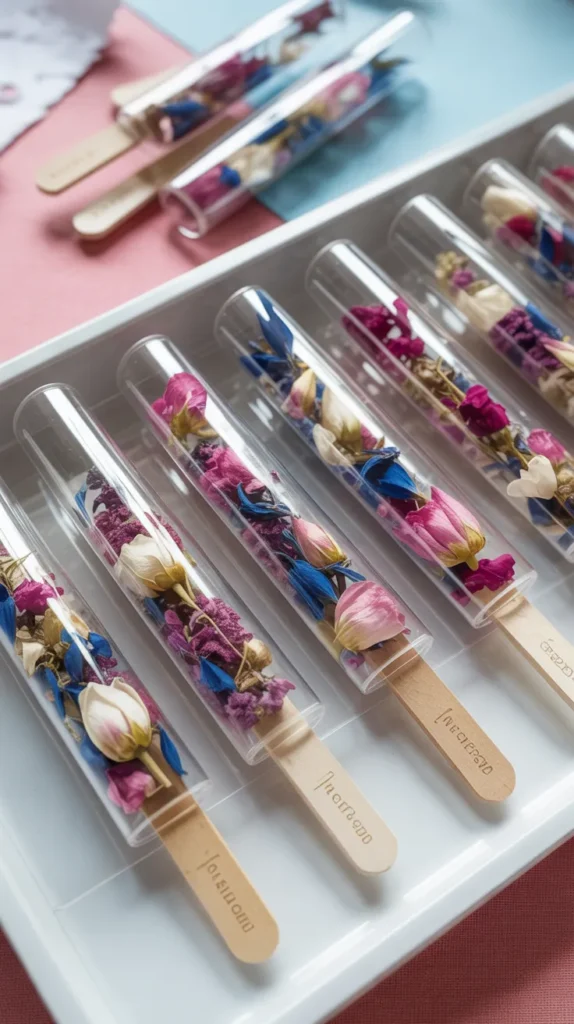
6. Mini “Everlasting” Bouquets
You don’t need to be a florist to create a beautiful floral arrangement. These mini bouquets, often called “posies,” are a simple and charming way to use sturdier dried flowers that have retained their 3D shape. They are incredibly versatile and make for a perfect dried flower crafts DIY project to do with friends.
What You’ll Need:
- A selection of dried flowers with stems (e.g., lavender, statice, bunny tails, strawflowers)
- Twine or ribbon
- Scissors
Step-by-Step:
- Gather a small handful of your dried flowers. Start with your taller flowers and add shorter, fuller blooms around them.
- Play with different textures and colors to create a balanced arrangement.
- Once you are happy with your mini bouquet, tie the stems together tightly with a piece of twine or a pretty ribbon.
- Trim the stems at the bottom so they are all an even length. These are perfect for small bud vases, as gift toppers, or even as cake decorations.
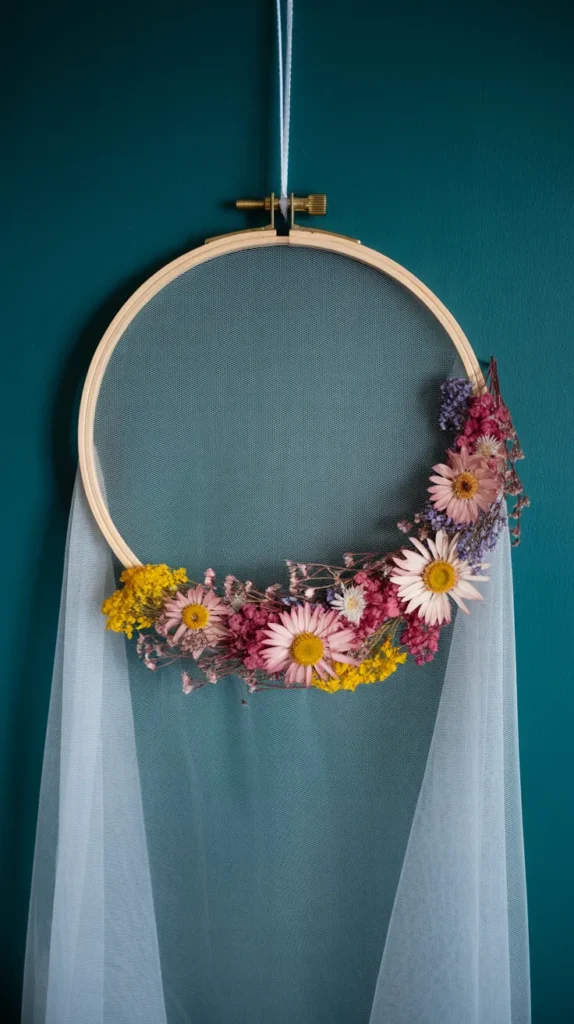
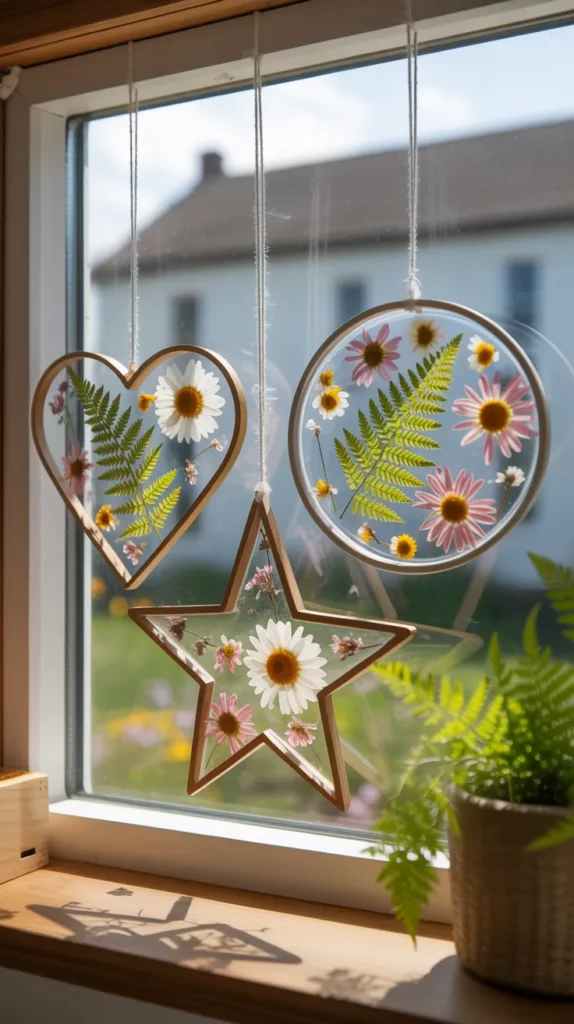
7. Botanical Wall Art with an Embroidery Hoop
Create a unique and bohemian piece of wall art using a simple embroidery hoop. By stretching a piece of sheer fabric across the hoop, you can create a circular “frame” for a floating floral design. This is an elegant and creative take on dried flower crafts DIY.
What You’ll Need:
- An embroidery hoop of any size
- A piece of sheer fabric, like tulle or organza, larger than your hoop
- A variety of pressed flowers
- Clear-drying fabric glue
Step-by-Step:
- Separate the two rings of the embroidery hoop. Place your fabric over the inner ring.
- Place the outer ring over the top and press down, stretching the fabric taut as you tighten the screw.
- Trim the excess fabric from the back of the hoop.
- Plan your design, then carefully glue your pressed flowers onto the taut fabric. You can create a crescent shape on one side, a full circle, or a more random, meadow-like pattern.
- Let the glue dry completely before hanging your beautiful, ethereal creation.
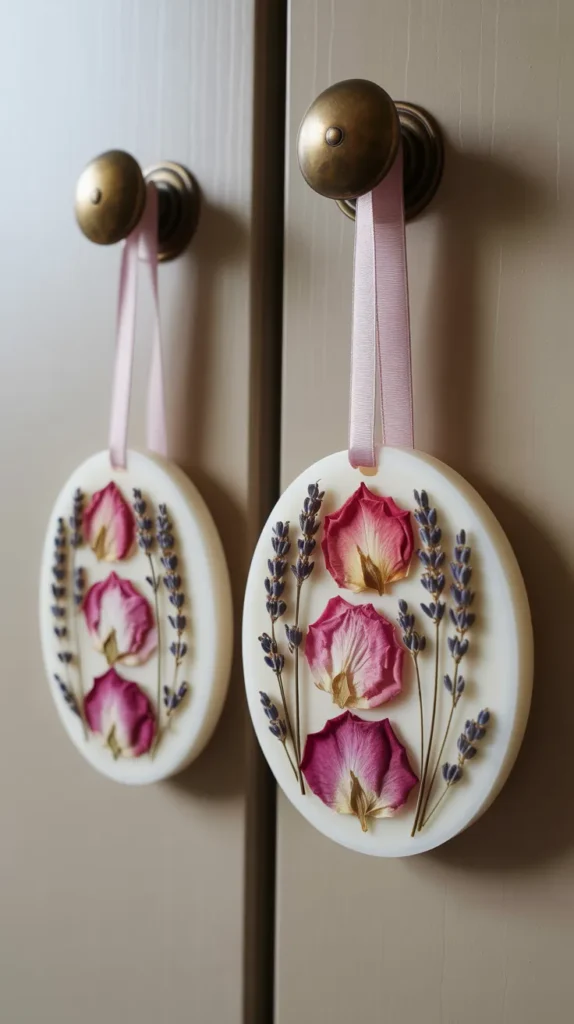
8. Scented Floral Wax Sachets
These solid wax air fresheners, also known as wax tablets, are a beautiful way to bring a gentle, natural fragrance to small spaces like closets, drawers, or bathrooms. Decorating the surface with dried flowers and petals turns them into miniature pieces of art.
What You’ll Need:
- Soy wax flakes and a small amount of beeswax
- Essential oils for fragrance
- Dried flowers and petals for decoration
- A silicone mold (muffin top or soap molds work well)
Step-by-Step:
- In a double boiler or a microwave-safe container, melt the soy wax and beeswax together. Using a quality wax like {NatureWax C-3 Soy Wax Flakes} will give you a smooth, professional finish and excellent scent throw.
- Remove the melted wax from the heat and stir in your favorite essential oils.
- Pour the scented wax into your silicone molds.
- Let the wax cool for a few minutes until it is semi-set (no longer liquid, but still soft).
- Gently press your dried flowers and petals onto the surface in a beautiful design.
- Let the sachets cool completely, then pop them out of the molds. You can poke a hole at the top before the wax is fully hard and thread a ribbon through for hanging.
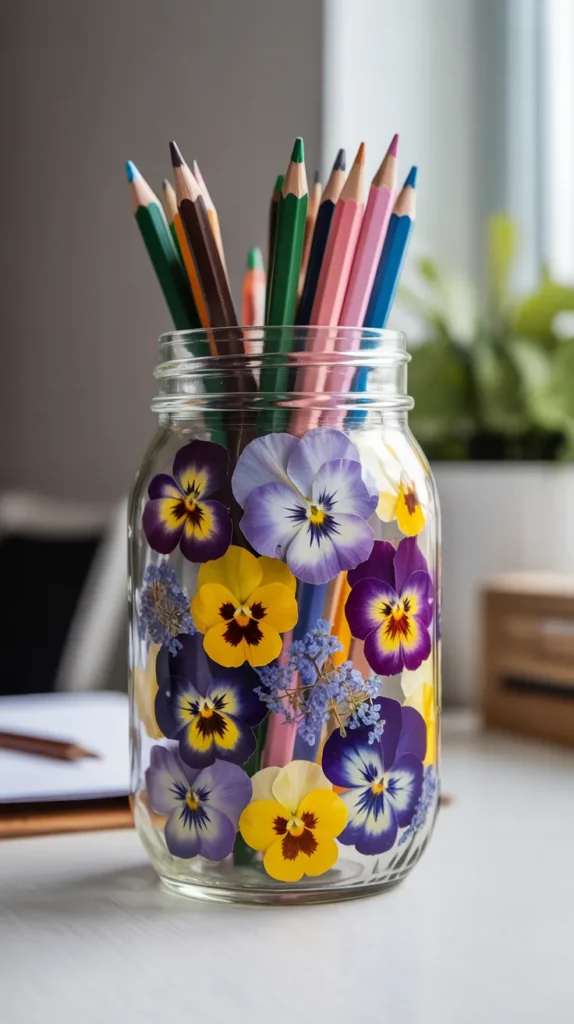
9. Upcycled Decoupage Jars
Give plain glass jars a stunning botanical makeover with the simple art of decoupage. This technique allows you to cover a surface with paper cutouts—or in this case, beautiful pressed flowers—to create a charming, textured finish. It’s a fantastic way to upcycle old jars into pretty storage containers.
What You’ll Need:
- A clean glass jar
- A variety of pressed flowers
- A decoupage medium like {Mod Podge Waterbase Sealer, Glue and Finish}
- A soft paintbrush
Step-by-Step:
- Make sure your jar is clean and dry.
- Using your paintbrush, apply a thin layer of Mod Podge onto a section of the glass. This product is a crafter’s best friend as it acts as glue, sealer, and finish all in one.
- Gently place a pressed flower onto the wet medium, and then paint another thin layer over the top to seal it.
- Repeat this process until your jar is covered in a beautiful collage of flowers. Once dry, it can be used as a pencil holder, a makeup brush holder, or a vase for your mini dried bouquets!
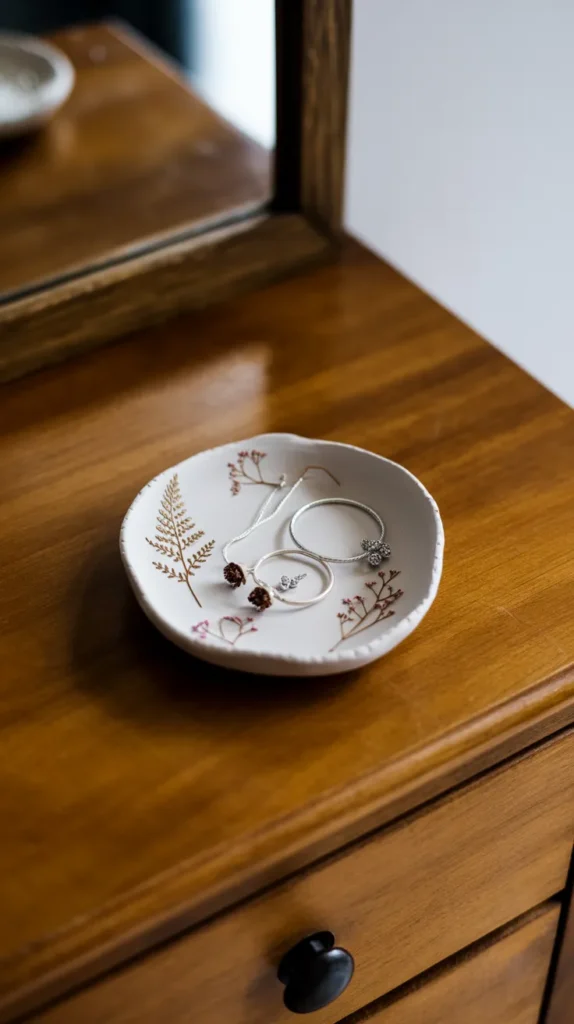
10. Botanical Clay Jewelry Dishes
Create a beautiful, handcrafted dish to hold your rings and other small treasures. By impressing flowers into air-dry clay, you create a permanent, fossil-like record of the bloom’s delicate shape. This is a wonderfully tactile project that combines sculpture with botanical art.
What You’ll Need:
- Air-dry clay
- Flowers with interesting textures (ferns, lavender, Queen Anne’s lace)
- A rolling pin
- A small bowl to use as a mold
Step-by-Step:
- Roll out a piece of air-dry clay until it’s about a quarter-inch thick.
- Arrange your flowers on the clay and use the rolling pin to gently press them into the surface.
- Peel away the flowers to reveal the beautiful impressions.
- Gently drape the circle of clay over an upside-down bowl to give it a dish shape as it dries.
- Let it dry for 24-48 hours. Once dry, you can seal it with a clear varnish. A spray sealer like {Krylon Crystal Clear Acrylic Spray Finish} is an easy way to give your dish a protective, waterproof finish.
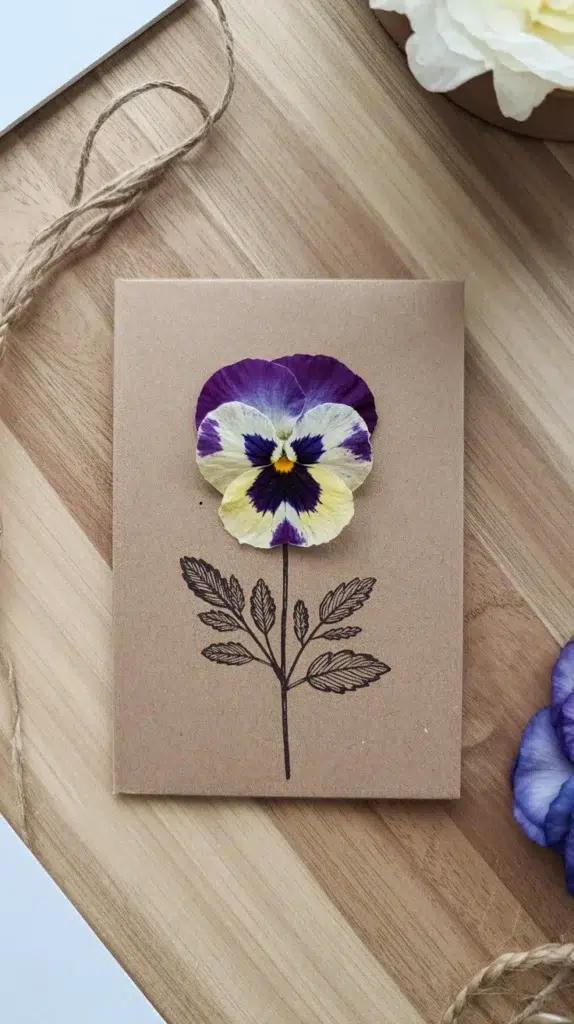
11. Custom Greeting Cards
Elevate your correspondence with handmade cards adorned with real pressed flowers. This personal touch is sure to make any recipient feel special and is a perfect way to use smaller blooms and leaves.
What You’ll Need:
- Blank cards and envelopes
- A variety of pressed flowers
- A fine-tipped glue applicator or glue stick
Step-by-Step:
- Fold a piece of quality cardstock in half to create your card.
- Plan your design. A single, beautiful cosmos flower, a small bouquet in the corner, or a border of tiny petals can all look stunning.
- Carefully glue your flowers in place.
- For an extra artistic touch, you can use a fine-liner pen to draw stems, leaves, or a vase to connect your flowers and complete the illustration.
12. Easy Nature Suncatchers
This is a classic childhood craft for a reason—it’s incredibly simple and the result is always beautiful. Using contact paper to trap flowers is a mess-free way to create a “stained glass” effect that looks gorgeous in a sunny window.
What You’ll Need:
- Clear contact paper
- A variety of pressed flowers and leaves
- Scissors
Step-by-Step:
- Cut two identical squares or circles of contact paper.
- Peel the backing off one sheet and lay it sticky-side up.
- Let your creativity shine as you arrange your flowers on the sticky surface.
- Peel the backing off the second sheet and carefully place it sticky-side down over the flowers, sandwiching them inside.
- Smooth out any bubbles, trim the edges, punch a hole, and add a ribbon for hanging. It’s a perfect rainy-day activity!
13. Floral Confetti Poppers
Make your next celebration more beautiful and sustainable with eco-friendly confetti. Dried flower petals are a romantic and biodegradable alternative to plastic or paper.
What You’ll Need:
- Clear push-pop containers
- A large quantity of small, colorful dried petals (rose, delphinium, bougainvillea)
Step-by-Step:
- Simply fill the push-pop containers with your mix of colorful dried petals.
- Add a custom sticker to the outside for the occasion, like “Toss Me!” or “Happy Birthday!”
- When it’s time to celebrate, guests just push the bottom, and a beautiful shower of petals is released.
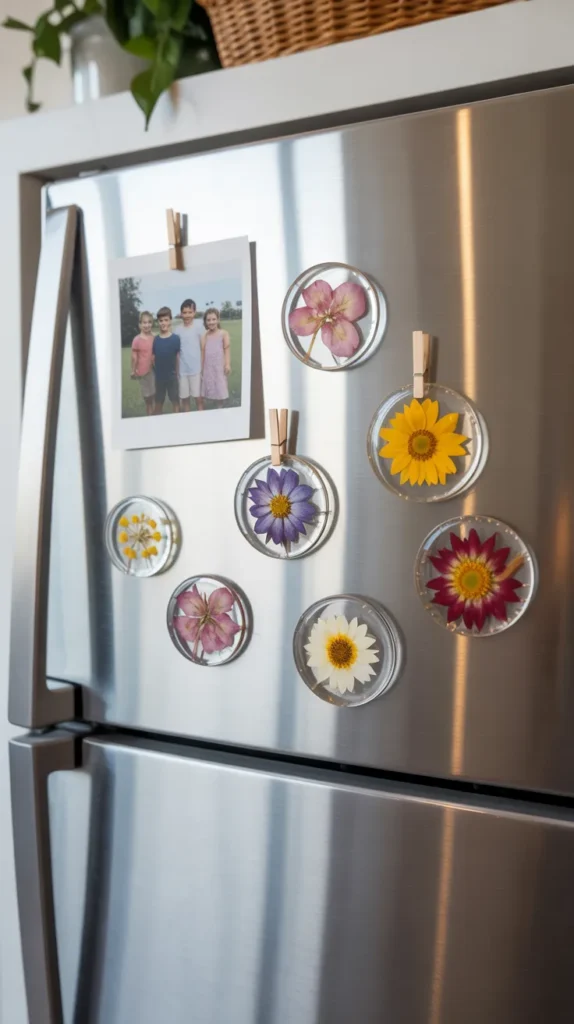
14. Simple Floral Magnets
Create tiny pieces of art for your refrigerator or whiteboard. This is a simple and fun project that is great for using up your smallest pressed blooms and can be made in batches.
What you’ll Need:
- Small pressed flowers
- Clear flat-backed glass cabochons (sometimes called “dragon tears”)
- Strong craft glue
- Small, strong magnets
Step-by-Step:
- Apply a small dot of clear-drying glue to the flat back of a glass cabochon.
- Press a small flower face-down into the glue. The dome of the glass will magnify it beautifully.
- Let the glue dry completely.
- Glue a strong magnet to the back of the cabochon. These look fantastic when sold or gifted in sets.
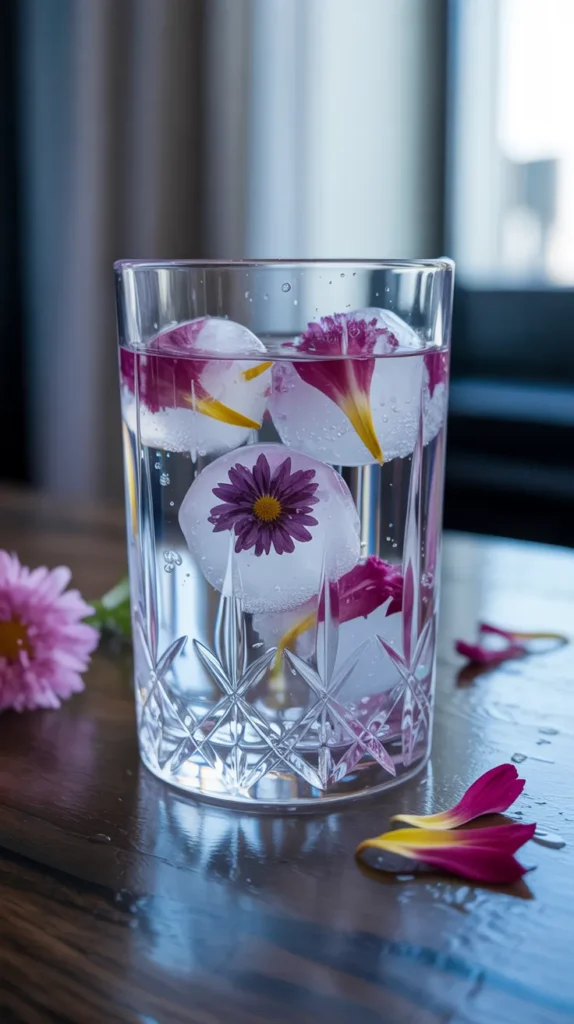
15. Floral Ice Cubes
This isn’t a permanent craft, but it’s an enchanting DIY idea to elevate any special occasion. Floral ice cubes are an incredibly easy way to make your beverages more beautiful.
What You’ll Need:
- An ice cube tray
- Water
- Small, edible dried flower petals (rose, hibiscus, cornflower)
Step-by-Step:
- Place one or two dried petals into each compartment of your ice cube tray.
- Fill the tray with water and freeze. For the clearest ice, use distilled water that has been boiled and then cooled.
- Add your beautiful floral ice cubes to a glass of water, lemonade, or a cocktail for an instant touch of elegance.
Your DIY Crafting Toolkit
You don’t need many supplies to start, but these few items can make your dried flower crafts DIY projects easier and more professional-looking.
| Product Name | Brand | Use |
|---|---|---|
| Epoxy Resin | ArtResin | For creating crystal-clear, non-yellowing, and durable resin crafts like coasters. |
| Precision Craft Glue | Bearly Art | Ideal for applying a tiny, controlled amount of glue to secure delicate petals on phone cases. |
| Waterbase Sealer, Glue and Finish | Mod Podge | The perfect all-in-one medium for decoupaging flowers onto jars and other surfaces. |
| NatureWax C-3 Soy Wax Flakes | NatureWax | High-quality soy wax for creating smooth, beautifully scented floral wax sachets. |
| Crystal Clear Acrylic Spray Finish | Krylon | An easy-to-use spray that seals and protects air-dry clay projects and other crafts. |
Conclusion: Let Your Creativity Blossom
The world of dried flower crafts DIY is a gentle invitation to slow down, appreciate nature, and create something beautiful with your own hands. It’s about preserving memories and turning the fleeting beauty of a bloom into a lasting treasure.
We hope these 15 enchanting ideas have demystified the process and sparked your imagination. Start with the project that speaks to you most, whether it’s a simple bookmark or a set of romantic candles. Remember, the goal is not perfection, but to enjoy the creative journey.
So, gather some flowers from your next walk, press them in a book, and see where your creativity takes you. Which of these beautiful projects will you try first?