
Have you ever chopped the bottom off a bunch of celery and tossed it in the compost bin without a second thought? What if I told you that little stump holds the secret to an endless supply of fresh, homegrown celery? This guide will show you exactly how to plant celery from a stalk, a fun and incredibly easy project that turns kitchen scraps into a thriving garden plant.
This is one of the most rewarding and magical gardening tricks out there. You don’t need seeds or a nursery; all you need is a bunch of celery from the grocery store.
We’ll walk you through every step, from sprouting roots in a dish of water to planting it in soil and caring for your new plant. Get ready to be amazed as you watch a brand new celery plant grow from something you used to throw away!
Why You Should Try Regrowing Celery
This simple project is more than just a fun science experiment. It’s a practical and sustainable way to garden that comes with a whole host of benefits.
- It’s Basically Free: You were going to buy the celery anyway! This method turns a part of your groceries that you’d normally discard into a productive plant. It’s the ultimate in recycling.
- Incredibly Easy for Beginners: This is one of the easiest ways to get started with gardening. The process is simple, the results are fast, and it’s a huge confidence booster for new gardeners.
- Perfect for Kids: Children are fascinated by the process. They can see the roots and leaves emerge in just a few days, making it a tangible and exciting introduction to how plants grow.
- You Get Super-Fresh Celery: While you won’t grow a giant, thick bunch of celery like the one from the store, you will get a continuous supply of fresh, flavorful celery leaves and tender young stalks. These are perfect for chopping into soups, stews, stocks, and salads. The flavor is often more intense than store-bought celery.
- No Big Garden Needed: You can do this project entirely in a pot on a sunny windowsill, balcony, or patio. It’s perfect for apartment dwellers and those with limited outdoor space.
What You’ll Need to Get Started
The beauty of this project is how few supplies you need. You probably have everything in your kitchen right now.
Your Simple Supply Checklist:
- A bunch of celery from the grocery store
- A sharp knife
- A small, shallow bowl or jar
- Fresh water
- A pot (at least 8 inches wide) for later
- Potting soil for later
- A sunny spot
That’s it! It’s one of the most accessible gardening projects you can possibly do.
Step 1: Choosing and Preparing Your Celery Stalk
Success starts with picking the right base. While almost any celery bunch will work, a few simple choices can improve your results.
Selecting the Best Celery
- Look for Freshness: Choose a bunch of celery that is fresh, firm, and compact. Avoid any bunches that are wilted, rubbery, or have signs of browning. A healthy start leads to a healthy plant.
- Check the Base: Look for a base that is wide and solid. The more compact the center of the celery bunch is, the better. This is where the new growth will emerge from.
- Organic vs. Conventional: Both will work, but some people prefer to start with organic celery to ensure no growth inhibitors were used. However, most people have success with conventional grocery store celery.
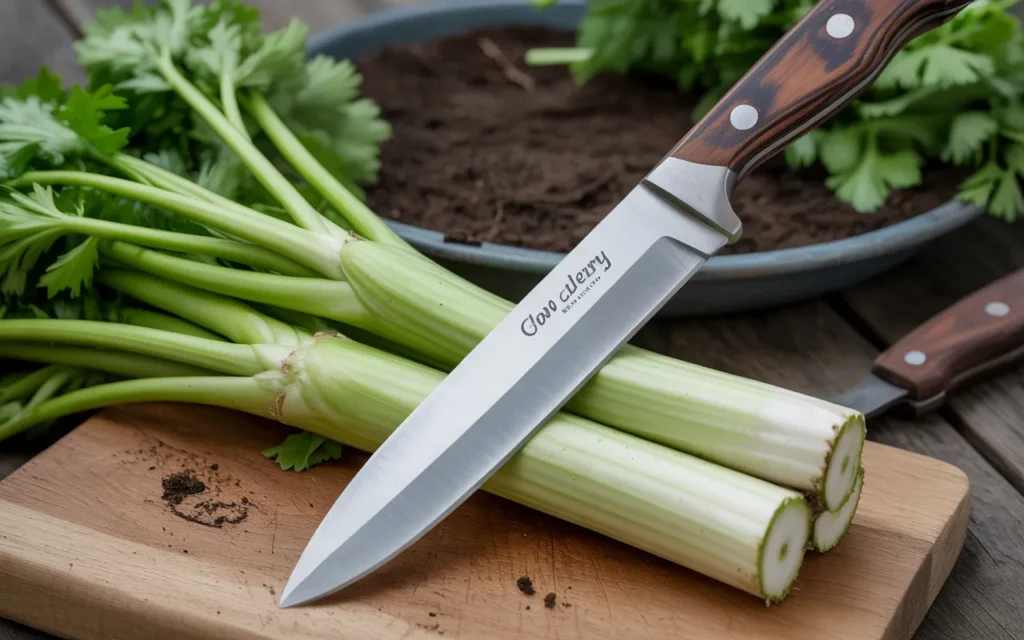
Making the Cut
This is the most important part of the preparation.
- Place your bunch of celery on a cutting board.
- Using a sharp knife, make a clean, straight cut across the bottom of the bunch. You want to cut off the base, leaving about 2 to 3 inches of stalk attached.
- The part you have left should look like a solid, flat-bottomed stump. The rest of the celery stalks are now ready to be washed and used for your snacks and recipes. You’re going to grow a whole new plant from the part you just saved.
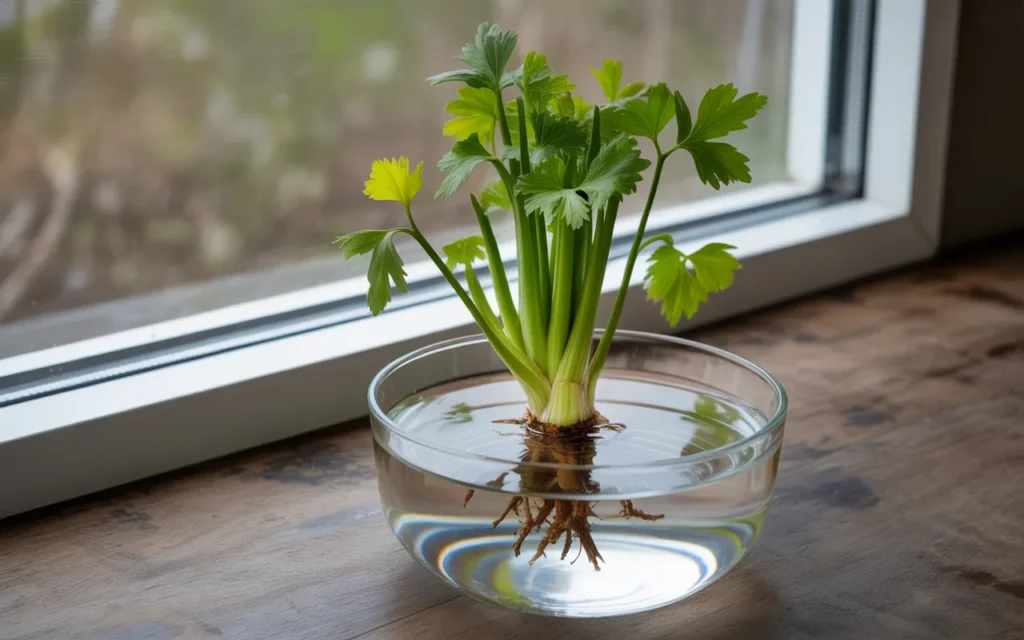
Step 2: Sprouting Your Celery Base in Water
This is the magic stage where you get to watch your celery come back to life. You’re going to use water to encourage the base to sprout new roots and leaves before you plant it in soil.
Setting Up Your Sprouting Station
- Find a small, shallow bowl, a saucer, a short glass, or a cut-off plastic bottle bottom. You just need something that can hold about an inch of water and is wide enough for the celery base.
- Place the celery base in the bowl with the cut-stalks side facing up and the flat, root end facing down.
- Add about 1 inch of warm water to the bowl. You don’t want to submerge the whole thing. The water should just cover the very bottom of the base. Submerging the top can cause it to rot.
- Place the bowl in a sunny spot, like a bright windowsill or a kitchen counter that gets good light.
What to Expect in the Coming Days
This is where the fun begins. You’ll be amazed at how quickly you see changes.
- Days 1-2: You probably won’t see much change, but the base is busy absorbing water and getting ready to grow. Change the water every day to keep it fresh and prevent bacteria from growing.
- Days 3-5: You should start to see tiny new leaves, usually yellowish-green, begin to sprout from the very center of the base. The outer stalks may start to brown and dry out a bit, which is perfectly normal.
- Days 5-10: The new leaves will grow taller and turn a darker green. At the same time, you should see tiny, delicate white roots starting to emerge from the bottom of the base. This is the sign you’ve been waiting for!
Crucial Tip: Remember to change the water every single day. Stagnant water can quickly lead to mold and rot, which will kill your project. Fresh water is key.
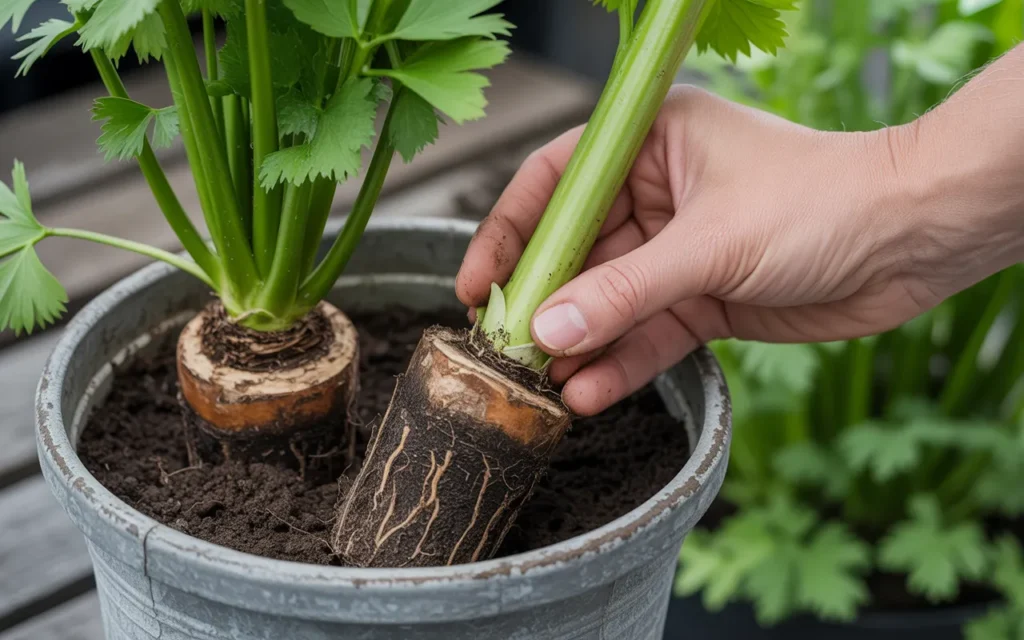
How to Plant Celery From Stalk into Soil
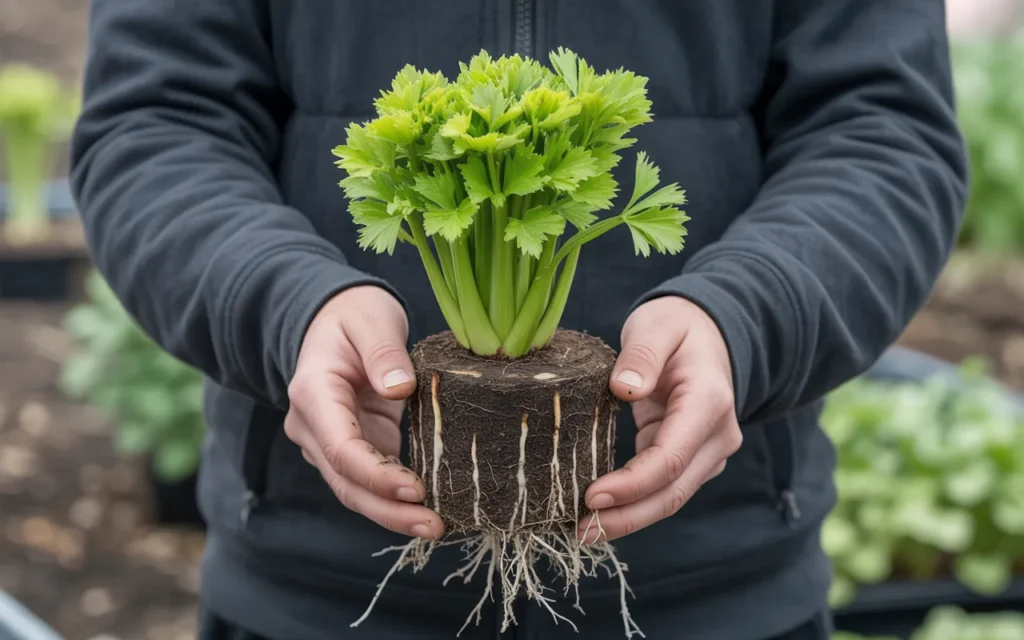
Once your celery base has sprouted a good cluster of new roots (about an inch long) and has some healthy new leaf growth in the center, it’s time to move it to its permanent home in a pot of soil. While it can survive in water for a while, it needs the nutrients from soil to truly grow and become a productive plant.
Choosing the Right Pot and Soil
- Pot Size: Choose a pot that is at least 8 inches wide and 8 inches deep. This gives the roots plenty of room to develop. A larger pot (around 3-5 gallons) is even better and will require less frequent watering.
- Drainage is a Must: Ensure the pot you choose has excellent drainage holes. Celery likes moist soil, but it will rot if its roots are stuck in a swamp.
- The Best Soil: Celery is a heavy feeder and loves rich, moist soil. Use a high-quality, all-purpose potting mix. To give your plant an extra boost, mix in a generous handful of compost or well-rotted manure. This provides the nutrients celery needs to thrive.
[Amazon Product: Premium Organic Potting Mix with Compost]
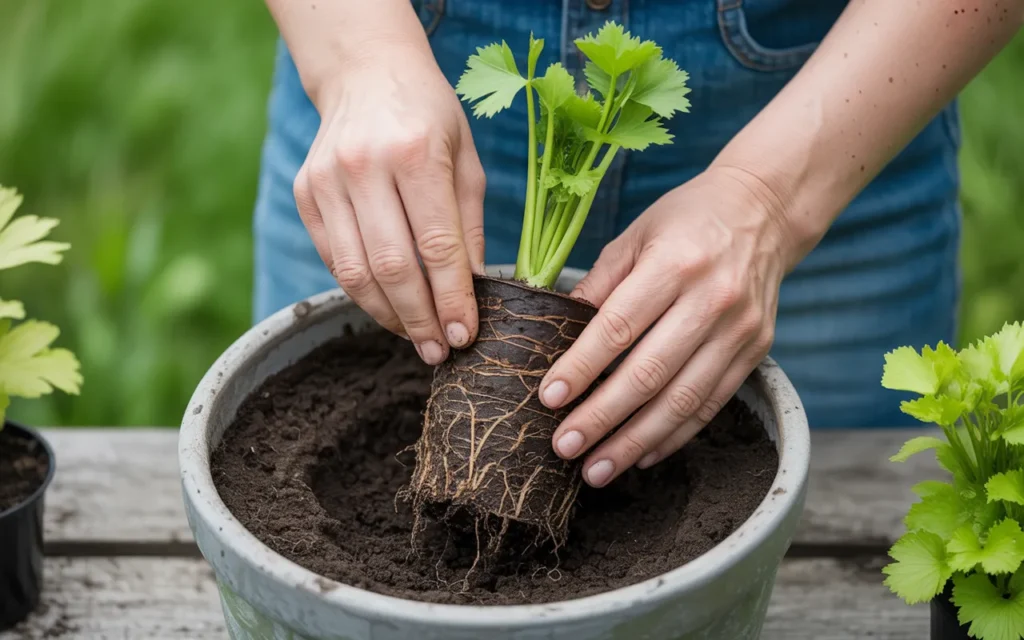
The Planting Process
- Fill your chosen pot with your prepared potting mix, leaving a few inches of space at the top.
- Dig a small hole in the center of the soil, just large enough to fit the celery base.
- Gently place your rooted celery base into the hole.
- Bury the base in the soil, covering the roots and the original stump completely. The new leaf growth emerging from the center should be sticking out just above the soil line.
- Gently pat the soil down around the new plant to secure it.
- Water the pot thoroughly until water runs out of the bottom drainage holes. This helps to settle the soil and gives the roots a good drink.
Caring for Your New Celery Plant
You’ve successfully regrown and planted your celery! Now, a little bit of ongoing care will ensure it grows into a lush, productive plant. Celery has two main demands: lots of water and plenty of nutrients.
Watering: Celery is Thirsty!
- The most important part of celery care is keeping the soil consistently moist. Celery has shallow roots and will quickly become stressed if the soil dries out.
- Check the soil every day, especially in hot weather. Stick your finger an inch into the soil. If it feels dry, it’s time to water.
- Water deeply until the pot drains from the bottom. Don’t let the pot sit in a saucer of water, but do make sure the soil never completely dries out. A stressed, thirsty celery plant will produce tough, stringy stalks.
Sunlight Needs
- Celery needs a good amount of sun to grow well. Aim for at least 6 hours of sunlight per day.
- However, if you live in a very hot climate, your celery plant may appreciate some shade during the hottest part of the afternoon. The intense afternoon sun can sometimes stress the plant. A spot with morning sun and afternoon shade is often perfect.
Feeding Your Celery
- As a heavy feeder, your celery plant will appreciate a regular supply of nutrients to keep producing new growth.
- About a month after planting, you can start feeding it every 2-3 weeks with a balanced, all-purpose liquid fertilizer. Follow the dilution instructions on the package.
[Amazon Product : All-Purpose Liquid Plant Food]
The Art of Blanching (Optional)
Have you ever wondered why celery from the store is pale green, while homegrown celery is often a darker green? Store-bought celery is “blanched,” which means it’s shielded from the sun. This reduces chlorophyll, resulting in a paler color and a milder, less bitter flavor.
- How to Do It: About two weeks before you plan to harvest a larger stalk, you can wrap the base of the plant with cardboard, newspaper, or a milk carton to block the light. This will give you stalks that are more tender and less bitter.
- For many, the more robust flavor of unblanched homegrown celery is a bonus, so this step is entirely optional.
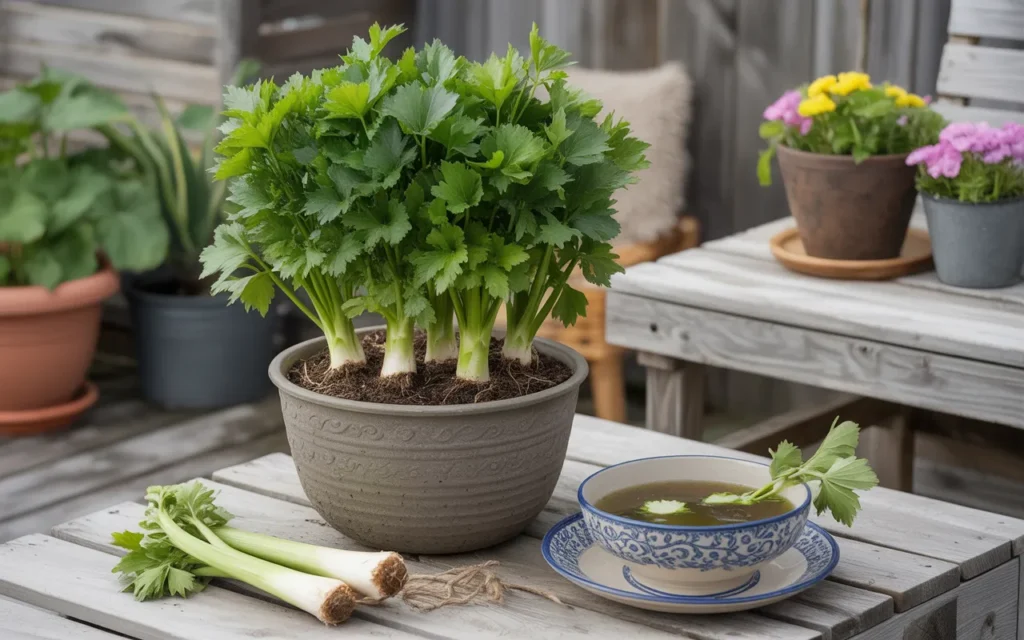
Harvesting Your Homegrown Celery
The best part of this whole process is getting to eat what you’ve grown! You won’t harvest a whole giant bunch at once like you’d buy at the store. Instead, you’ll harvest stalks as you need them.
- When to Harvest: You can start harvesting once the outer stalks are about 8 inches tall.
- How to Harvest: Don’t cut the whole plant down. Instead, use a sharp knife or pruning shears to harvest the outer stalks first. Make your cut near the base of the plant.
- Leave the Center: Always leave the inner stalks to continue growing. This “cut-and-come-again” method will allow your plant to keep producing new stalks from the center for many months.
- Harvest the Leaves: Don’t forget the leaves! Celery leaves are packed with flavor and are wonderful chopped up and used like parsley in soups, stocks, and salads.
Common Problems and Troubleshooting
- Plant is Bolting (Sending up a flower stalk): This often happens when the plant is stressed by heat or lack of water. Once it bolts, the stalks can become bitter. Try to provide more consistent water and some afternoon shade.
- Hollow Stalks: This is usually a sign of inconsistent watering or a nutrient deficiency. Ensure the plant is getting enough water and regular feedings.
- Pests: Aphids and slugs can sometimes be a problem. A strong spray of water can dislodge aphids. Slugs can be managed with various organic traps.
Conclusion
You are now an expert on how to plant celery from a stalk! This simple, sustainable project is a fantastic way to reduce kitchen waste and connect with your food.
Watching new life sprout from a discarded scrap is a small miracle you can witness right on your windowsill. By giving your new plant plenty of water, sun, and rich soil, you’ll be rewarded with a continuous supply of fresh, flavorful celery for all your culinary creations.
Frequently Asked Questions (FAQs)
1. How do you start a celery plant from a stalk?
You start by cutting the bottom 2-3 inches off a store-bought bunch of celery. Place this base in a shallow bowl with about an inch of water. Once new roots and leaves sprout after about a week, you can plant it in a pot with soil.
2. How long does it take to grow celery from a stalk?
You will see new leaf growth in as little as 3-5 days. It typically takes about 7-10 days to grow enough roots to be ready for planting in soil. You can start harvesting the outer stalks a few weeks after that.
3. Can you regrow celery in just water?
You can start the process in water, and it will survive in water for a long time, but it won’t thrive. To get a truly productive plant that produces healthy stalks, you need to transfer it to soil where it can access nutrients.
4. Will regrown celery produce a full-sized bunch?
No, a regrown celery plant will not produce a large, dense bunch like the one you originally bought. Instead, it will grow into a more open plant, and you will harvest the outer stalks individually as they mature, allowing the plant to keep producing from the center.
5. What is the best way to grow celery from scraps?
The best way is to use the water-sprouting method first to establish roots and then transfer the plant to a pot with rich, well-draining soil mixed with plenty of compost. Keep the soil consistently moist and provide at least 6 hours of sun.
6. Why is my homegrown celery so dark and strong-flavored?
Homegrown celery that isn’t blanched (shielded from the sun) produces more chlorophyll, which makes it a darker green and gives it a more robust, intense flavor than the milder, pale celery from the store. Many people prefer this stronger flavor.
7. How often should I water my regrown celery plant?
Celery is very thirsty. You should water it whenever the top inch of soil feels dry. This might be every day in hot, dry weather. Consistent moisture is the key to tender, healthy stalks.