
Picture this: stepping into your own backyard on a crisp spring morning and harvesting tender, delicious spears of asparagus for dinner. It’s a gardener’s dream, and it’s more achievable than you might think. Planting asparagus is an investment in future meals, a perennial vegetable that will reward you with harvests for up to 20 years.
This guide is your complete resource on how to plant asparagus successfully. We’ll cover everything from preparing the perfect bed to the patience required for that first amazing harvest, ensuring you have a thriving patch for years to come.
While it requires a little more upfront effort than planting annual vegetables, the long-term payoff is immense.
Forget the woody, expensive spears from the grocery store. With our tips, you’ll be growing the freshest, most flavorful asparagus you’ve ever tasted. Let’s dig in and get started on your perennial edible garden.
Understanding Asparagus: A Perennial Delight
Before we get our hands dirty, let’s understand the plant we’re working with. Asparagus (Asparagus officinalis) is a perennial, meaning it comes back year after year from its root system.
This is why the initial planting process is so important. You are creating a permanent home for your asparagus patch.
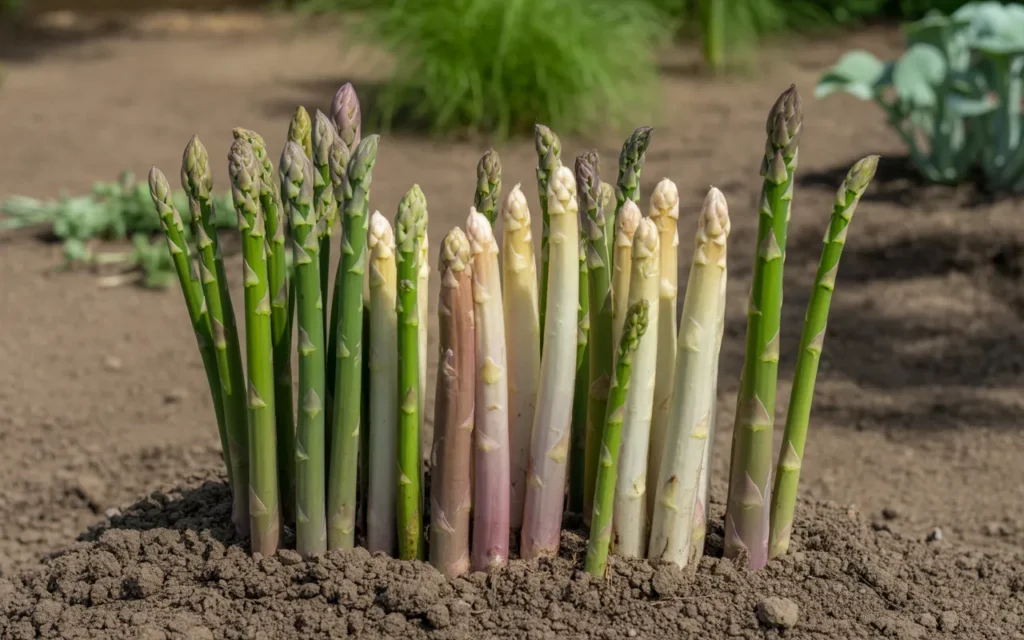
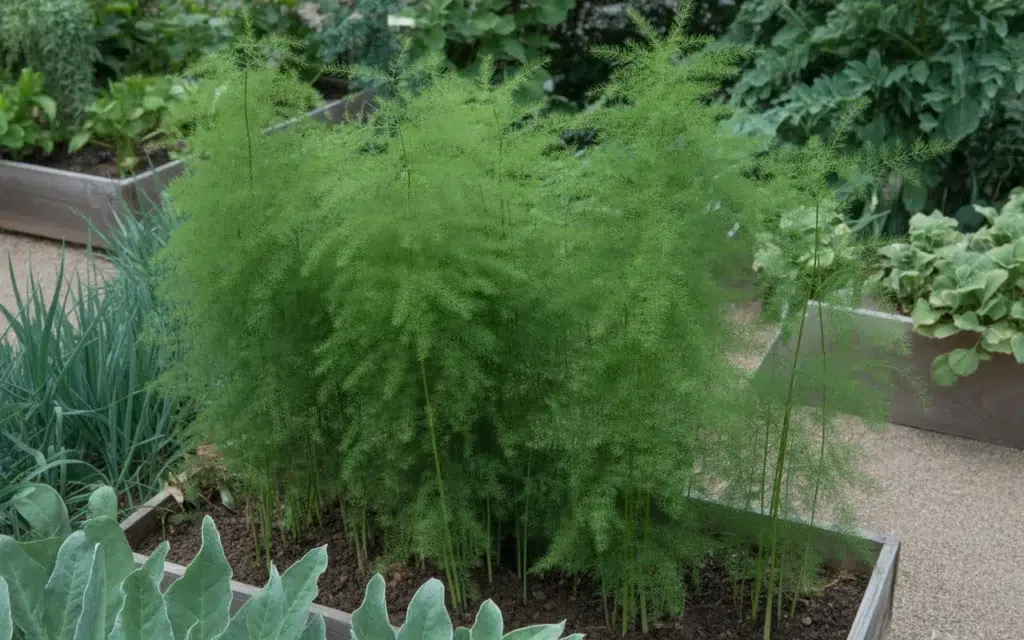
The part we eat is the young shoot, or “spear,” that emerges from the ground in the spring. If left unharvested, these spears grow into tall, feathery “ferns” that can reach 4-5 feet in height. This foliage is crucial; it spends the summer gathering sunlight and energy, which it stores in the plant’s root system (the crown) to fuel the next year’s growth.
Choosing Your Asparagus Variety
You’ll typically plant asparagus as 1- or 2-year-old dormant roots, known as “crowns.” While you can grow from seed, it adds an extra year to the waiting time, so crowns are the preferred method for home gardeners. Look for all-male hybrid varieties.
Why? Male plants don’t produce seeds, so they put all their energy into producing more and larger spears. Female plants produce smaller spears and spend energy on red berries (seeds), which can also become weedy.
- Jersey Knight: An all-male hybrid known for high yields and good disease resistance, especially to rust and fusarium wilt. It’s a very popular and reliable choice.
- Jersey Giant: Another vigorous, all-male hybrid that produces large, tender spears. It’s widely adapted to various climates.
- Purple Passion: A unique variety that produces beautiful, deep-purple spears. They are often sweeter and more tender than green varieties, perfect for eating raw in salads. The color fades to green when cooked.
- Mary Washington: An older, open-pollinated heirloom variety. It produces both male and female plants but is still a reliable and flavorful choice if you prefer heirlooms.
For beginners, a disease-resistant, all-male hybrid like Jersey Knight is a fantastic starting point. You can find high-quality, ready-to-plant crowns like these Jersey Knight Asparagus Crowns.
The Most Critical Step: Asparagus Bed Preparation
If you take one thing away from this guide, let it be this: proper bed preparation is the secret to a successful asparagus patch.
Since this is a permanent planting, you want to create the absolute best environment for the roots to thrive for the next two decades.
1. Select the Perfect Location
- Full Sun: Asparagus needs at least 8 hours of direct sunlight per day. The more sun it gets, the more energy the ferns can store for next year’s crop.
- Excellent Drainage: Asparagus crowns will rot in soggy, waterlogged soil. If you have heavy clay soil, consider building a raised bed to improve drainage.
- Weed-Free Zone: Asparagus does not compete well with weeds, especially aggressive perennial weeds. Choose a spot that is free of persistent weeds like quackgrass or bindweed. You must be diligent about removing any weeds that pop up.
2. Prepare the Soil (The Trench Method)
The traditional and most effective way to plant asparagus is the trench method. This technique ensures the crowns are planted deeply, protecting them and encouraging a robust root system. Plan to do this in the early spring, as soon as the soil can be worked.
Step-by-Step Trench Preparation:
- Mark Your Area: Plan for a bed that is about 4 feet wide. This allows you to plant one or two rows while still being able to reach the center for weeding and harvesting.
- Dig the Trench: For each row of asparagus, dig a trench that is 12-18 inches wide and 8-12 inches deep. Pile the excavated soil alongside the trench; you’ll use it later. If planting multiple rows, space the trenches 3-4 feet apart.
- Amend the Soil: This is where the magic happens. Asparagus is a heavy feeder and loves rich, organic soil. In the bottom of the trench, mix in a generous amount of organic matter. A good formula is:
- A 2-4 inch layer of well-rotted compost or aged manure.
- A balanced, slow-release fertilizer. A granular fertilizer formulated for vegetables works perfectly. Look for something like All-Purpose Garden Fertilizer.
- If your soil is acidic, asparagus prefers a neutral pH (6.5-7.0). You can add garden lime to raise the pH. Use a simple soil test kit to check.
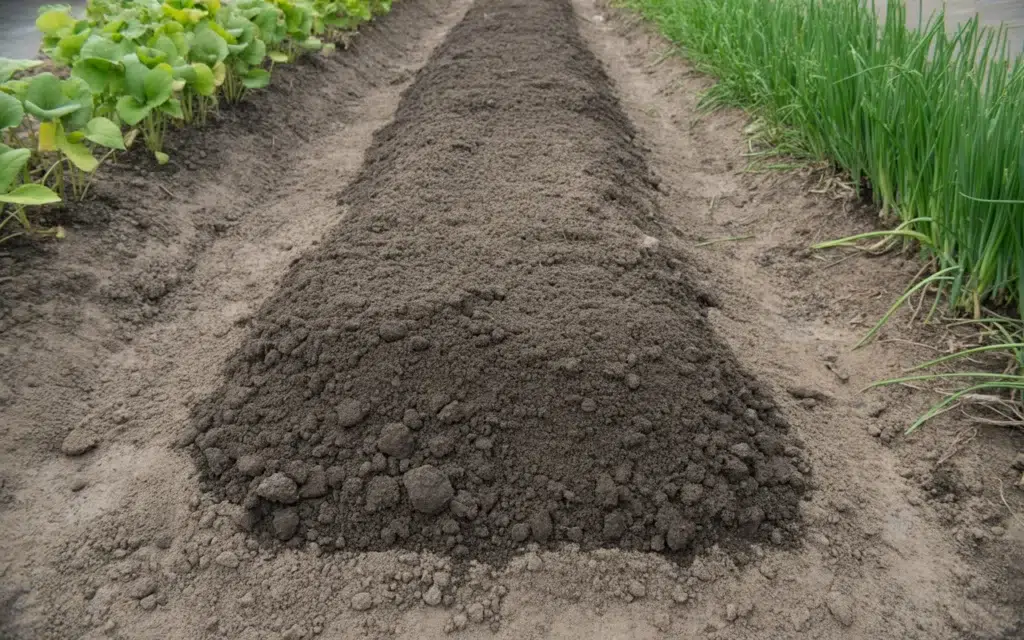
- Create a Mound: Mix the amendments thoroughly into the soil at the bottom of the trench. Then, create a small ridge or mound of this enriched soil running down the center of the trench. This mound should be about 4 inches high.
Your asparagus bed is now ready for planting! This upfront work will pay off massively in the health and productivity of your patch.
How to Plant Asparagus Crowns
With your trench prepared, it’s time for the main event. Planting the crowns correctly sets them up for a long and productive life.

Step-by-Step Planting Guide
- Soak the Crowns (Optional but Recommended): About 30 minutes before planting, soak the dormant crowns in a bucket of lukewarm water. This helps to rehydrate them and wake them up from dormancy.
- Place the Crowns: Take each crown and place it on top of the mound you created in the trench. Drape the long, dangling roots down over the sides of the mound, spreading them out like an octopus.
- Space Them Out: Space the crowns 12-18 inches apart within the row. Giving them enough space is crucial for air circulation and reduces competition, leading to larger spears. Overcrowding will result in a thicket of thin, spindly spears.
- Initial Burial: Cover the crowns and their roots with about 2-3 inches of the reserved topsoil. You are not filling the trench completely at this stage. Gently pat the soil down.
- Water Well: Give the newly covered crowns a good, deep watering. This helps settle the soil around the roots and eliminates air pockets.
- The Gradual Backfill: As the young asparagus shoots begin to grow and poke through the soil layer, you will gradually fill in the rest of the trench.
- When the shoots are 2-3 inches tall, add another 2 inches of soil, being careful not to cover the tips completely.
- Continue this process every few weeks throughout the first growing season.
- By the end of the fall, the trench should be completely filled in, and your soil level will be even with the surrounding garden. This gradual burial encourages more buds to form on the crown, leading to more spears in the future.
Asparagus Care: The First Three Years
Patience is the most important tool in an asparagus grower’s shed. You cannot harvest your crop in the first year, and only sparingly in the second. This waiting period allows the plant to establish a deep, powerful root system that will fuel harvests for decades.
Care and Maintenance Chart (Years 1-3)
| Year | What to Expect | Harvesting Rules | Key Tasks |
|---|---|---|---|
| Year 1 | Small, thin shoots will emerge and grow into feathery ferns. | DO NOT HARVEST! | Keep the bed well-watered (about 1 inch per week). Diligently remove all weeds. Gradually backfill the trench. |
| Year 2 | More numerous and thicker spears will emerge. The ferns will be taller and fuller. | Harvest very lightly. You can pick 1-2 spears per plant for a period of about one week, then stop. | Keep weed-free. Water during dry spells. Allow ferns to grow all summer. Cut ferns back to the ground after they turn yellow in the fall. |
| Year 3 | The plant is now well-established. You’ll see a significant number of thick, harvestable spears. | You can now harvest for 2-4 weeks. Stop harvesting when the spear diameter shrinks to the size of a pencil. | Fertilize in early spring. Keep weed-free. Allow remaining spears to grow into ferns. Cut back dead ferns in the fall. |
Essential Asparagus Care Tips for All Years
- Watering: Asparagus has deep roots, but it still needs consistent moisture, especially during its first couple of years and during dry spells. Aim for about 1 inch of water per week. A Soaker Hose is an efficient way to deliver water directly to the root zone without wetting the foliage.
- Weeding: This is non-negotiable. Weeds steal water, nutrients, and sunlight from your asparagus. Hand-pull weeds carefully to avoid damaging the shallow feeder roots of the asparagus. A 2-3 inch layer of straw or shredded leaf mulch can significantly suppress weeds and help retain soil moisture. For stubborn weeds, a specialized tool like a Hori Hori Garden Knife can be invaluable.
- Fertilizing: Asparagus is a heavy feeder. Apply a balanced fertilizer, such as the one used during bed preparation, each spring just as the first spears begin to emerge. You can also top-dress the bed with a fresh 1-2 inch layer of compost each year.
- Fall/Winter Care: After the first hard frost in the fall, the asparagus ferns will turn yellow or brown. This is a sign that they have finished storing energy for the winter. Cut the dead ferns down to about 2 inches above the ground. Remove the foliage from the garden to prevent pests and diseases from overwintering.
Harvesting Your Homegrown Asparagus
After your patient waiting, the reward finally comes. From the third year onward, you can expect a harvest period of 6-8 weeks each spring.
- When to Harvest: Start looking for spears when the soil temperature reaches about 50°F (10°C). Harvest spears when they are 6-10 inches tall and the tips are still tight and compact. If you wait too long, the tips will start to open up and the base will become tough and woody.
- How to Harvest: There are two methods. You can either snap the spear off at ground level with your hands—it will break at its natural tender point—or use a clean, sharp knife to cut the spear just below the soil surface. Be careful not to injure the crown or any emerging spears nearby.
- How Often to Harvest: During the peak of the season, you may need to harvest every day or every other day to keep up with production.
- When to Stop: The plant will tell you when it’s time to stop. When the new spears that emerge are thin (about the diameter of a pencil), it’s a sign that the crown’s energy reserves are running low. Stop harvesting immediately and allow all subsequent spears to grow into ferns. This ensures the plant has enough energy for a great crop next year.
Troubleshooting Common Asparagus Problems
- Asparagus Beetle: These small, black-and-white or orange-and-black beetles (and their slug-like larvae) chew on spears and ferns. Hand-pick them off if the infestation is small. For larger problems, Neem Oil Pest Control Spray is an effective organic option. Harvesting promptly can also reduce damage.
- Fusarium Wilt/Crown Rot: This soil-borne fungus causes ferns to yellow and wilt, and crowns to rot. There is no cure. Prevention is the only solution: buy disease-resistant varieties, ensure excellent drainage, and avoid planting asparagus where it has grown before.
- Asparagus Rust: This disease appears as reddish-brown, dusty spots on the ferns. It’s more common in humid areas. Choose rust-resistant varieties, ensure good air circulation by spacing plants properly, and cut down dead foliage in the fall.
Frequently Asked Questions (FAQ)
Q1: How many asparagus crowns should I plant?
A good rule of thumb is to plant about 10 crowns per person in your household. A well-established patch of 10-15 plants can produce a significant amount of asparagus for a family during the spring harvest season.
Q2: Can I grow asparagus in a container or raised bed?
Growing in a raised bed is an excellent idea, especially if you have poor soil. Ensure the bed is at least 12-18 inches deep to give the roots plenty of room. Container growing is more challenging due to the plant’s extensive root system and perennial nature. A very large container (20+ gallons) might support one plant for a few years, but it’s not the ideal method.
Q3: Why are my asparagus spears so thin?
Thin spears can be caused by several factors: the plants are too young (years 1-2), the patch is overcrowded, there is too much weed competition, the soil lacks nutrients, or the patch was over-harvested the previous year. Address these potential issues to encourage thicker spear production.
Q4: Do I need to support the asparagus ferns?
In windy locations, the tall ferns can be prone to flopping over. You can provide some simple support by placing stakes at the corners of your bed and running twine around the perimeter to corral the ferns and keep them upright.
Q5: When is the best time to plant asparagus crowns?
The best time to plant dormant asparagus crowns is in the early spring, as soon as the ground is no longer frozen and can be worked easily. This gives the plant a full growing season to get established before its first winter.
Planting an asparagus patch is a true act of faith for a gardener, but it’s one that delivers rewards far beyond the initial effort. By following this guide, you are setting the stage for decades of delicious, healthy, and incredibly fresh harvests right from your own garden. Happy planting